Dugout, how to build. Dugout construction technology
How to build a dugout and where to start the construction itself? Having marked the area, decided on the dimensions, and collected all the necessary materials for the construction of the dugout, we move on to the main part:
- We compact the walls of the pit (from inside the dug hole). We tap and compact the walls and floor. This is necessary to provide thermal insulation and avoid soil shedding.
- We install supports around the perimeter (as reinforcement).
- Having determined which wall will have the entrance, we install two support pillars with a diameter of 15-20 cm there.
- We lay the rafters on the prepared supports (for the roof). Round logs with a diameter of about 10 cm are suitable for rafters. The rafters are attached to supports, dug into the ground, their ends should go under the slope of the roof, at an angle. Roofing felt can be laid along the walls as thermal and waterproofing. At the same stage, consider and provide for the presence of windows in the home.
- At the stage of laying the rafters, a stove should be installed. The most acceptable and budget option in this situation is a potbelly stove. Its pipe should be brought out at this stage.
- We cover the rafters with frequent lathing. To install it, you can use both nails and natural materials - branches, rhizomes.
- We cover the walls with lathing according to the same principle as the roof. We arrange the entrance to the home from the side of the supports, hanging prepared doors on them.
- The entire sheathing, the ends of the rafters and supports must be thoroughly coated with clay. The final thickness of the clay installation should be at least (or preferably more) 15 cm. Each new layer of clay should be smeared only when the previous one has dried.
- The last stage is the roof. We lay roofing material in several layers, covering it with dry branches, leaves, and grass. We insulate cracks and holes with moss or any other insulating agent.
Dugout construction technology
How to build a dugout and where to start the construction itself? Having marked the area, decided on the dimensions, and collected all the necessary materials for the construction of the dugout, we move on to the main part:
Step 1
We compact the walls of the pit (from inside the dug hole). We tap and compact the walls and floor. This is necessary to provide thermal insulation and avoid soil shedding.
Step 2
We install supports around the perimeter (as reinforcement).
Step 3
Having determined which wall the entrance will be on, we install two support pillars there, with a diameter of 15-20 cm.
Step 4
We lay the rafters on the prepared supports (for the roof). For rafters, round logs with a cross-section about 10 cm in diameter are suitable. The rafters are attached to supports, dug into the ground, their ends should go under the slope of the roof, at an angle. Roofing felt can be laid on the walls as heat and waterproofing. At the same stage, consider and provide for the presence of windows in the home.
Step 5
At the stage of laying the rafters, a stove should be installed. The most acceptable and budget option in this situation is a potbelly stove. Its pipe should be brought out at this stage.
Step 6
We cover the rafters with frequent lathing. To install it, you can use both nails and natural materials - branches, rhizomes.
Step 7
We cover the walls with lathing according to the same principle as the roof. We arrange the entrance to the home from the side of the supports, placing prepared doors on them.
Step 8
The entire sheathing, the ends of the rafters and supports must be thoroughly coated with crumpled clay. The final thickness of the clay installation should be at least (or preferably more) 15 cm. Each new layer of clay should be smeared only when the previous one has dried.
Step 9
The last step is to lay the roof. We lay roofing material in several layers, covering it with dry branches, leaves, and grass. We insulate cracks and holes with moss or any other insulating agent.
An important point is safety precautions during construction. Its main components should be reliable fixation of all fasteners, a flat surface of the construction site, adherence to all rules for the use of electrical appliances and protective equipment, and high-quality tools. Do not forget about the mandatory presence of a first aid kit. Burns, scratches, cuts are an integral attribute of any construction site. Therefore, your work first aid kit must certainly include bandages, ointment for burns, bruises, disinfectants, and adhesive tape.
Construction will most likely take a lot of time; during this time it is best to arrange an overnight stay at this place. This will allow you not to delay the process and complete construction in the shortest possible time.
For a comfortable stay, you should pay a lot of attention to the internal arrangement of the dugout. The home should be clean, comfortable, easy to use and equipped with everything necessary for living.
The first attribute is the oven. Its main purpose is to heat the room, but the presence of a stove will also add homely warmth to the home. Before building a dugout with a stove, consider what type of stove will be acceptable and convenient for you. A potbelly stove would be an excellent option. In this case, you are only responsible for choosing a good place to place it. Other ovens require heat-resistant bricks or stones. The area around the stove itself should be separated with a sheet of iron or brickwork.
Also think about how to make the dugout comfortable and practical. Sun lounger (bed) - it is better to place it away from the exit and the stove. Usually the lowest area in the dugout is chosen. For a comfortable stay, do not forget about such types of furniture as chairs, a table, and a storage rack. Housing lighting also needs to be considered. There are several options for this: a classic candle is the most budget option, but it is enough to illuminate a small space and supplies of candles should be made in advance.
Solar lamp - replaces 2-3 candles, the lamp is charged to maximum within one day (provided it is sunny) and this charge lasts for 10-12 hours. Rechargeable lamp - charges from the mains within 14 hours, its charge lasts for 6 hours. As we can see, these options are practical, but not always reliable. In the summer, any of the lighting sources will be enough, but in the winter there will be little such lighting. Consider all options for lighting devices and stock up on various lighting sources, so you won’t be left without light.
How to build a dugout in the forest with a stove with your own hands. Advantages and disadvantages of a dugout
If you are unsure whether to build a dugout in the forest, consider the advantages of this structure:
- The design does not require a foundation, which significantly speeds up the construction process.
- Heats up quickly and retains heat for a long time. If you equip the shelter with a stove or potbelly stove, it will be comfortable at any time of the year.
- The dugout is very inconspicuous to the eyes of people and animals. This is convenient to use while hiking or hunting.
- No specific skills are required for construction. Almost any person can handle the work of constructing a dugout.
- A shelter in the ground is built very quickly. It will take no more than a month to make a good-quality home.
But, despite all the positive qualities of the dugout, such a structure also has its drawbacks:
- In winter and autumn it is difficult to avoid dampness indoors. To do this, the dugout needs to be heated at least once every 2 days, otherwise condensation will form on the walls.
- For a person who is not accustomed to long-term digging of a large volume of earth, digging a dugout will seem like a difficult task. For most, digging a hole of the required volume will take from 1 to 3 days.
- It is always dark in the dugout due to the lack of windows. But if you are using the shelter only for overnight stays, this will not be much of an inconvenience.
- During rainfalls and melting waters, precipitation can accumulate near the steps and get inside.
Among low-budget buildings, the dugout occupies a leading position in terms of comfort and safety.
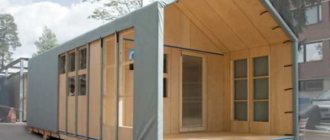
DIY dugout model. Master class of the layout “At a rest in moments of calm” about the Second World War
We often talk about how to build an eco-house with your own hands. We talk about different construction technologies, but we have undeservedly forgotten about one of them - the construction of dugouts! But the modern dugout has long turned into not just a house in the ground, but a cozy and comfortable home, the principles of construction of which, however, remain the same. Let's tell you a little more about how you can build a dugout and why it is profitable and simple.
In fact, building a dugout is quite profitable - a well-designed and built house has a number of serious advantages, which without a doubt include the following.
Firstly , any dugout is very energy efficient - due to the poor thermal conductivity of the earth, heat is retained inside the house for a long time, and the dugout itself is easily provided with a stable temperature, which makes such an underground house undoubtedly comfortable in harsh climates. By the way, not everyone knows that temperature fluctuations on the surface of the earth reach depth with a serious delay. For example, if you take measurements at a depth of three meters, it will turn out that the temperature of the warmest moment of the year arrives here with a delay of not much, not less, but about three months! In addition, the soil does not freeze so deeply - in winter (in our climate) the temperature at a depth of 2 meters is 6-8 degrees C, and in summer 15-18 degrees.
How to build a dugout with a stove. Dugout with a stove
To properly build a dugout with a stove, you need to choose the optimal location. Cold enters the shelter mainly through doors or windows. The stove is located near the entrance so that the heat inside is well retained. You can install a portable iron or cast iron stove, build it in the ground, brick or stone. The good thing about a portable one is that you can use it not only to heat, but also to cook food.
A stove can be made using available materials: a milk can, an iron barrel, metal boxes, roofing iron. Ground ones are carried out in the simplest, small dugouts. The walls of ground ovens are finished with clay 15-20 cm thick or with stone or brick. A wattle vault is laid on top. The arch is treated on all sides with a mixture of clay and earth, diluted with water. Perform 2-3 layers.
Options for stoves – earthen stove, fireplace stove, metal. An earthen stove consists of a firebox, a pipe, and a chimney. Metal stoves have poor heat transfer and require constant heating. They try to remove the chimney not through the covering, but through the side walls. It is imperative to insulate the chimney parts from the wooden parts to prevent fire. If the chimney is iron, be sure to make a ventilation duct.
To ensure that the dugout does not cool down quickly, it is necessary to seal all the cracks well, be sure to debon it, and arrange adjustable ventilation. If you follow all these rules, you will always be warm and dry inside. A dugout with a stove can be made in any of the options suitable for you.
How to build a dugout in the taiga. Construction of a dugout. How to build a dugout?
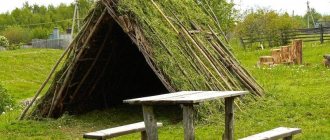
Dugout is a type of building that is partially underground and disguised to match the general color scheme of a forest or field. Such houses are no longer built, but the article is not about luxury, but about necessity. A dugout is built only if you are very far from people and you do not have the opportunity to quickly return. The chance of this happening is very small, but it's good to know just in case. Construction can take place in two versions - when there are tools and when they are not. As they say, it’s better to hope for the best, so let’s look at construction using the example of a team of green tourism lovers from St. Petersburg.
Construction should begin from the pit. As the name of the structure itself suggests, it is underground, but not completely. The hole should be about one and a half meters deep (but this depends on your height). Determine the dimensions of the dugout for reasons of comfort and practicality. Approximate dimensions 4x3 meters. But first we recommend making it a little larger, because the walls of the house will consist of logs. Unlike a log house, you can use thinner logs, because the house is in the ground, thanks to which it will be quite warm even in winter. Decide in advance where the oven will be located. It will help you at any time of the year, because it will not only heat the house, but will also help you prepare food. There are two types of flooring: earthen and wooden. The first type - the earth is simply trampled down, and the second - the best option would be to saw the logs in half, lay them down and put boards on top. This will be one of the most convenient flooring options, if you can afford boards, of course. In the next article we will talk about the continuation of the construction of the dugout.
Continuing the discussion about this type of structure, it is worth noting that it is better to place the stove in one of the corners. In the same place it is worth leaving a place that is not covered by logs. A chimney must be installed in the same place. It can be made from an iron pipe or laid out from brick. In addition, there are a huge number of other materials and ways to remove smoke from the stove. Making a roof in such a house is quite simple. The only difficulty is that it must have an obtuse angle - approximately 150 degrees. Arrange the beams in a grid so that the roof can be conveniently placed on them. Boards or iron sheets can be used as roofing material. You can also use sheaves of hay or reeds, as in cases of building a house with a thatched roof. Any type of roof must be laid very tightly. The basic principle of building a dugout is to subsequently lay a layer of clay and earth on the roof. Clay can be replaced with ordinary soil. You can also lay a layer of turf on top to organize even faster camouflage of your home. Since the entrance to the house is partly underground, steps should lead to it. To prevent them from being washed away by the first rain, it is better to make them from boards or cover them with pebbles. Windows are sometimes made in dugouts, but for this, you need to have glass. Typically, a window is made either at the door or in the back wall of the house. Most often, the back wall is not covered with earth, since the house is gable. Sometimes the dugout is completely closed in order to completely camouflage the house against the background of the entire area, leaving only the door.
Such a house is very warm in winter and cool in summer, and all thanks to the fact that it is partly underground. In addition, it is very convenient and invisible against the backdrop of a forest or field. If you decide to simply test your strength and build such a house, then he advises you not to cut down living trees, otherwise the criminal code may hit you with a baton on the ridge.
How to build a dugout in 1 day
How to build a dugout in 1 day
A dugout is a ground-based household structure. The main purpose of the dugout is to serve as ordinary residential and office premises in the absence of the latter for rest and accommodation of personnel, placement of various warehouses, workshops, communication points and other things. By the standards of military field conditions, the dugout creates very comfortable living conditions, providing personnel with an area and volume almost identical to the conditions of the barracks and accommodating the entire unit in its entirety. Dugouts, depending on their purpose, can have different sizes, but the principle of construction and the materials used are the same in all cases. Let's consider a standard dugout with a capacity for a motorized rifle squad. A depression measuring 5.5 x 3.7 meters and 50 cm deep is opened in the ground. Then along the longitudinal axis the pit is deepened to 1 meter, and the width is 1 meter. This ditch extends 2-3 meters beyond the pit. This will be the floor of the dugout. At the end of the ditch there are steps - the entrance to the dugout. The strip on the right, 5.5 meters long and 1.8 meters wide, will be a bed for 11 people. The narrower strip on the left is 2.5 meters long and 0.9m wide. will be a table (see Fig. 1). The second stage of work is the installation of support pillars and laying of rafters (see Fig. 2). The rafters can simply dig into the ground or rest on the beds (logs or knurling laid on the ground). The posts and rafters are made from knurling (round timber with a diameter of 5 to 11 cm). Metal pipes, I-beams, channels, angles, and reinforced concrete products of the desired profile can be used as pillars and rafters. The main thing is that the strength of the material used is sufficient to withstand what will be placed on them. After this, poles (diameter 3-5 cm) are laid on the rafters, which will form the ceiling of the dugout. The poles need to be laid as closely as possible to each other and secured to the rafters - nailed or tied with wire. You can also make shields from them, and then lay the shields on the rafters. If there is no scaffolding, then the ceiling part is made from bundles of twigs, bundles of reeds, reeds, inserting one pole into each bundle. The end sides are sewn up with poles installed vertically or with boards and knurling. A window is made at one end, a doorway is arranged on the opposite side and a door is hung. The roof is covered with crumpled clay with a thickness of at least 15-25 cm. A layer of turf is laid on top of the clay layer. In cold weather, a heating stove is installed inside the dugout. This is the primary mandatory work on the construction of a dugout. Labor costs - approximately 100 man hours. Material consumption - knurling 12 pcs. 2.5 m long, 6 m long poles - 70 pieces, 5.5 m long. - 120 pieces, 2 m long. 12 pieces, coniferous spruce branches 5 cubic meters, wire 8 kg, roofing iron - 2 sheets, field stove - 1 piece. door - 1, window -1. A trained motorized rifle squad builds a dugout in 1 (one) day (!!). In this way, it is possible to provide conditions that are quite comfortable for field life. You can walk upright in the dugout. Each fighter has 50-60cm on the bench. in width and 1.80 m in length. Duffel bags are placed at the head. Comfort can be increased by making a floor out of boards, laying boards on a bed, or covering the walls with poles. In winter, it is advisable to coat the end walls with clay and cover them with turf, build a vestibule and hang a second door in the vestibule.
Unlike a tent, which is warm only while the stove is burning, a dugout retains heat in the same way as a regular wooden house. In dugouts planned for long-term living, the ceiling is usually whitewashed, electricity is installed, a clay blind area and drainage ditches are made around the dugout so that surface rainwater does not flow inside. There is no need to talk about the penetration of groundwater into the dugout, which is the scourge of underground fortifications, because the maximum depth is no more than 1 meter.
Chicken coop dugout. What to build from
- 1 What to build from
- 2 Foundation for a chicken coop
- 3 Insulation
- 4 Heating 4.1 Electricity
- 4.2 Boiler and stove
- 4.3 Heating the chicken coop by decomposing sawdust
You can build a chicken coop inexpensively from cinder block or foam concrete. If there is a place nearby where there is clay, you can remove the walls using adobe technology (mud or dried bricks).
If you need a budget warm chicken coop, you can make it like a dugout. The walls can be raised half a meter above the level; in the south, well-insulated windows with double or triple glass can be made. It is good to insulate the piece that protrudes above the ground and the roof. For warmth, all walls except the southern one can be covered with earth. If there is still snow on top, it will be quite warm.
Those who are seriously planning to raise poultry should think about building a chicken coop made of foam concrete: it is light and warm
Another perhaps most popular and economical option is a do-it-yourself frame chicken coop. Since the rooms are usually small, the timber for the frame needs a small cross-section and little of it is required. The frame can be sheathed with boards, plywood, OSB and other similar materials. Place insulation between the posts and sew up the other side. To prevent mice from settling in the insulation, people came up with the idea of covering the insulation on both sides with a metal mesh with a fine mesh. This makes construction somewhat more expensive, but fighting mice is more expensive. It turns out to be a warm chicken coop and the thickness of the insulation depends on the region. You can focus on recommendations for the construction of frame houses.
A chicken coop made of logs or thick timber can do without insulation in the middle zone. Only the caulking seams need to be sewn up with slats. Not so much from drafts, but from chickens: so as not to pull the tow or moss.
How to build a dugout in the forest with your own hands. Tools for building a dugout
Tools for construction. Under normal conditions, you will need tools such as:
- roofing felt;
- poles (120 pieces, 5.5 m each);
- wire (about 8 kg);
- iron (about 2 tin sheets);
- timber (about 5 cubes);
- window;
- bake;
- drive.
Step-by-step instruction:
- You need to prepare a drawing of the dugout and think about where the door, windows will be located, and what the layout will be. It is necessary to clear the construction site of branches, leaves and other debris. Next you need to dig a hole of 6-7 meters, the width should be about 50 cm.
- Then along one of the walls you need to dig another recess about 50 cm long. It is needed for the future floor. It is necessary to make a shallow depression of about a meter from the entrance and equip it with steps. The steps should be about 4-5, about 30 cm wide. To avoid falling from them in the dark, you can create a railing from leftover materials. The steps should also be insulated and made durable.
- Next you will need bars and poles. The bars must be placed around the perimeter of the dugout to create support for the future roof. The bars need to be dug into the ground and it is advisable to treat the area where the bar and the ground come into contact with antiseptic or anti-corrosion substances. When the roof support is ready, you need to lay the poles on it as close to each other as possible. To fasten the roof and beams you need to use wire and nails.
- Next, you need to insulate the roof and make sure that it does not leak. For this you can use moss, spruce branches, branches and foliage, grass. The walls and roof need to be treated with roofing felt. All these manipulations will retain heat, and also prevent leaks, flooding of the dugout and sprinkling of soil.
- It is better to install doors and windows at the stage of installing the frame and bars. If it is not possible to use good doors and windows, you can make any shutter, the main thing is to ensure a tight fit. The insulation of the roof and walls does not end there. The roof and walls on both sides need to be covered with several layers of clay, allowing each layer to dry.
- It is necessary to take care of drainage. A drainage channel needs to be built along the perimeter of the dugout. You can use clay for this. If possible, insulation of the roof and walls can be done using polystyrene foam. For the floor you can use wooden boards, chipboard sheets, plywood. All this needs to be placed tightly on the floor and also treated with roofing felt.
- The main manipulations end here and then you need to take care of heating the dugout. An oven will be used for this. So, how to build a dugout with a stove with your own hands. Due to the fact that the dugout retains heat well, when the stove goes out, the heat will remain for a long time. Provided the roof and walls are well insulated and sealed.
How to build a dugout in the forest with your own hands
It is clear that in conditions of survival in the forest it is not possible to have all the tools and materials necessary for building a long-term earthen shelter. Under such circumstances, it is necessary to somehow get out of the situation by replacing the materials listed below with any analogues that are available. So, to build a dugout you will need:
The roof is covered with moss, branches, leaves
- Ruberoid for covering roofs and floors. Instead, you can use branches, leaves, grass, bark, spruce branches. If spruce branches are used, about 5 m3 will be needed.
- Poles (approximately 70 pieces of 6 meters and 120 pieces of 5.5 meters).
- Wire (8-10 kg). If this material is not available, you can use bast and thin willow branches.
- Iron for covering the roof. For an ordinary dugout, two sheets will be enough.
- Timber, boards, chipboard, insulation, and other building materials that may be useful for building a warm home. Instead of ready-made insulation, you can use dry moss.
- Windows and doors can be made from lumber, or installed ready-made, if such a possibility exists.
- A stove if you plan to build heated housing.
- Nails, self-tapping screws of various diameters and lengths.
Tools you will need: axe, hammer, knife, saw, construction tape, level, shovel.
Preparation
To build a dugout in the forest, you need to draw up a detailed drawing of it. If conditions do not allow, and time for construction is very limited, you can do without it.
It is necessary to consider the outer and inner diameter of the room, as well as its height, then begin preparing the site for construction. The place is cleared of branches and grass, then a depression of approximately 6 by 7 meters, 50 cm deep, is dug.
Pit for a dugout
After this, a recess of another 50 cm is dug along one of the walls; this will be the floor of the future home. A meter deep depression leads to the exit from the building, which is equipped with steps. An elevated strip 50 cm above the ground forms a place for a couch inside the building.
Construction of walls and ceilings
The next stage is the construction of rafters from wooden beams. The first way to install them is to rest the pillars directly on the ground, and the second is to cut them into a beam or metal pipe laid around the perimeter of the home. If there are anti-corrosion, antiseptic substances, they should be used to treat the places where the timber comes into contact with the ground. After installing the support pillars, the roof deck is formed. Poles are laid on the rafter system with maximum density to each other. The poles are attached to the vertical rafters with nails or wire.
We build walls and ceilings
If it was not possible to obtain even poles, you can use branches, reeds, and reeds tied into bundles. The walls are covered with roofing felt on top, and the gaps between the poles can be filled with soil, clay, moss or any available insulation. Roofing material will not allow the soil between the poles to crumble or be washed out by rain. The end of the roof is covered with the same materials, and a window and a door are installed on the sides. It is best to install the doorway and window at the stage of installing the rafter system, this will remove part of the load from it. If it is not possible to install a good-quality door, you can cover the entrance with any vestibule, the main thing is that it tightly closes the opening and does not allow rainwater to penetrate inside.
After laying the poles on the roof, it is necessary to insulate it and at the same time form a protective layer. The frame is covered with several layers of soft clay, each of which must dry before laying the next layer. The end part must also be covered with clay. Instead of clay, you can use turf covered with roofing felt. To prevent leaks inside the building during rain, drainage channels made of clay should be made along the perimeter.
The walls and ceiling inside the shelter can be insulated with foam boards. The ground on the floor is covered with roofing felt, on top of which wooden boards, chipboard sheets or plywood are laid. You can lay wooden joists and then make the flooring.