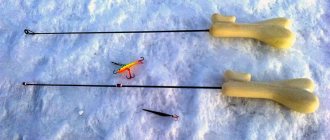
Winter jig fishing is widely popular among fishermen, but not all ice fishing enthusiasts know correctly how to tie a jig to a fishing line for a winter fishing rod. Its position in the water and its play depend on a correctly made knot, so anyone who prefers this type of fishing is advised to figure it out. It is also important to understand that weak and unreliable knots quickly unravel in the water and often cause the bait to break.
Briefly about the types of jigs
A jig is a fishing hook soldered into a ball, shot or other piece of metal (lead, tin, less often tungsten). Its game is an imitation of the movements of the amphipod crustacean, after which the bait got its name. To attract the attention of the fish, the body of the jig can be shiny or simply bright in color. They are often coated with luminescent paints to make them glow in the dark.
When going fishing, you need to choose a jig based on weight and type of design. With the first parameter, everything is simple: the deeper the reservoir, the greater the weight of the bait should be. Experienced fishermen recommend following the following rules:
- depth up to 2 meters – weight 0.3-0.5 grams;
- 4-5 meters – 0.6-1 grams;
- 7-8 meters – 1.2-1.5 grams.
Depending on the type of design, baits are made with or without an eye. Depending on its availability, a knot is selected with which to tie the jig to the fishing line. If it is weak and unreliable, it will disperse towards the water, which means the bait will be lost.
How to knit a jig correctly?
There are a large number of technologies for attaching different models of attachments. There is no need to know and use them all. Once you select and try out a few, the fishing enthusiast will use them on many occasions.
Jig with an eye
It is a jig with a ring soldered into the body for knitting a working line.
To tie such a bait, the following methods are used:
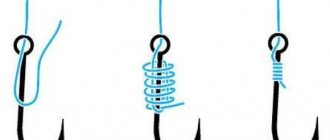
- Suspension for the fore-end. Used when you need an angular position of the hook in the water. This position is obtained due to the shifted tension vector of the jig. This fastening is performed using a regular clinch and a self-tightening fishing loop.
- The suspension is straight. This scheme gives a vertical position of the gear in the water. To use this method, special knots are used: palomar, regular or reinforced clinch, hanging in a loop.
Tips for fisherman: Winter fishing rod for trolling with your own hands - What is the difference, pros and cons
Mormyshka without an ear
To knit a rewinder with a hole, use the same methods as for the base of a forearm with a ring. In this case, the fishing line is passed into the body of the jig from the sting side and secured with a Canadian (ordinary fishing loop) knot or clinch. Similarly, they knit such rewinders without ears as the devil or the goat.
Tungsten jig
Rewindless products made of hard metals such as tungsten have taken a strong position.
Products made from it are much heavier than their “lead counterparts,” which has a beneficial effect on their scope of application:
But in addition to the advantages, there is also a negative side - tungsten is a hard metal that is difficult to process. The burrs and sharp edges of such a reelless reel injure the fishing line, which means the chance of breaking the monofilament thread and losing not only the jig, but also the removal of the trophy specimen increases.
Methods for fastening tungsten products:
Traditional knitting methods. These techniques are described above. The nuance here is to prevent the line from coming into contact with the metal.
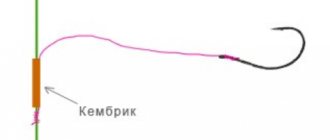
For this, a cambric is used, which is inserted into the hole in the body of the jig:
Making an additional element from a braided cord - an eyelet. This method appeared relatively recently, but has already become very popular. By using it, problems with fishing line injuries are eliminated.
This technique is quite labor-intensive, requiring additional effort and the use of tools (needle, braid, soldering iron).
Method 1
Initially, you need to prepare the braid if it does not fit into the hole in the mothless body.
A braided cord consists of several fibers - they need to be unraveled:
- Cut a piece of braided cord 5 cm long.
- From the side of the sting we pass a thin fishing line and wind it back so that a loop is formed on the back side of the jig.
- We put the prepared piece of braid in half into this loop and bring it back through the hole with the help of a fishing line, so that the loop comes out from the side of the sting. You should get an ear coming out of the hole on the side of the sting.
- The resulting loop from the braided section must be fixed. This can be done using a 1 mm fishing line. We thread it through the resulting eyelet.
- On the other side of the body, we pull the two ends of the cord and wrap them around the shank of the hook several times. One end is clockwise, the other is counterclockwise. Tie with a simple or double knot.
- Instead of cutting off the excess ends, you can fluff them up, then the bait will gain additional attractiveness for fish.
- The main monofilament line is threaded through instead of the thick securing line and tied with any known knot.
Method 2
The only difference in this method is that the ends, pulled into the hole of the rewinder, are not wrapped around the forend. A locking unit is made, which, together with the tips, is melted with a soldering iron, a heated knife or a screwdriver.
The only drawback of this design is the impossibility of recreating it directly while fishing.
Jigs made of hard and soft materials
The technique for tying jigs made of hard and soft materials is the same. The difference is that most purchased products made from hard materials have technological flaws: sharp edges and burrs that are almost impossible to process.
Therefore, in order to tie such a product, it needs to be modified (cambric, braided eyelet). Soft material, such as copper or lead, is more gentle on the monofilament.
To verify this, watch the perches. On the first ice, if you look into the hole, you can clearly see what effect a quick return of the jig to the point of an empty bite gives compared to a slow return. After a long pause, the perch seems to have to “tune in” to the bite again.
Hooking is a very important element of fishing technique. Usually, when the hook is empty, they say: “I hooked it early” or “I was late with the hook.” When the hook is correct, even if it is empty, the jig makes a jump upward of only 40-50 cm and immediately returns to the bite point. Unfortunately, many fishermen perform this technique incorrectly - they “cut” with the movement of the whole hand. The jig moves a meter or more away from the bite point, and while the angler lowers the light tackle again, the fish most often leaves.
To verify this, watch the perches. On the first ice, if you look into the hole, you can clearly see what effect a quick return of the jig to the point of an empty bite gives compared to a slow return. After a long pause, the perch seems to have to “tune in” to the bite again.
How to hook correctly?
Maybe when lifting the tackle, it seems to the fish from the side that the lower jig is chasing the upper one and you need to attack this strange “food object” first. Therefore, most often the upper jig is smaller, and sometimes it is replaced with a regular hook with beads, thread or cambric.
Maybe when lifting the tackle, it seems to the fish from the side that the lower jig is chasing the upper one and you need to attack this strange “food object” first. Therefore, most often the upper jig is smaller, and sometimes it is replaced with a regular hook with beads, thread or cambric.
We will look at several methods so that you can choose which one is suitable for your case.
Important addition. Since the fishing line does not like knots and sharp bends, and usually breaks in such places, it is recommended to check such equipment for strength before each trip. It is better to prepare a winter fishing rod in advance for fishing and tie the equipment with two jigs at home in the warmth, than to later get a break on the long-awaited bream, ruin your mood and waste time installing the tackle on the ice in the cold wind and frost.
- Heat an elastic PVC cambric in boiling water, stretch it to the desired diameter size and pass it through the eye of the jig.
- Fix the casing and release it beyond the edges of the countersunk hole. This way the line will be protected from chafing.
A jig is a small piece of fishing equipment; it is a hook soldered into a piece of metal. It is made from tin, lead, and tungsten.
Tips for a fisherman: Which screwdriver is best for winter fishing - All the nuances
There are two types of jig designs - with and without ears. The steps to attach them to the main line are completely dependent on the design of this part.
Which one to choose?
When choosing a jig, you take into account the depth of the reservoir where you are going to fish, the speed of the water flow in it, and most importantly, what kind of fish you are going to catch.
It is important for a novice fisherman to understand the truth: the greater the depth, the greater the mass of the bait, and also to take advantage of information from the arsenal of experienced fishermen:
- If the depth of the reservoir is no more than two meters, the weight of the jig is 0.3-0.5 g;
- If the depth is four to five meters, the mass of the jig is up to 1.0 g;
- At a depth of seven to eight meters, winter bait should weigh 1.2-1.5 grams.
It’s not enough to buy a jig; you also need to figure out how to tie it to the fishing line, what kind of knot to use to attach it so that it is of high quality and does not come undone. If the knot is knitted incorrectly, it will come apart, and the jig will fly into oblivion, and the fisherman’s mood will be ruined.
The design of the jig determines the method of tying the knot that should be used.
How to securely tie a jig to a winter fishing rod? This question is asked by all novice winter fishermen. Let's figure it out in order.
How to tie a jig without an eye
For a jig that does not have an eye, a simple and popular method among fishermen is used, the procedure is as follows:
- Thread a piece of fishing line into the hole of the jig, the end of the piece should extend beyond the edge of the hole by about 10 cm (the hook points up).
- Form the required loop near the hook.
- Press the hook of the jig with the resulting loop. Wind five turns of fishing line around the hook and loop.
- Insert the end of a piece of fishing line into this loop.
- Tighten the knot after moistening it.
- Remove excess line.
How to tie a jig to a fishing line with an eye
With an eye, a jig can be tied to a fishing line in several ways: Simple Knot, Clinch and Figure Eight. Let's look at each in more detail.
Clinch
For a bait that has an eye, the “Clinch” knot is used.
- Pass the line through the eye of the jig.
- Wrap the main piece of fishing line four or five times, making sure that the very first loop is not tight.
- Thread the end of the fishing line into the loop.
- Moisten the knot and tighten tightly.
- Trim off excess.
A variant of this unit for a winter jig of the “Drop” type:
- Take a jig with a hook, the tip of which points upward, and insert a fishing line into its eye.
- Roll the line into a ring.
- Wrap part of the ring with fishing line and make several turns.
- Pull the resulting winding, i.e. end of the wound fishing line and pull the rest of it to form a figure eight.
- Pass the point of the hook through each ring of the figure eight.
- Moisten the knot and tighten.
These methods of tying jigs are not suitable for tungsten products. This is a hard metal, jigs made from it (even very high-quality ones) quickly destroy it in direct contact with the fishing line.
Tungsten jig
There is a way to improve a tungsten jig so that it does not fray the fishing line.
Eight
- Take a jig with a hook, the tip of which points upward, and insert a fishing line into its eye.
- Roll the line into a ring.
- Wrap part of the ring with fishing line and make several turns.
- Pull the resulting winding, i.e. end of the wound fishing line and pull the rest of it to form a figure eight.
- Pass the point of the hook through each ring of the figure eight.
- Moisten the knot and tighten.
These methods of tying jigs are not suitable for tungsten products. This is a hard metal, jigs made from it (even very high-quality ones) quickly destroy it in direct contact with the fishing line.
Tungsten jig
There is a way to improve a tungsten jig so that it does not fray the fishing line.
You need to do the following:
- Heat an elastic PVC cambric in boiling water, stretch it to the desired diameter size and pass it through the eye of the jig.
- Fix the casing and release it beyond the edges of the countersunk hole. This way the line will be protected from chafing.
This problem can be solved in another way. To protect the line from the sharp edges of the tackle, you need to use braid.
To do this, a loop is made from a cord and fishing line, which is threaded into the hole, while the cord should protrude beyond the edges by no more than 1 mm. The cord is attached to the tackle, and the fishing line is attached to the loop made in the form of a knot. The most famous knots for tying tungsten jigs are Palomar, Trailin, Double Clinch.
How to tie a jig without an eye
When attaching bait to a fishing line, a number of important conditions must be observed.
- First, the bait must be in the right position in the water. If this rule is violated, most hooks will not produce results, because... the fish will break off.
- Secondly, you need a reliable node. A weak one will quickly come undone in the water and cause the bait to be lost.
- Thirdly, the friction of the fishing line against the hole or eye should be minimal. Constantly touching metal will quickly wear out the cord.
To tie a jig without an eye, most often fishermen choose a simple self-tightening loop. It allows you to correctly form the position of the bait while immersed in water. To do this, you need to follow these steps:
- Thread the end of a monofilament line (usually this is the one chosen for winter fishing) from the side of the hook tip into the hole on the jig.
- Form a loop and lean it against the forend.
- While holding the loop, wrap the fishing line around the fore-end three to seven times.
- Thread the remaining end of the cord into the loop.
- Moisten the knot with water, pull it up and tighten it.
This is a reliable and popular type of fastening, called a “spindle”. The bait tied in this way shows a good game.
The “spindle” also has disadvantages:
- At the entrance to the hole and exit, the fishing line bends and eventually breaks off under prolonged or severe load. Jigs made of tin or lead, as well as regular hooks, can be knitted in this way. If the bait is made of tungsten, then a thin fishing line (0.08-1 mm) is likely to break due to damage received from the sharp metal edges of the hole. It is recommended to use other methods for this, which will be described below.
- Tying a jig to a fishing line in this way is quite difficult in the cold, when your fingers freeze and do not obey well.
- Part of the hook is occupied by the knot. This is undesirable if beads are hung on a hook. If the size of the hole in it is larger than the thickness of the assembly, there will be no problem. If the hole is smaller or approximately the same, then the beads will not rise up the shank of the hook, hit the body of the jig and attract the attention of the fish with a “clanging”. In addition, over time, the beads will generally get stuck on the knot and disrupt the play of the bait.
You can avoid damage to the fishing line when it comes into contact with the edges of the hole in the following way:
- Thread the line from the point of the hook.
- Make the first loop, thread the cord again from the tip side.
- Make a second loop, but you no longer need to thread the fishing line through the hole. The loop is formed from the outside and held with your fingers. This is a reserve for tightening directly, not through a hole. This will allow you to avoid kinking and touching the edges of the hole, which means damage to the monofilament.
- Tie a regular self-tightening loop on the forend (see the first method). Moisten it and tighten it, but not through the hole, but through the second loop.
- Pass the line through the first loop and tighten from above (on the pellet) or from the side if the bait is oblong.
After fixing, the jig hangs correctly, and the fishing line will not be damaged under heavy or prolonged loads.
Some fishermen make a loop out of braided wire. To do this, a braided fishing line is threaded through the hole from the back of the bait. A loop is formed on the front side, after which a match is inserted into it so that the loop is not pulled into the hole and the cord is passed back. Both ends of the cord are tied to the shank of the hook. A monofilament line is attached to the finished loop.
Mormyshka without an ear
The greatest difficulties are presented by models that do not have a ring. They have a through hole in the body of the bait. Typically, breaks occur due to the fact that the fishing line frays on the uneven edges of this hole. The problem is solved by pulling the cambric. But the hole is too narrow; simply inserting a cambric into it will not work. And this is done like this:
- Heat the cambric in hot water.
- Gently stretch a piece about 2 cm long.
- Cut the edge diagonally.
- Pass the cut through the hole.
- Pull so that the unstretched cambric enters the body of the jig. It will fill the hole tightly.
- Cut off the excess, leaving approximately 1 mm from the edges on both sides.
- Using a lit match, heat the ends until they melt a little and become smooth.
Now you can tie the bait. To do this, we use one of the most reliable and simple nodes:
- From the side of the hook tip, we pass the fishing line through the hole.
- We make a loop and press it with our fingers to the fore-end.
- Wrap the free end around the hook and pressed loop 7 - 10 times.
- Pass the fishing line through the loop, tighten the resulting knot well, not forgetting to wet it.
In this way you can quickly tie everything you need, even in the cold. It will be in the correct position, and thanks to the cambric, the line will not fray.
How to tie a jig to a fishing line with an eye
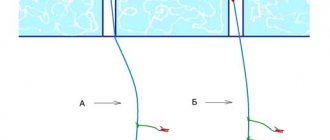
Attaching a bait with an eye to a winter fishing rod is easier than attaching a jig with a hole in the body. Several popular nodes are used for this, but there are a number of nuances. If you tie the line at the top, the bait will hang naturally. If you pass the monofilament through the eye and tie it to the fore-end, then a certain vertical tilt will appear and the action of the jig will change. Which method is better can only be determined in a pond, by the behavior of the fish.
Fishermen interested in how to tie a jig with an eye should know that there are three types of knots for attaching this type of bait:
- rigid, tightening, firmly fixing the jig;
- loop knots along which the bait slides freely;
- hook - the golden mean between the two previous types of knots.
The peculiarity of hard knots is that they are firmly tied on the ring and fix the jig in almost one position. These include: self-tightening loop, regular and reinforced clinch, palomar.
How to knit a clinch:
- Pass the end of the fishing line through the eye of the bait.
- Leaving the loop around the eye free, wrap the end of the fishing line around the main thread five times.
- Pass the end of the fishing line through the first loop, wet the knot and tighten.
- Trim excess thread and melt.
Strengthened Clinch:
- Insert the end of the fishing line into the eye of the jig.
- Leave the first loop loose, then wrap the fishing line around the main thread five times, without tightening the last loop to form a loop.
- Thread the end of the thread into the first free loop on the eye of the jig, and then into the loop formed by the last turn on the main piece of fishing line.
- Moisten the knot and tighten it, then melt the end of the cord.
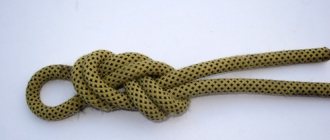
Palomar:
- Fold the fishing line in half.
- Pull the resulting loop through the eye of the jig.
- Tie the loop with a single regular knot.
- Place the bait hook into the loop, starting from the point.
- Tighten the knot on the ring, after wetting it well.
The three listed knots are very strong, limit freedom of movement and allow you to tie a reelless jig at the required angle.
To allow the bait to move freely, so-called loop knots are used. They do not fix it and allow it to slide freely along the fishing line that has formed the loop. One of the easiest ways to tie a jig with an eye looks like this:
- Make a simple knot in the fishing line, but do not tighten it. Pass the end of the cord through the eye of the bait, and then through the knot.
- Tie the monofilament with five or six turns, and then thread the end into a knot again.
- Pull the main line, carefully tightening the simple knot and adjusting the length of the loop, then adjust and tighten the turns and finally fix the entire knot.
The advantage of this method is that it is simple and ensures free play of the bait. The disadvantage is that the knot is quite large and noticeable, which can affect fishing in the dead of winter. It is also not strong enough, because... the eye of the jig will constantly press on the end of the loop, deforming the fishing line.
A bait tied in this way cannot be fixed at a certain angle, but this is compensated by its excellent action.
Somewhere between rigid knots and loop knots are the so-called “hook” knots. Their peculiarity is that the fishing line is only pulled into the ring, but is attached to the shank of the hook. One of these methods is the “figure eight”:
- Position the jig so that the tip points upward. Pass the line through the eye.
- Form a loop at the end of the monofilament and pass the end of the line through it three to five times.
- Pull the ends of the cord until two rings are formed in the shape of a figure eight.
- Pass the tip of the jig through the figure eight rings and tighten the knot.
Due to the fact that the monofilament rests against the ring, this method is less strong than fixation with rigid knots, but more reliable than a loop. The game of the bait is expressive and of high quality.
We tie a jig with an eye
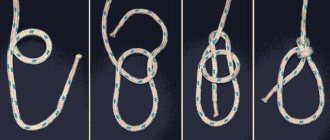
To securely tie a jig with an eye to a fishing line, use step-by-step instructions. It is so simple that even a beginner can cope with attaching the gear (Figure 3).
The binding is carried out like this:
- The line is passed through the eye of the line and pulled down, parallel to the shank of the hook.
- Next, the line is turned in the opposite direction, at the place where the shank of the hook is rounded.
- After this, the fishing line is brought parallel to the forend to the area where the hook is soldered into the metal, turned it in the opposite direction and made several turns down around the forend.
Figure 3. Methods for tying a jig with an eye.
At the final stage, the fishing line is threaded into the resulting loop and tightened tightly. In this case, physical force should be applied to both ends of the fishing line.
There are several ways to tie jigs with an eye to a fishing line, but I will show you the most common and reliable knots. They are used by many experienced comrades, and under reasonable conditions they hold up well to the jerks of large fish.
There are several ways to tie jigs with an eye to a fishing line, but I will show you the most common and reliable knots. They are used by many experienced comrades, and under reasonable conditions they hold up well to the jerks of large fish.
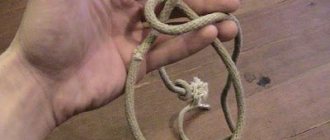
1 way:
- We pass the free end of the fishing line through the eye of the jig and make a loop, as shown in the figure below.
- We pass the jig through the loop again, wet the knot and carefully tighten it.
Method 2:
- We make a loop on the fishing line and pass the free end into the eye.
- Next, you need to bring the same end of the fishing line back into the loop and make 4-5 turns around the main fishing line.
- Pull the free end back into the loop, and then back into the resulting loop.
- Moisten the knot with water and tighten smoothly.
[THERE IS AN ANSWER] How to equip a bottom fishing rod with a feeder
The stages of knitting a knot are presented more clearly in the image. This knot is also very reliable and has been tested by many fishermen. The only drawback, perhaps, is the difficulty of tying it in the cold, but once you get used to it, you will knit it “automatically”.
The color of the jig or its shade is selected based on certain natural factors, such as the presence of sunlight and the color of the bottom of the reservoir. On a bright day and at shallow depths, darker models are suitable. If the bottom in the fishing area is light (sandy), then darker shades should be used here as well. In conditions where the weather is cloudy and rainy outside, preference should be given to lighter specimens.
The easiest ways to tie
There is a universal way to correctly tie a jig of any type, both with and without an eye. Its peculiarity is that the bait is attached to the hook, but the knot is only created on the fore-end, and is not completely fixed. Here's how it's done:
- Thread the fishing line into the hole or ring on the jig from the tip side.
- Make a loop, insert the tip of the hook into it, lift the loop up, almost to the junction of the hook and the body of the jig.
- Make three to five turns with the end of the fishing line on the main cord.
- Insert the end of the fishing line into the loop on the hook, moisten and tighten, tightening and adjusting the turns.
The second option is to make an “improved clinch” or any other knot that forms a self-tightening loop on the shank of the hook instead of a knot.
The advantage of this method is that tying a knot is very easy, which is important during frost, when your fingers freeze and do not obey. In addition, it takes up virtually no space on the fore-end, which is important for lures with beads. The disadvantage is that such a knot is not strong enough, because the line at the junction with the forend experiences heavy loads.
We tie a jig with a ring
There are modifications of jigs that are equipped with a special ring designed for tying fishing line. The best and most reliable way to attach such hooks is a classic noose. To be on the safe side, you can put a nipple on the fishing line over the noose.
For clarity, you should provide step-by-step instructions on how to tie a jig with a ring to a fishing line:
- First you need to thread the working end of the fishing line through the ring at the top of the jig.
- After this, make a small diameter loop around the hook.
- Wrap the loop with several turns of the free end of the fishing line.
- Then pull the end of the fishing line through the formed eye.
- Moisten and tighten the knot.
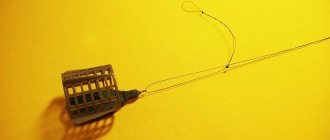
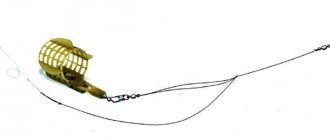
A jig with a ring can also be fixed as a second attachment, at a distance of about 20 centimeters from the edge of the main line or leash:
- First you need to thread the fishing line into the ring of the jig.
- Then you need to make a loop and tie it with the free end of the fishing line, as shown in the diagram below.
- Rewind the free end of the fishing line 5-7 turns.
[THERE IS AN ANSWER] Which screwdriver should I choose for winter fishing?
A large loop should form at the bottom. It is put on a hook and the connection is simply secured by pulling the two ends of the fishing line.
How to tie two jigs on one line
If desired, the fisherman can tie two jigs. In this case, the main one will be the lower one, and the lighter upper one will act as an additional bait-provocateur. This can be done in several ways, the simplest of which is the so-called “steam locomotive”:
- Tie the first smaller jig, which will be the top one. It is attached in any convenient way, but you need to leave a long free piece of fishing line 30-40 cm long.
- Tie the second jig so that there is a distance of 20-25 cm between the baits. Cut a piece of fishing line and melt it.
If the top bait has an eye, then you can simply thread the fishing line through it. In this case, to limit its movement, it is enough to install a bead or cambric at the top and bottom. This method of fastening will allow you to adjust, if necessary, the height at which the jig is located.
It is allowed to attach an additional bait below the main one, at the end of the fishing line remaining after tying the first one. In this case, you can use jigs not only with an eye, but also with a hole in the body.
Fishing with two jigs always gives better results compared to one bait. This is explained by the fact that you can use different deceptions in size, color and type of game. In this case, the fish’s attention is attracted by two objects at once. In this regard, you should not place jigs close to each other. The optimal distance is 20-25 cm.
A way to tie a jig with an eye
The color of the jig or its shade is selected based on certain natural factors, such as the presence of sunlight and the color of the bottom of the reservoir. On a bright day and at shallow depths, darker models are suitable. If the bottom in the fishing area is light (sandy), then darker shades should be used here as well. In conditions where the weather is cloudy and rainy outside, preference should be given to lighter specimens.
Several fastening methods have been invented for attaching jigs.
If the jig has an eye, the knitting process is somewhat simplified. For example:
- The fishing line is threaded through the eye, after which a loop is formed. For ease of knitting, the threaded end of the fishing line should be long.
- The loop is laid parallel to the hook, after which the free (long) end is wrapped around the hook.
- After several turns (about six), the end of the fishing line is threaded into the laid loop, after which everything is tightened on both sides.
- Finally, all excess is cut off so that it does not interfere.
To prevent the fishing line from fraying during use, a cambric is placed on the ring. Before tightening the knot, the fishing line must be moistened with water (saliva) so that it does not lose strength.
As a rule, the jig is attached to the fishing line at an angle of 45, 90 or 180 degrees, so you should always remember this.
How to tie a jig to a fishing line
The method of tying a jig to a fishing line depends on the design of the jig itself. If the jig has a fastening ring, then there shouldn’t be any problems. But there are jigs in which there is no ring, but there is a hole in the body of the jig, which serves to attach the jig to the fishing line.
As a rule, such baits are tied in one way - with a noose. At the same time, you need to monitor how the bait is balanced or at what angle it is tied.
Method of knitting jigs with a train
Jigs tied with a “train” are always more catchy. It's connected:
- with the fact that it is possible to use baits that differ in both color and size;
- with the opportunity to demonstrate different game of baits;
- with increased attention of the fish to two objects at once. At the same time, the jigs should not be placed close to one another. As a rule, they are located at a distance of 25-30 cm.
The lower jig may have slightly more weight, but the upper one can be attached both rigidly and movably. The movements of the upper jig are limited by two beads fixed at a certain distance from one another. At the same time, you can adjust the gap, which determines the movement of the upper jig.
First of all, the top bait is tied. This is done very simply, using a loop that is inserted into the ring of the jig. After this, the bait is passed through the same loop and tightened.
Then the bottom bait is tied. How to tie the lower jig has already been mentioned in this article. Despite this, every angler has every right to attach jigs in his own way. The main thing is that the knot is reliable and cannot come undone during the fishing process.
After the two jigs are secured, we can say that the “locomotive” is ready for use.
How to tie braided fishing line to a leash?
Step-by-step knitting of a leash to a “Stren” type braid:
- The braid and leash are folded overlapping, after which the leash end is taken and a loop of a universal knot is formed from it.
- The end of the leash is made several turns around the braid. The number of turns depends on the size of the fish that is supposed to be caught.
- After this, take a leash with braided wire and tighten the knot.
- After this, a clinch is made around the resulting knot, which is also fixed. To do this, again the leash and braid are pulled in different directions.
[THERE IS AN ANSWER] How to conveniently store ice fishing rods in a box?
It should be noted that using braid for fishing in winter is somewhat problematic, since it is afraid of low temperatures and quickly freezes, which is not entirely convenient.
If the jig has a ring, then you can attach it in two ways. In the first case, the thread is passed through the ring and tied at the top, and in the second, it is fixed on the shank of the hook. Each attachment method affects the hanging angle of the bait. To reliably tie a jig with a ring and the natural hang of the tackle, a palomar or a reinforced clinch is usually used.
How to tie a tungsten jig
The peculiarity of tungsten jigs is that when tying them, the fishing line is often deformed and breaks due to contact with the sharp edges of the hole. You can tie such a bait using braided fishing line or cambric. Some jigs already have such inserts-cambrics, and if they are still missing, they are easy to make yourself.
First way:
- Take a small piece of braided fishing line and tie its edges to the shank of the jig in a way that is convenient for the fisherman.
- Pull the resulting loop into the hole of the bait from bottom to top.
- Now you can tie the main monofilament line to the loop.
Second way:
- Select a cambric according to the size of the jig hole. If you don’t have what you need, you can take a slightly larger one in diameter or length and pull it out using boiling water or a lighter.
- Insert the cambric into the hole of the bait and cut it, the edges are countersunk.
- Thread the fishing line through the cambric and tie it in any convenient way.
Now the cord will not contact the metal and will not break due to deformation under heavy or prolonged load.
How to tie a jig on a leash
Usually, additional jigs are attached to the leash, often in quantities of several pieces, for example, when fishing in a current. To avoid overlap, when tying, it is worth placing the leashes so that they are directed upward, towards the tip of the fishing rod.
The easiest way is to use a knot such as a counter or Flemish eight, used when tying two fishing lines. It looks like a regular figure eight, but is performed not on one fishing line, but on two. In this case, not both ends are cut, but only the downward one. Pointed upward and will be an additional leash.
How not to tie jigs
When tying a jig, you should not make elementary knots. They weaken the monofilament thread by half, quickly unravel, and the bait breaks off. In addition, inexperienced fishermen often attach it not to the fore-end, but on top of the body, which is why the jig is not positioned correctly in the water.
You cannot attach the bait using the usual hook method, in which a cord is wrapped around the fore-end and a knot is tied on it. The result is regular friction and inevitable damage.
A locking knot tied in a figure eight or in the classical way at the end of a fishing line stretched through the body is also ineffective when attaching a jig. It increases the risk of damage to the cord. In addition, the bait constantly slides up and down the monofilament, which impairs its performance.
It is important to remember that a well-made jig knot is not afraid of loads and does not come undone under them or after they are removed.
Tools and devices for tying jigs
You can tie a jig with your bare hands, but many fishermen advise using simple devices and tools that can simplify these manipulations. Among them:
- A tailor's pin, which is a needle with a loop or ball at the end. This handle will make it much easier to clear a clogged hole in the jig.
- Small scissors (preferably nail scissors). They do not take up much space in your backpack and allow you to conveniently cut fishing line.
- Syringe with a needle. You can blow it out with a syringe, and clean the hole with a needle.
- Knife. It will help cut fishing line or cambric, and will also be useful in a number of other situations.
- Lighter. Useful for melting the ends of fishing line.
Another useful item is a miniature fly holder. It makes tying knots much more comfortable.
Useful tips
Experienced fishermen, who have long been familiar with the peculiarities of jig fishing, give a number of tips on attaching this bait:
- You should always tie a jig so that the hook is always pointing upward. The hook itself should be in a position of 145° in relation to the monofilament. This will reduce cord chafing and wear.
- When fixing the knot, it is imperative to wet the fishing line with saliva or water. When it gets into water, the monofilament cord stretches, so the knot weakens. To avoid this, you need to create similar conditions for it when tying.
- The fixed knot should not only be strong, but also, if possible, small. A massive one will impair the performance and effectiveness of the bait, and may also scare away the fish.
- Some fishermen apply a tiny drop of superglue to the knot, which can make it stronger. This should be a miniature dose and only after the line is completely dry.
- The treatment of the ends of the fishing line is important. They should be as short as possible and melted until softened. The small ball that appears will secure the knot and prevent the fish from pricking itself when biting.
- Do not unnecessarily pull the monofilament through the jig hole two or three times. To some extent, this allows you to fix the bait in the desired position, but the same result can be achieved using a “spindle” knot or a cambric adjusted to size. At the same time, a large amount of fishing line negatively affects the play of the jig in the water and reduces its effectiveness.
- It is better to take several equipped fishing rods with you. Tying knots in the cold is not the most pleasant experience. In addition, during the time spent attaching the jig, you may miss the fish.
Before you go fishing, it is recommended to learn how to knit fishing knots for jigs at home. This will allow you not to waste time during winter fishing, trying to attach the bait with frozen, unruly hands.
Winter jig fishing is very popular among fishermen. For it to bring good results, you need to be able to correctly tie this type of bait to the fishing line. Weak and unreliable knots quickly unravel and cause the jig to be lost, while large and bulky ones reduce its mobility and scare away fish.
Before going to the pond, it is recommended to learn how to tie basic knots at home. Experienced fishermen recommend taking several fishing rods with different baits at once, so as not to waste time tying them in the cold.