The display of relief plays an important role, since it largely determines the nature of all other elements of the content of maps and plans. In addition, the relief affects the water regime, the distribution of vegetation and the spatial distribution of most terrain objects. Without a sufficiently accurate representation of the relief and its detailed study on a map or plan, it is impossible to establish relationships between individual elements of the landscape and, therefore, to rationally use natural resources.
The traditional idea of the terrain on topographic maps and plans is its depiction as contour lines. This method is visual and gives an unambiguous idea of the terrain, allows you to quickly obtain quantitative characteristics of the terrain and solve various applied problems.
Types and forms of terrain
Relief is a set of irregularities on land, the bottom of oceans and seas, varied in outline, size, origin, age and history of development. It is made up of positive (convex) and negative (concave) shapes. The main forms of relief are: mountain, basin, ridge, hollow and saddle.
In addition to the listed forms, the relief has details. Relief details include: ravines, gullies, mounds, embankments, recesses, ledges, quarries, etc. All types of relief shapes and details consist of elements. The main elements of the relief are: base (base), slope (slope), top (bottom), height (depth), steepness and direction of the slope, watershed and drainage lines (thalweg).
In military affairs, terrain refers to the area of the earth's surface on which combat operations are to be conducted. The unevenness of the earth's surface is called terrain, and all objects located on it created by nature or human labor (rivers, settlements, roads, etc.) are called local objects.
Relief and local objects are the main topographical elements of the terrain that influence the organization and conduct of combat, the use of military equipment in combat, conditions of observation, firing, orientation, camouflage and maneuverability, i.e., determining its tactical properties.
A topographic map is an accurate representation of all the most tactically important elements of the terrain, plotted in a mutually precise location relative to each other. It makes it possible to explore any territory in a relatively short time. A preliminary study of the terrain and decision-making for a unit (unit, formation) to carry out a particular combat mission is usually carried out on a map, and then clarified on the ground.
The terrain, influencing combat operations, in one case can contribute to the success of troops, and in another have a negative impact. Combat practice convincingly shows that the same terrain can give greater advantages to those who study it better and use it more skillfully.
According to the nature of the relief, the area is divided into flat, hilly and mountainous.
The flat terrain is characterized by small (up to 25 m) relative elevations and relatively low (up to 2°) slope slopes. Absolute heights are usually small (up to 300 m).
The tactical properties of flat terrain depend mainly on the soil and vegetation cover and the degree of ruggedness. Its clayey, loamy, sandy loam, and peat soils allow the unimpeded movement of military equipment in dry weather and significantly complicate movement during the rainy season, spring and autumn thaw. It can be cut up by river beds, ravines and ravines, and have many lakes and swamps, which significantly limit the ability of troops to maneuver and slow down the pace of the offensive.
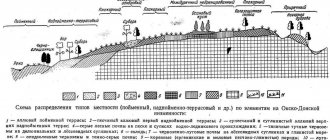
Hilly terrain is characterized by the undulating nature of the earth's surface, forming irregularities (hills) with absolute heights of up to 500 m, relative elevations of 25 - 200 m and a predominant steepness of 2-3° (Fig. 3, 4). Hills are usually composed of hard rock, their tops and slopes are covered with a thick layer of loose rock. The depressions between the hills are wide, flat or closed basins.
Hilly terrain ensures the movement and deployment of troops hidden from enemy ground observation, facilitates the selection of places for firing positions of missile troops and artillery, and provides good conditions for the concentration of troops and military equipment. In general, it is favorable for both offense and defense.
Mountainous areas are areas of the earth's surface that are significantly elevated above the surrounding terrain (with absolute heights of 500 m or more). It is distinguished by complex and varied terrain and specific natural conditions. The main forms of relief are mountains and mountain ranges with steep slopes, often turning into cliffs and rocky cliffs, as well as hollows and gorges located between mountain ranges. Mountainous terrain is characterized by sharply rugged terrain, the presence of inaccessible areas, a sparse network of roads, a limited number of settlements, rapid river flows with sharp fluctuations in water levels, a variety of climatic conditions, and the predominance of rocky soils.
Combat operations in mountainous areas are considered as actions under special conditions. Troops often have to use mountain passes, making observation and firing, orientation and target designation difficult, at the same time it contributes to the secrecy of the location and movement of troops, facilitates the installation of ambushes and engineering barriers, and the organization of camouflage.
Jules Verne
Jules Verne -
French geographer and writer. His work "The Mysterious Island" takes place on an island in the Southern Hemisphere. During the lesson, the teacher will build a plan of this island and mark the absolute heights on it.
Rice. 8. Map of Lincoln Island as the author imagined it
Homework
Paragraphs 7, 8.
1. How are the irregularities of the Earth depicted on the plan?
Bibliography
Main
1. Basic course in geography: Textbook. for 6th grade. general education institutions / T.P. Gerasimova, N.P. Neklyukova. – 10th ed., stereotype. – M.: Bustard, 2010. – 176 p.
2. Geography. 6th grade: atlas. – 3rd ed., stereotype. – M.: Bustard, DIK, 2011. – 32 p.
3. Geography. 6th grade: atlas. – 4th ed., stereotype. – M.: Bustard, DIK, 2013. – 32 p.
4. Geography. 6th grade: cont. cards. – M.: DIK, Bustard, 2012. – 16 p.
Encyclopedias, dictionaries, reference books and statistical collections
1. Geography. Modern illustrated encyclopedia / A.P. Gorkin. – M.: Rosman-Press, 2006. – 624 p.
Literature for preparing for the State Exam and the Unified State Exam
1. Geography: initial course. Tests. Textbook manual for 6th grade students. – M.: Humanite. ed. VLADOS center, 2011. – 144 p.
Top Articles: How many meals a day does a cat need depending on its age?
2. Tests. Geography. 6-10 grades: Educational and methodological manual / A.A. Letyagin. – M.: LLC “Agency “KRPA “Olymp””: “Astrel”, “AST”, 2001. – 284 p.
Materials on the Internet
1. Federal Institute of Pedagogical Measurements (Source).
2. Russian Geographical Society (Source).
3. Geografia.ru (Source).
The essence of depicting relief on maps using contour lines
Relief is the most important element of the terrain, determining its tactical properties.
The image of the relief on topographic maps gives a complete and fairly detailed idea of the unevenness of the earth's surface, the shape and relative position, elevations and absolute heights of terrain points, the prevailing steepness and length of the slopes.
The relief on topographic maps is depicted by contour lines in combination with conventional signs of cliffs, rocks, ravines, gullies, stone rivers, etc. The relief image is supplemented by elevation marks of characteristic points of the area, signatures of contour lines, relative heights (depths) and directional indicators of slopes (berg strokes) . On all topographic maps, the relief is depicted in the Baltic height system, that is, in the system of calculating absolute heights from the average level of the Baltic Sea.
9.7. FEATURES OF THE IMAGE OF THE RELIEF ON THE MAPS OF SCALES 1:500,000 AND 1:1,000,000
Relief on small-scale topographic maps, as on maps of larger scales, is depicted by contour lines and symbols, but in a more general way. They display only the general nature of the relief - its structure, basic forms, the degree of its vertical and horizontal dissection. The height of the main section when depicting flat areas on both maps is set to 50 m, and mountainous – 100 m. On a map of a scale of 1:1,000,000, in addition, a section height of 200 m is used to depict areas located above 1,000 m above sea level . Relief objects that are not expressed as contours are shown only those that are necessary to characterize the terrain or are important landmarks. They are indicated by the same symbols as on other maps, but smaller in size. The main feature is the depiction of mountainous terrain. For greater clarity, its image with horizontal lines is supplemented with the so-called hillshading and layer-by-layer coloring in steps of heights.
Top Articles: Bird's Nest Facts
Rice. 9.9. Map without hillshade (top) and with hillshade (bottom)
Shading, i.e. shading the slopes of the most important forms of mountain relief, makes the image more expressive and plastic, allowing you to visually perceive its volumetric forms. Shading is done with gray-brown paint according to the principle - the larger, higher and steeper the slope, the stronger the tone of the wash. Thanks to washing, the main mountain ranges and massifs, their most important spurs and peaks, passes, highland ledges, deep valleys and canyons are clearly distinguished. The direction and comparative steepness of the slopes, the shape of the ridges (sharp, rounded, etc.) and the difference in height of the main mountain ranges are clearly perceived. Layer-by-layer coloring along the steps of heights clearly displays the altitudinal characteristics of the mountain relief and enhances the plastic effect of its image. It is done with orange paint of various tones according to the principle - the higher, the darker. In this case, the relief image is, as it were, divided into separate high-altitude layers (steps), the color tone of which easily distinguishes their absolute heights and mutual elevations. The color tone of the layers intensifies after 400, 600 or 1000 m, depending on their absolute heights. The scale of elevations adopted on the map is indicated on each sheet under the southern side of its frame.
Questions and tasks for self-control
- Give the definition of “relief”, “horizontal”, “sectional height”, “laying”, “laying of the slope”
- Name the main shapes of the part and relief elements, give them a brief description.
- What horizontal lines are called the main ones?
- For what purposes are half and auxiliary contour lines used and at what vertical distance are they drawn on the map?
- For what purpose are bergshades put on the map?
- What colors are used to depict terrain on maps?
- What is the essence of the hillshading method for depicting relief on maps?
- What is the essence of the hypsometric method for depicting relief on maps?
- How are the digital symbols located when labeling contour lines?
- What relief objects are indicated on maps with special symbols?
- Using contour lines, show a mountain, ridge, saddle, basin, hollow in the drawing.
- What are the features of depicting relief with horizontal lines on flat and mountainous terrain?
- Name the types of stingrays. How are they shown on the maps?
- What are the features of the relief image on maps of scales 1:1,000,000 and 1:500,000?
- Further
- home
- Previous
Types of contours
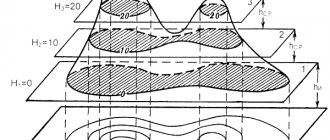
Horizontal is a closed curved line on a map, which corresponds to a contour on the ground, all points of which are located at the same height above sea level.
The following horizontal lines are distinguished:
- main (solid) - the relief section corresponding to the height;
- thickened - every fifth main horizontal line; stands out for ease of reading the relief;
- additional horizontals (semi-horizontals) - drawn by a broken line at a height of the relief section equal to half the main one;
- auxiliary - depicted by short, broken, thin lines at an arbitrary height.
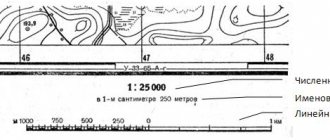
The distance between two adjacent main horizontal lines in height is called the height of the relief section. The height of the relief section is indicated on each sheet of the map under its scale. For example: “Continuous horizontal lines are drawn every 10 meters.”
To facilitate the calculation of contours when determining the heights of points on the map, all solid contours corresponding to the fifth multiple of the section height are drawn thickly and a number is placed on it indicating the height above sea level.
In order to quickly determine the nature of surface irregularities on maps when reading a map, special slope direction indicators are used - berg strokes - in the form of short lines placed on horizontal lines (perpendicular to them) in the direction of the slopes. They are placed on the bends of horizontal lines in the most characteristic places, mainly at the tops of saddles or at the bottom of basins.
Additional horizontals (semi-horizontals) are used to display characteristic shapes and details of the relief (bends of slopes, peaks, saddles, etc.), if they are not expressed by the main horizontals. In addition, they are used to depict flat areas when the gaps between the main contour lines are very large (more than 3 - 4 cm on the map).
Auxiliary horizontal lines are used to depict individual relief details (saucers in steppe regions, depressions, individual hillocks on flat terrain), which are not conveyed by the main or additional horizontal lines.
Depiction of typical relief forms by horizontal lines
Relief on topographic maps is depicted by curved closed lines connecting terrain points that have the same height above the level surface, taken as the beginning of the height reference. Such lines are called horizontals. The image of the relief with horizontal lines is supplemented by captions of absolute heights, characteristic points of the terrain, some horizontal lines, as well as numerical characteristics of relief details - height, depth or width.
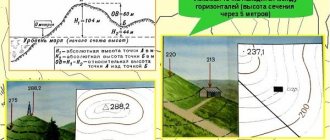
Determination of absolute heights and relative elevations of terrain points on the map
Profile is a drawing depicting a section of terrain with a vertical plane.
For greater expressiveness of the terrain, the vertical profile scale is taken to be 10 or more times larger than the horizontal one.
In this regard, the profile, conveying the mutual elevation of the points, distorts (increases) the steepness of the slopes.
To build a profile you need:
- draw a profile line (route of movement) on the map, attach a sheet of graphed (millimetre) paper to it, transfer to its edge with short lines the places of contour lines, inflection points of slopes and local objects that the profile line cuts, and label their heights;
- sign on a sheet of lined paper at the horizontal lines the heights corresponding to the heights of the contour lines on the map, taking the spaces between these lines as the height of the section (set a vertical scale);
- from all the lines indicating the intersection of the profile line with the marks of the heights of the horizontal lines, inflection points of the slopes and local objects, lower the perpendiculars until they intersect with the parallel lines corresponding to the marks and mark the resulting intersection points;
- connect the intersection points with a smooth curve, which will depict the terrain profile (ascents and descents along the route).