A paracord bracelet is often also called a survival bracelet. The material used to create the product is a synthetic multi-layer thread, better known as a parachute line. However, it is not necessary to make all bracelets from sling; it is also possible to make a cheaper option - from a regular strong cord or synthetic rope. But a sling is still preferable; it is quite durable and has many useful properties, especially in hiking conditions. In general, products of this type will be useful not only in survival conditions, but also in everyday life.
Features and purpose of the bracelet
Classic paracord has many useful properties:
- High elasticity;
- Little weight;
- Good slipperiness;
- The rope is soft to the touch;
- Ability to hold knots;
- Ability to withstand weight 50 – 230 kg;
- You can pull out individual threads from the product and also use them as a rope;
- Huge selection of different colors.
Such bracelets will be useful for survival. They can easily turn into a rope, and also contain additional details that make life easier in camping conditions. There are a huge number of options for using a bracelet; experienced tourists prefer to take such products with them on hikes, since they often need a rope or simply strong fastenings.
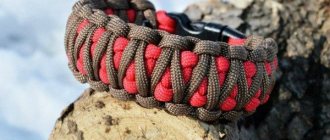
What does a paracord bracelet look like?
More often you can find men's paracord bracelets, since the product still looks a little rough, but women's versions are also found. The color range of parachute lines sold is so diverse that you can choose both men's and women's combinations, and a variety of decorative elements can easily be attached to the finished bracelet, depending on the purpose for which this accessory is intended to be worn - convenience, benefit, or just decoration, or even all three of these goals together.
Learning to choose
To make a quality product, you need to choose the right material. For these purposes, use a number of useful tips:
- The cord should be soft to the touch.
- High-quality paracord should burn with a smoky flame with black acrid smoke that smells like plastic.
- The cord consists of an inner fiber and a braid. The braid always burns faster, shrinking and exposing the core of the cord.
- Be sure to ask for a certificate of conformity when choosing a material, this will allow you to make a real survival kit. Indeed, often instead of nylon, which has very high strength, you may be offered polyester cords.
Related article: Master class on a kanzashi crown made from ribbons for the New Year with photos and videos
Application
Below are specific applications for the product:
- Providing medical care - stopping the bleeding, suturing the wound, flossing, applying a splint and even preparing a stretcher. Here, not only the entire rope will be useful, but also its individual fibers;
- Fishing (making a fishing line and even a fishing rod if fish hooks are attached to the bracelet), making a bowstring, weaving a basket for mushrooms and berries, creating traps for animals;
- Repair of clothes and shoes - replacing belts, suspenders, laces and even zippers;
- Wrapping the handles of tools and homemade weapons, creating a hut, making fire, creating snowshoes, a raft, a noose, as insurance when ascending and descending.
In addition, the bracelet can be used in everyday life, as it is a very strong rope. It is suitable as a dew for a car, for attaching cargo to a car, as a collar for animals, a rope for drying clothes, a rope ladder and more; the areas of application are very extensive.
Sometimes such a rope is even used as a climbing rope, but it is better to resort to this option only when there is no real rope.
As a rule, the length of the bracelet coincides with the circumference of the arm, and to make the product easy to put on and take off, special clasps are made, which can also be used for survival. But the clasp is not necessary; sometimes craftsmen do without them altogether. If you decide to use fastening elements, you should stock up on them before you start weaving. There are many options - carabiners, beads, buckles and more.
Types of built-in elements
Since these bracelets are often used for survival, various useful little things are often added to them to make life easier in the wild. But since now bracelets are often used for everyday wear, decorative elements are often used as jewelry.
Simple
Even clasps can be called the simplest decorations. These can be carbines, beads, rings, buckles, fastex and more. Here the scope for imagination is not limited; almost any elements that are comfortable to wear and easy to attach to a bracelet will do. For example, you can make such decorative elements from the remains of a cord, or you can take several slings and weave individual decorative elements from them, and then attach them to the product.
Specialized
Decorations designed to make it easier to survive in camping conditions are also quite varied. These can be fishing keys, flint, compass, knife blade and more. You can choose from a variety of small travel accessories that can be easily attached to the product. For example, various keychains with useful little things and more.
Thus, fishermen will appreciate bracelets that contain fishing line, hooks, sinkers and other small devices that are indispensable in fishing. Hiking enthusiasts will prefer to attach a mini keychain containing small but useful accessories for a hike. If you wish, you can even find a small compass and attach it to the product using tape or through special holes for fastenings.
Decorative
Various decorative ornaments are often beads, skulls and other things that can be purchased, for example, in online stores. You can even attach accessories for jewelry to the bracelet; the main thing is to make sure that it matches the product itself, the style of the person who will wear it, and also does not create inconvenience while wearing it.
Patterns and nuances of weaving
Scheme for weaving a paracord bracelet
Usually, up to several meters of paracord are required to create one product; the required length depends on the size and the chosen weaving option. On average, a length of 5 meters is sufficient. The minimum size of the sling is two meters. Before starting weaving, it is important to understand that for every ten centimeters of a bracelet there is 1 - 2 m of rope, the length depends on the chosen weaving method. There are many options for making bracelets of varying complexity. Often they additionally display little things useful for survival in the wild, as well as simply various decorative elements.
Before starting weaving, it is important to measure the circumference of your wrist. For the simplest option, the appropriate length is when the volume of the wrist is equal to the volume of the bracelet. For thick bracelets, you should add a few more centimeters depending on the expected thickness of the future accessory. Sometimes it is worth leaving a little extra length for the fastener.
Traditional bracelet
Here we are talking about a bracelet made by the simplest weaving method, which even beginners can do, since no special skills are required. To weave according to this pattern, you will need a parachute line of medium diameter, a carbine with flint, scissors, and a lighter.
Traditional paracord bracelet
The pattern for weaving a paracord bracelet with your own hands can be described as follows:
- The cord is folded in half and pulled through a notch in the carabiner. The two remaining ends of the rope are passed through the resulting loop, and then they are tied into a knot;
- The second part of the carabiner is attached to the ends;
- Then the ends are placed through the middle ropes, one end is drawn from top to bottom, and the other from bottom to top;
- In this way, the bracelet is woven to the required length, and then the ends are passed through special fastenings, the excess parts of the paracord are cut off with scissors and singed.
This technique is very simple and is suitable not only for making bracelets, but also for creating straps, bag handles and even bookmarks. For more complex and decorative products, other weaving options should be used.
Cobra bracelet
If you use Cobra weaving, the bracelet will be wider. The classic color scheme in this case uses two threads of contrasting colors. The weaving itself can be flat, wide or voluminous.
A simple Cobra weave looks like this:
- You need to take a cord approximately 3 m long, fold it in half, thread the ends of the cord into the clasp and secure them;
- The second part of the bracelet is folded onto the free ends, and then the required length of the bracelet is measured. To select the length, the following formula is used - the length of the wrist and two more fingers (indentation for double-sided knitting);
- The loose ends are thrown over the fastener, and the weaving is done around the middle lines;
- Then the left cord is taken and laid at an angle of ninety degrees, resulting in a loop on the left;
- The right end goes around the left, the element is pushed into the loop from top to bottom, and the resulting knot is tightened. Then the same actions are performed in the opposite direction.
When weaving, the main thing is to ensure that the loops are not too tight, but also not loose.
After one side is finished, the decoration is turned over and the inside is made. In this way, any number of layers can be produced until the desired thickness of the product is achieved. The remaining ends must be cut and singed.
King Cobra Bracelet
This type of weaving is somewhat more complex than a regular cobra. Here a ready-made bracelet, already made using the Cobra technique, will be braided. The weaving pattern looks like this:
- To make it, the sling is folded in half and pulled under the bracelet;
- The lower end is pulled into the resulting loop to the left of the bracelet so that the cord is above the bracelet, then the resulting knot is tightened;
- Now a loop is made on the right, the end of the cord is also threaded into it and tightened;
- These steps should be repeated until the end of the bracelet;
- Once complete, the ends are trimmed and singed.
The finished product will be thicker than the original bracelet. If desired, you can attach various decorative elements to it.
Snake paracord bracelet
Snake is one of the simplest weaving options, which looks aesthetically pleasing and is great for beginning bracelet makers.
For this method of weaving, you will need a cord for the warp and a cord for the braid. You need to find the middle of the braided cord and place it under the warp thread. Two threads folded in half make four verticals. The left end of the rope is wrapped over the top through the first and second threads, and the right end through the third and fourth, as well as over the left end.
Snake paracord bracelet
This weaving is then repeated. The threads of the bracelet are intertwined in the middle. The ends of the bracelet are brought together and braided with some kind of knot, or you can use a clasp. The end of the rope should be singed.
Watch strap
You can style your wristwatch as a survival bracelet. This master class will tell you how to weave such a thing.
Take a measurement from your wrist and attach the cord to the clip so that there is a length of 50 cm on one side and 1.5 m on the other.
Pass the ends of the cable through the back wall of the watch and secure it to the second part of the clamp with two turns. The length of the future strap is slightly larger than the size of your wrist. It should look like this.
The short tail is not involved in the work; weaving is done with the long end. Pull the working thread under the central sections and circle around the left one, going from above. The cable will be at the bottom. Now you need to pass it over the middle sections and circle the right cord from bottom to top. The principle of weaving is clearly visible in the photo instructions.
Related article: Crochet sweater (women's and men's): how to knit with diagrams and videos
When you reach the watch itself, insert the cord directly through its fastenings and continue to weave the second part of the strap according to the pattern.
Having reached the fastening, the working thread must be pulled through the outermost loop of the clamp and hidden inside the weave. After cutting, do not forget to melt it with a lighter so that it does not unravel.
A real man's watch is ready. At any moment they can turn back into a rope.