Paracord weaving includes many techniques for creating multifunctional accessories. Merchandise stores for real men are replete with a variety of paracord bracelets, differing in style, thickness, final cable length, and additional elements. However, the most durable product can be considered a hand-made product, since its owner can be one hundred percent sure of its strength and reliability. Next, we will look at how to make a high-quality survivalist bracelet or lanyard with your own hands, as well as what tools are recommended to use for weaving paracord.
Paracord weaving
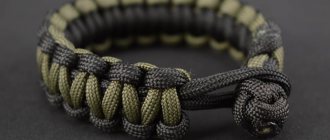
Paracord is a durable synthetic material (Figure 1), has a wide range of applications and high load-bearing capacity. Weaving from paracord became popular thanks to American paratroopers, who cut the cables from used parachutes for survival purposes. From such a cable it is easy to make a snare for catching small game and insurance for moving in the rocks, apply a splint and stop the bleeding, secure the sail cloth on a raft and yacht, or tent awning, insert into boots instead of laces, and even sew up a wound if unraveled into a thinner cord. Methods of operation vary solely from the situation and resourcefulness of the owner.
Figure 1. This is what paracord looks like
Since in critical conditions it is not always possible to remove the backpack to get a skein of lace, the most convenient method of wearing is an easily unfastened bracelet attached to the wrist. Having such a product on your body, you can quickly react and get out of even the most difficult situation without wasting time. A paracord bracelet is woven using simple patterns involving one or more cables. The patterns came to us from macrame and consist of knitting loops and weaving cord. The advantage of use is versatility and durability. Synthetic fibers do not rot, do not become covered with fungus or rust, are slightly dirty, burn relatively poorly, and moisture disappears from them almost instantly.
Unusual keychain
This accessory is perfect for lovers of extreme recreation. It is made with a “cobra” pattern. To complete the keychain, take:
- Paracord;
- Scissors;
- Matches;
- Carbine.
Fold the cord in half. The inner section in the form of a loop should be left the size you want to get the keychain. Weave a starting knot following the pattern.
Braid the middle section, leaving a small loop for attaching a carabiner. Turn the product over and braid it with the second row, following the instructions. You can decorate your work with a small metal accessory. As a rule, they have several eyes for fastening, through which you need to pass the cord and pull the decoration to the weave.
To complete the work, the free ends of the cord are tightened and melted with a lighter.
The stylish keychain is ready!
It also has another purpose. The fact is that previously such ropes were attached to the handle of bladed weapons. This thing is called a lanyard. It helped to easily handle the weapon and not lose it in battle. In addition, the hunters made a braid on the handle of the bladed weapon itself. In case of an emergency, this weave could also be used as a survival bracelet. A rope is simply necessary in the forest; you can use it to hang things out to dry, make a shelter or hut, set a snare for small animals, and use it as a tourniquet when injured.
Related article: How to make an origami module: a swan according to a diagram with video quickly and easily
How to choose paracord
Before weaving a paracord bracelet, you need to choose the right cord. If you get to know paracord more closely, it is a type of nylon, considered one of the strongest synthetic materials.
The structure of the lace is divided into:
- Internal base (Figure 2). It is woven from several thin and strong cords (up to approximately 1 millimeter in diameter each), which can be quickly pulled out, unbraided and used for sewing, as a fishing line for a fishing rod, a bow string, a base for a snare and other purposes. The base is located under the outer covering and serves to enhance the load-carrying capacity;
- External covering. It is woven from many ultra-thin threads into a single tube-shaped fabric. It bears the main load. After pulling out the core, such a rope will be able to lift significantly less weight. However, the load capacity will never drop by more than half, because a rope of medium thickness without a core can support two people of normosthenic build.
Figure 2. 550 paracord (left), 750 paracord (middle), and inner rope view (right)
The maximum rope capacity varies depending on the overall thickness.
The average cable can withstand more than 250 kilograms and weigh up to 100 grams.
This criterion is used to select the best material.
The following options are available on the market:
- Paracord 100: 1.6 millimeters, 45 kilograms, 1 rope in the core;
- Paracord 425: 3 millimeters, 181 kilograms, 4–7 ropes in the core;
- Paracord 550: 4 millimeters, 249 kilograms, 7–9 ropes in the core;
- Paracord 750: 4 millimeters, 340 kilograms, 11 ropes in the core.
When calculating thickness, it is necessary to remember the errors that are allowed by each manufacturer. With the same diameter, the load capacity may drop to 10–20 kilograms, and the number of middle cords will differ from the parameters stated above. It is for this reason that it is recommended to order cords from trusted suppliers (Figure 3). American and German suppliers are considered the leaders. They clearly indicate all the features of the lace, unlike their Chinese counterparts. Chinese ones often withstand 2 times less weight than originally stated. If your life depends on the quality of the cable, treat your purchase with the utmost responsibility.
The following tips will help you determine that what you are looking at is not a fake:
- The skein should be soft and elastic, smooth;
- When lit, it smokes strongly black and smells like plastic, but the outer shell burns many times faster than the core.
Figure 3. Comparison of different paracord manufacturers
Weaving pattern and process
There are a large number of different nodes and ways of winding the blade. One of the simplest and most popular methods is criss-cross winding. It is performed as follows:
- Place the handle in the middle of the paracord. Cut a long piece of cord and place it on your work surface. Place the handle in the middle of this rope. The length of the cut paracord should be four to five times the length of the handle. At the end of the winding, you can cut off the excess.
- Fold the left end up. Wrap it around the top of the handle and pass it under the right one, pointing it down away from the blade. Both edges should form a loop across the handle. The intersection of this loop should be on the right side.
- Pass the right edge of the cord through the loop. Take the second ending (the one you haven't used until now) and pull it through the loop from the back. Bring it out from the left side. It is necessary to stretch this edge from the back of the loop (the one that is under the handle) through its base, extending it through its top. This step will secure the loop in place. Pull both ends of the paracord firmly to get a firm grip on the handle. After this step, the right and left edges of the paracord will switch places.
- Fold the right end up. Grasp it and fold it over the handle below where you created the previous loop. Pass the right edge under the left, pulling it under and out at the top. As before, you will end up with a loose loop. This time the intersection point should be on the left side.
- Place the left edge behind the handle. Take it and pass it under the handle of the knife.
- Thread the end through the loop. Take the end you manipulated in the previous step and pass it through the loop on the right side of the handle. It is necessary to insert the edge of the loop from bottom to top. Pull the paracord tightly, securing it in place. At the end of this, the cords will again change places.
- Each time, mirror the previous actions performed on the other side of the handle. After tightening the loop on the left, repeat the steps exactly, but this time on the right.
- Repeat until you have wrapped the entire handle. Continue making criss-cross stitches along the handle of the knife, keeping them as close as possible to it and to each other, until you reach the edge.
- Thread the ends through the hole. Pass both ends of the cord through the hole on the edge of the knife handle. In the latter case, to secure the winding, tie the edges with a knot on the side of the hole.
- Tie an end knot. Tie both ends of the paracord into a strong knot. The resulting loop can be worn around the wrist.
After completing this step, the winding is completed.
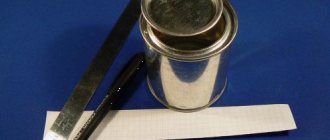
Paracord Weaving Tools
Once the material is selected, it is not enough to download the diagram and start weaving the accessory. The guarantee of quality will be tools for weaving paracord. They will help create symmetrical and even loops, and will also significantly speed up the overall process. Thanks to this, in the period of time it took to create one product completely by hand, you can make two or even three. Since survivalist bracelets require high quality and maximum efficiency at all stages of creation, it is recommended to purchase accessories.
Accessories for weaving paracord (Figure 4):
- Specialized needles. If they are not available, you can use needles for leather laces, since they have a similar design. The tip of such a needle is sharp, and at the other end, instead of the usual eye, there is a recess with an ordinary thread. To insert a paracord thread, you need to melt it and screw it into the recess while still warm. When it cools down, it will be securely fixed. Once all operations are completed, the tip is unscrewed as the cooled synthetic fibers take the form of a thread. The use of needles opens up a wide range of new knots and unusual style combinations;
- Paracord weaving machine. Most of the schemes involve creation “on the knee”, therefore the mention that there are reliable and cheap specialized stands with clamps is rare, and only professionals know about their existence. The design of the machines includes frames for fasteners of different sizes, a measuring ruler, adjustable to the required length. One of the main advantages will be not only accuracy, but also the ability to uniformly adjust the tension.
Figure 4. An example of a machine and needles for weaving paracord
Patterns for weaving a paracord bracelet
Paracord weaving patterns vary in style, level of complexity and amount of lace used. Most users do not succeed in quickly unraveling bracelets the first time, so it is recommended to practice on shoe laces or ropes so as not to damage the cord. After the training product unravels in an instant, you can move on to the main material.
The most popular methods of weaving paracord include the classic one. You can begin the process without prior preparation. Unlike other schemes, in this case weaving knots with paracord does not involve. To create, you will need a two-meter cable of medium diameter, a fastener (plastic or a specialized carbine with flint), cauterization matches and scissors or a sharp blade for needlework.
Classic weaving pattern:
- The rope should be folded in half and inserted into the recess of the carabiner. The free edges are drawn into the resulting loop and a knot is tied;
- The second half of the fastener is attached to the ends. The accessory is tried on directly on the wrist to determine the approximate length. If the loose slings are too long, it is not necessary to cut them, since the loops can be made wider;
- To tie the loops, alternately loop each end through the two secured middle slings. The edge is wound from the bottom up in one direction and from the top down in the other. The classic style is similar to the braid hairstyle;
- To secure, the ends are passed through the fastener again, cut with sharp scissors and a blade, and lightly melted with fire.
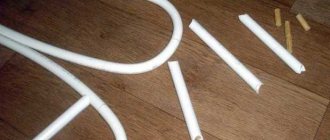
Cobra. Weaving a cobra from paracord requires some preparation and is more complex in terms of execution.
Figure 5. Weaving pattern of the “Cobra” bracelet
Cobra weaving pattern (Figure 5):
- Fold a three-meter paracord rope in half, thread it through the fastener and secure it, as in the instructions for the classic scheme;
- Place the second part of the fastener on the free ends and measure the distance using the following formula: “comfortable length for wearing + two fingers.” An indent of two fingers is necessary for double-sided knitting;
- Throw the loose ends through the clasp. Further knitting of loops will take place around the fixed middle lines;
- Take the left line and place it at a 90 degree angle on the middle lines. A loop will appear on the left, and both ends will point to the right;
- Take the right tip and bend it around the left cord, inserting it from top to bottom into the loop on the left. After the slings point in different directions, they should be pulled until the knot is tightened;
- After this, the process is repeated in the opposite direction. The directions change alternately;
- Be careful that the loops are not too loose or too tight. Once one side is completed, flip the accessory over and start weaving from the inside. There can be many layers, and they are created until the material runs out. Then the extra centimeters are cut off and cauterized.
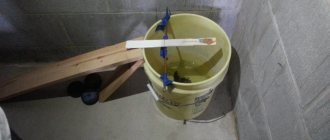
King Cobra. A wide weave of paracord up to the middle is performed using the Cobra algorithm, then supplemented with a cable of a different color.
Figure 6. “King Cobra”
King Cobra weaving pattern (Figure 6):
- The cord is folded in half and placed under the unfolded bracelet with a loop on the right and free ends on the left. The lower tip is released and thrown over the accessory perpendicularly;
- The upper left tip is passed along the front side of the product, its edge is pushed from top to bottom into the right loop. Ultimately, the ends point in different directions and need to be pulled, thereby tightening the knot;
- The action is performed in the reverse order, then vice versa and is carried out until the new cord completely covers the surface of the finished accessory;
- The ends are cauterized and inserted into the clasp.
The technique of weaving paracord King Cobra is very popular among travelers, because after unraveling the bracelet, you get not one, but two ropes.
Centipede pattern
A distinctive feature of this bracelet is that it consists of 5 meters of cable and can unravel in a few seconds.
Article on the topic: Openwork stoles with knitting needles: diagrams and description with photos
To make such a decoration we will need a carbine fastener and paracord. The length will depend on your wrist size.
To begin, the paracode needs to be folded in half and attached to the top clasp by the middle. Next, hook the paracord to the bottom fastener and return to the top one again.
We attach our paracord to the top fastener. This action can be done in two ways. The first option: fasten it when the cable is attached to the fastener. As a result, it should anchor in four places. The second option is to fasten with the paracord going through the fastening loop that was created in the beginning. In this method, the fastener is attached in two places. The second method is easier and more convenient, so we will use it.
To begin weaving the base of the bracelet with threads, you should create a securing knot. After this, you can begin braiding. The bracelet diagram is shown in the picture below:
When the securing knot is tightened, you can begin braiding. It consists of a knot that will be woven around the entire bracelet. Before braiding, place the right thread on top and the left thread on the bottom. The threads should be intertwined in a mirror pattern. Until the final weaving of the warp, repeat step No. 4, which is shown in the photo below. To avoid unevenness, it is worth making sure that the knots are tightly and securely tightened.
After braiding the base, it is better to use special knitting needles for paracord to continue. They will make it easier to work on the bracelet and tighten it.
Once we have the base of the bracelet ready, we need to thread the right paracord cord between the braid and the clasp to secure the ends. Pass both threads under two or three center stitches and tighten. To tighten and straighten the future bracelet at this stage, it is better to use pliers or other forceps. Cut off the ends of the cable. Melt the place of circumcision. The bracelet is ready!
Article on the topic: DIY beaded flowers: diagrams of trees and flowers with a master class, photos and videos
Weaving a whip from paracord
Weaving a whip from paracord will be an excellent replacement for leather analogues and is carried out according to a standard algorithm for arapnik manufacturers.
Figure 7. Whip with paracord core
There are two types of creating arapnik:
- With core (Figure 7). To make the core, several paracord cables are taken and wrapped with thick black electrical tape. Then new cords are fixed on top of the core and wound with electrical tape, from the free ends of which the weave will be carried out;
- Regular without core. The accessory turns out to be much lighter and softer than the previous version, but the impact force is weaker.
In both cases, paracord weaving in a snake pattern is most often used.