Looking for snow
Work on an igloo begins with the preparation of wall material, and this requires a fairly thick layer of snow. Since the optimal dimensions for a block are considered to be 600 × 450 × 200 mm, the thickness of the snow at the excavation site theoretically cannot be less than 20 cm, but in practice one should look for a “quarry” of snow pie at least half a meter deep.
We make all the necessary measurements using a special probe, which can be purchased in a store or from a pre-marked metal rod.
LiveInternetLiveInternet
Alexander Berman. "Among the Elements"
Berman A.E. Among the elements - M.: Physical culture and sport, 1983. - 240 pp., ill.
(Extraordinary Journeys). OCR: Mikhail Khmelnik Now I’m reading this book and then I came across an interesting fact about building an igloo. Not just the theory of construction, but practice and testing in the field. Quite an interesting shelter for survival in severe frost :))
I read: “From the book I already knew then about the snow huts of the Greenlandic Eskimos - the so-called igloos. About round houses made of snow-white blocks, cut with a knife from dense wind crust. The first of the travelers to master this Eskimo science was Vilhjalmur Stefansson . Back in 1907, he wrote an article about how the Eskimos build a hut, and he himself built it only in 1914, when in good weather he was stopped on the ice of the sea by an open ice hole. For seven years, Stefansson had no time to study: he had to hurry forward.
We, too, constantly hurried forward on our sporting excursions. One autumn, on the Kuznetsky Bridge, leaving the Technical Library, I ran into Boris Smirnov. We got to talking, once again cursed the hectic city life, and at the same time the slushy autumn, then we remembered winter and suddenly found out that we were both passionate about the idea of snow huts. And finally, we decided that we would specially go to the Kola region in order to master this Eskimo science. Having found three more accomplices, we soon set off for Monchegorsk.
We built our first hut on Mount Nitis, near the city. And the next day we packed our backpacks and went to the mountains, and after a day of travel, under the pass, we built a snow house during a snowstorm. A year later I came to Kola again. Together with the mountaineer Cherenkov, we trained the mountain rescue teams of the Murmansk region in special equipment. The program also included the construction of huts. The technology for building the hut was divided into fourteen simple operations and explained in detail to the rescuers. The success exceeded expectations. Rescuers built two large huts in two hours.
When the gathering of rescuers ended, my wife and I climbed the Chuna-Tundra ridge. It was a cold, windy night. We deliberately did not take a shovel with us, counting on a snowy house. Olya cut out the bricks, and I carried them and immediately laid them. We built a small igloo in an hour and a half. It was quite spacious inside: two air mattresses fit. The two stoves made it hot, so I had to cut a window. We had a transparent drawing triangle, and we covered the window with it when we put out the primus stoves. By morning the water in the pot had not frozen, although the frost outside had reached twenty-five degrees. During the day, Olya and I calmly walked along the ridge, and no snowstorm was scary for us: we had long snow knives hanging on our belts.
What is an igloo? At that time, when civilization had not yet reached the Eskimo possessions, many tribes did not know a winter home other than an igloo, and were completely satisfied with it both as permanent housing and for overnight stays on the road. An igloo is a dome made of snow bricks. How did vaulted domes appear in the Arctic? Did they migrate from the south or were they independently discovered by the talent of the Eskimos? Be that as it may, the idea of a snow block vault is great!
To build a dome out of stone is long and hard work, but on the way they build a house for one night out of snow. The snow is light: a “brick” measuring 90x60x20 centimeters is lifted by one person. A building block made of snow is easily cut with a knife and strengthened in the wall of the structure. Danish traveler-ethnographer Knud Rasmussen writes that an Eskimo alone, in three quarters of an hour, builds a spacious snow hut for his entire family (apparently for 3-4 people). Rasmussen talks about snow villages with covered passages between buildings, about entire architectural ensembles erected by the Eskimos with amazing speed, about large hut-houses. Here is one of his descriptions: “The main housing... could easily accommodate twenty people for the night. This part of the snow house turned into a high portal like a “hall”, where people cleared the snow off themselves. Adjacent to the main dwelling was... a bright extension where two families lived.”
Usually in a tent, moisture from breathing and cooking accumulates and saturates clothing and sleeping bags. The snowy roof of the hut absorbs moisture like blotting paper; even if the hut is heated too much (for example, by an iron stove), the hut is dry. It would seem that a hut with room temperature inside should quickly melt, but this is not the case. Melting requires excess heat in the snow layer. The snow near the inner surface of the vault, having a temperature of 0 degrees , in contact with warm air, does not melt, because it is cooled outside the hut, through the thickness of the snow walls. Let's say cooling is slower than heating. Then the inner layer of snow melts, but the wall, when wet, “passes the cold” from the outside more easily (that is, it removes heat from the inside faster), and the melting slows down or stops altogether. This way the snow dome automatically resists melting when heated from the inside. Of course, in light frost and no wind, a hut heated to room temperature will melt, but strong frost or wind, having tormented the skier on the way during the day, will guard the walls of his hotly heated snow house at night. In general, the thermal conductivity of a snow dome is low, and it is easy to maintain a positive temperature in the hut; often the heat generated by sleeping people is sufficient for this.
But these are not all the advantages of a snow house in the tundra. It provides security to travelers. In the treeless area, it is risky for a group of skiers to separate even for a short time, because a shared tent is the only hope for salvation in a snowstorm. If you have a snow knife with you and know how to build a hut, then you can consider yourself safe even in a critical situation, when you get separated from the group or get lost. It takes longer to build a hut than to put up a tent with a wall . But in the morning, when you roll up the frozen tent and place it in your backpack, it requires up to half an hour of tedious work in the frosty wind. When you pack your backpacks outside the shelter in bad weather, you begin to understand that a snow hut saves not only time, but also energy and nerves. Having packed all your things in the warmth of the hut and cut out a large exit, you can leave it directly on skis with a backpack on your back.
To build a hut, three large knives with a total weight of less than 1 kilogram . The strongest snowstorm is inaudible in the hut. The snow bricks grow together just as tightly as on a windproof wall, but in addition, the hut is still frozen from heating up inside. The three of us calmly climbed onto the roof of our snowy house. The igloos are said to have supported polar bears.
The first description of his experience in building a hut was given by V. Stefansson . He said that it was very simple, “although in the vast polar literature the construction of snow huts is depicted as something incomprehensible to whites, accessible only to the national talent of the Eskimos.” Stefansson quotes Shackleton as saying: “There are no Eskimos in Antarctica that we could hire, as Peary did, to build snow houses for us.” In Antarctica, Robert Scott hoped that with the invention of the double tent, “the urgent need for solving the problem of building snow huts will disappear, although we will continue to work in this direction.” And a little later he writes about a winter expedition in conditions of sixty-degree frosts: “Never before has a person from the civilized world been in such conditions, having a canvas tent as his only protection.”
He goes on to say that although Amundsen experienced a temperature of 62 degrees during the expedition to the North Magnetic Pole, “it must be remembered that he had Eskimos with him, who built him a snow house every night.” Stefansson: “...it seems curious that until recently this art was considered incomprehensible.” Obviously, the difficulties of mastering huts are objective in the conditions of a polar expedition: a continuous rush forward, extreme moral tension - it is not easy to experiment in such an environment. But, having built the igloo once, Stefansson already constantly used them for overnight stays in winter conditions. An ordinary kitchen knife 30-35 centimeters long is convenient for cutting snow. You can cut slabs with a light hacksaw, but when adjusting slabs in a building, it is inconvenient: when sawing, the joints become loose. Medium density snow is selected for construction. It is easily cut with a thin knife, but is only slightly pressed under a person’s foot. Usually this is either fresh blizzard snow, or, conversely, very old, partially recrystallized.
If the density of snow on the site does not meet your requirements, you should look for suitable snow near large stones, slope bends, sastrugi and other irregularities. Note that areas of snow with different densities usually occur where the wind flow is not uniform. The snow “quarry” is laid in the form of a hole measuring 100x100 centimeters and 40 centimeters deep. Standing in a hole, they cut out slabs from its edges. Moreover, one large face of them is the surface of the snow cover. The pit is gradually extended into a trench 3-5 meters long. Now the slabs are removed along the long side of the trench, and each slab only has to be cut on two sides. Typically, the slab comes off easily when kicked along the intended bottom edge. Sometimes, under the top layer of dense wind crust there is very loose recrystallized and partially evaporated snow (almost voids). In this case, it is better to press down on the cut slab from above. The first row of slabs is installed outside along the outlined circle and cut in a spiral. Then a new slab is laid on the resulting step, followed by the next one, and so on. Already the first row of slabs is placed obliquely. For a hut with a diameter of 2.2 meters (training hut) - at an angle of 25 degrees to the vertical. Up to a height of one meter, the shape of such a small hut is close to a cone (with a slight convexity to prevent concavity). Further, the slope increases so that by the height of the wall of 1.6 meters the steepness reaches 45 degrees, and the diameter of the non-pointed opening of the hut is equal to half a meter. This hole is closed by a polygonal slab closing the building. One of its corners must rest on the last brick of the wall. All vertical joints must be covered with slabs of the upper rows. The larger the hut, the more experience the builders need to build it. Our hiking groups managed to build an igloo for their overnight stay in 1 hour (for 6-8 people). It happened more than once to build a hut under a snowstorm.
In the first row, strive to install slabs as large as possible - approximately 100x60x20 centimeters. The slabs should rest on each other only near the inner surface of the hut, that is, the cracks along the thickness of the walls should open outward. Only this position of the plates ensures the stability of the dome. Snow slabs must absorb lateral pressure with their strongest part. Usually this is a layer of slab formed by the surface of the wind crust (top edge) from which the slab is cut, and during construction, all slabs should be oriented inside the hut with this particular face. When installed on a wall, each successive slab should rest on adjacent slabs with only three of its corners: on the lower slabs - with two lower corners and on the previous slab - with one upper corner (more precisely, by sections of the edges near the corners). The lower corners of adjacent slabs should never touch. A slab, correctly installed on the “three points of support”, even in the upper, strongly inclined rows, holds on its own and does not require any support, despite the fact that the next slab has not yet been installed. But all three support points of the slab must be sufficiently distant from each other, for which they are placed at the corners of the slabs. It should be taken into account that a slab that is too short or narrow will not hold up in a sloping wall. Overlapping vertical joints in a checkerboard pattern leads to shortening of the slabs in the upper rows. To avoid this, two or three slabs need to cover two joints at once. In the last, closing turn of the spiral, it is possible to overlap three joints with one slab.
By the way, the hut must be folded in a spiral if one person is building it. If there are helpers (assistant), then the hut can be built from ring belts. In this case, all the bricks in each belt will be the same size, which is convenient for cutting out slabs directly in the quarry. Build your first training huts specifically with cracks. This ensures they are installed correctly. When building on the wall, supply rectangular slabs and adjust them to the location. After erecting the dome, all cracks must be covered with a thick layer of snow. Cover the vertical joints with loose snow, but in order to cover the horizontal cracks, cut off the sections of the slabs protruding above them.
The final installation of each slab is done in one go. You cannot move the plate back and forth, as it will wear out. Placed at an angle and slightly protruding outside the hut, it is moved towards the already installed slab and, with a turn around the supporting angle from above, is tightly driven into place. The newly obtained vertical joint is moved somewhat inside the hut (by lightly tapping the palm), while the inner surface of the hut is leveled and the joint is compacted even more. The free lower corner of the slab remains slightly shifted outside the hut in order to move it inside during the final installation of the next slab. The Eskimos, judging by the descriptions, with amazing speed cut out the slabs of the required complex curvilinear shape and with such precision that the construction was completed almost without cracks. We are far from this art, but to speed up construction, before placing the slab on the wall, one small side face was cut off, thus giving the large face a trapezoidal shape. Try to arrange the entrance to the igloo below floor level.
It is better to place a large hut on a slope. Then it will be easier to make a good entry. But for a small hut, the easiest way is to cut a round entrance in the wall and cover it tightly with snow bricks. It is easy to make a snow bed in the hut, cover it with bedding or air mattresses, and sit with your legs dangling. The kitchen is conveniently located in a snow niche, below the sleeping level. You can build shelves on the walls for small items and lamps. You can cut a double window made of any transparent material into the wall, but even without that, the morning sun penetrates through the snowy walls with a soft light of different shades. At night, one candle lit in the hut brightly illuminates the snow-white vault, and this light breaks through the thinner layer of snow at the joints of the bricks.
In the frosty darkness of the night, the hut glows with a web of blurry lines.
“A temple of festive joy among the snowdrifts of the snowy desert,” Rasmussen said about the igloo.
First row
Before we start laying the first row, we make markings. To do this, we hammer in a kingpin in the center of the area we have compacted and tie a piece of cord or clothesline to it, on which we set a distance of 1.05 m. We mark the latter with a knot.
Now, using this “compass”, we draw a circle on the site with a diameter of 2100 mm - this will be the outer boundary of the snow wall.
On the inside of the circle, strictly along its perimeter, we build a snow wall exactly one block high. All bricks in the masonry should be heaped inward at approximately 17°; more precisely, we control the angle of inclination using our measuring rope. Since the igloo has the shape of a regular hemisphere, the measured 1.05 m will not only be the radius of the Eskimo dwelling, but also the distance from the center of the site to any point on the snowy facade.
When the perimeter is laid out and the blocks are fitted to each other from the formed snow ring, you need to cut out the screw with a hacksaw.
It is this spiral shape of the first row that is the main secret of the northern builders, which Europeans have been unraveling for centuries. Laying along serpentine lines is the only option to get a third support point for the “brick” and not fall.
Thus, each block rests not only on the row below it, but also on the side edge behind the standing wall element.
Eskimo snow house or snow igloo
Harsh natural conditions forced the inhabitants of the north to build shelters for themselves. The building material that allowed the Eskimos to build a home was snow. Possessing amazing properties, it protected people from wind and low temperatures. And if you have a candle with you and light it inside, you can easily warm yourself up in such a home. In addition, snow can transmit light and water vapor. What is surprising is that when a candle or lamp burns, the walls of such a dwelling melt, but do not melt. An Eskimo house may also consist of separate ice huts connected by passages.
There are basic rules that you need to know in order to make an igloo out of snow :
- you can dig with a knife, saw, bowl and shovel;
- do not make the shelter large (the smaller, the warmer);
- the cracks are covered with snow;
- try not to sweat (remove excess clothing);
- When constructing an igloo from snow, it is necessary to use a bedding made of waterproof material.
If you try and find a huge snowdrift, you can build an entire Eskimo house in it. It looks like a cave. The entrance can be dug into the wall lower and a small corridor can be added to strengthen the structure. The diameter at the base can be 3 or 4 meters. The low construction of the entrance to the igloo is due to the fact that the warm air rising to the top does not evaporate. The heavier carbon dioxide sinks down and comes out. Lighting shines directly through the walls. You can make a window using ice instead of glass. Inside, make flooring from skins on the floor and on the walls too. Now the real Eskimo house is ready. You can light a candle or fat lamp inside.
Further masonry. Keystone
Important! Since the mason is inside a closed loop, a helper is needed for further work. It is he who must supply the snow blocks.
There is nothing complicated about the spiral masonry itself; you just need to follow a few basic points.
Tilt angle
We control the angle of inclination as before using a piece of rope tied to the king pin. Only such a measure will allow us to build the right dome.
End trimming
For denser masonry, we cut the ends of the snow bricks at one angle.
The direction of the cut of the right edge of the block is set by the already familiar lacing.
We file down the left end, focusing on the already finished cut of the previous element. Sawing is done with an ordinary saw.
Keystone
The keystone is more difficult to trim. You need to work from the inside, focusing only on the finished working planes of already laid blocks.
Digging the exit
After finishing the masonry work, you can think about the door. This is the tunnel under the wall of our snowy hut (that’s why we needed deep snow on the construction site); it is this design of the entrance that ensures the free flow of oxygen into the room, but prevents warm air from escaping from the hut.
From the street, the “undermining” is decorated with snow blocks, making from the latter a kind of short snow pipe.
Video: how to build an igloo with your own hands
Ice igloo technologies: - 40° outside and + 20° inside
Looking at small houses created from cubes of ice or snow, most of us wonder: “How can you live in such a strange house in harsh conditions?” But the northern peoples know that there is nothing more reliable than ice igloos, and if they are built correctly, then at a temperature of - 40° outside, it will be + 20° indoors! Our further story will tell you what needs to be done to live in comfortable conditions in an extreme climate zone.
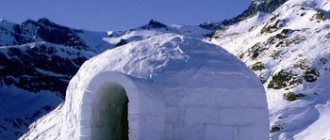
An igloo is a traditional winter home for the Eskimos. | Photo: ru.depositphotos.com/politeka.net.
Looking at small hemispheres created from snow or ice, it is difficult for an ordinary person living in temperate or subtropical zones to even imagine how a person can exist in such conditions. But not everything is as incomprehensible as it seems at first glance; it is enough to understand construction technology and know some laws of physics, and it will immediately become clear why an igloo is considered the most reliable winter shelter among all northern peoples.
Recently, igloo hotels have become very popular. | Photo: funon.cc.
Information from the editors of Novate.Ru: An igloo is a dome-shaped structure created from ice blocks, compacted snow, or cut from a snowdrift of suitable density and size. Such a structure is a traditional place of residence for indigenous peoples living on the polar coast of North America from Greenland to Nunavut and in the northeastern part of Chukotka. These people belong to the Arctic race; the more common name for the nationality is Eskimos.
The smaller the igloo, the warmer and more comfortable it will be inside. | Photo: vesti.ru.
Since ancient times, people have known that the smaller the room, the warmer it will be inside. It is this knowledge that the Eskimos make full use of when creating ice or snow houses, which is why no one makes huge domes. The most optimal sizes for building an igloo for one person to live in are hemispheres with a diameter of 2.7 m. But for a family of 3 people, a building diameter of 3.4 m will be sufficient. As a rule, the height of any of these buildings does not exceed 2 m.
The fastest way to get a home is to make an igloo in a large snowdrift. | Photo: nepropadu.ru/ drive2.ru.
Considering that it is very difficult to cut squares of the desired shape from ice, wind-compacted or well-packed snow is most often used, which, after construction is completed, is watered from the outside with water in order to strengthen and “insulate” the structure as much as possible. But the simplest way to build housing is considered to be when excess snow is removed from a deep snowdrift, the walls are compacted and the exit is strengthened. Moreover, the entrance hole (it cannot be called a traditional entrance!) is always made below floor level.
This strange arrangement is explained by physical laws that help maintain a comfortable temperature in a snow house and ensure proper air ventilation. In the case when the snowdrift does not have sufficient depth, they break through the wall at the lowest point and, separately, with the help of snow bricks, make a kind of sleeve-corridor through which you can... crawl into your house.
The entrance to the igloo will always be below floor level. | Photo: expo-capital.rf.
Note: The location of the entrance “door” in the form of a hole of the required diameter below the floor level is mandatory when creating an igloo from any “building” material, so you can only get inside by crawling.
An ordinary person cannot build an igloo on his own; Eskimos learn this skill all their lives. | Photo: dead-v-life.ru/bolshoyvopros.ru.
Assembling an Eskimo house from “bricks” made from snow and ice is a more complex and time-consuming process. Thanks to the Canadian polar explorer, ethnographer and writer Vilhjalmur Stefansson, the first non-Eskimo to build an igloo with his own hands in 1914, now we can learn all the secrets of the reliability of the Eskimos’ winter shelter.
To keep the igloo warm, you need to know all the technological subtleties of creation. | Photo: turpohod.org/pikabu.ru.