How to build a hut on a tree with your own hands?
Clear the area for building the house, remove debris and large weeds and thorns. Choose the right tree. When choosing a tree, rely on its stability and branching.
- Build a platform.
- Install additional supports, placing them on adjacent sides of the trunk
- Install a rectangular frame, which in the future will be the floor for the treehouse.
- Make a roof from branches with the largest number of leaves and lay the branches fastened together on beams prepared in advance for this.
- Arrange the entrance to the treehouse - it can be a ladder, wooden or rope.
- You can put hay or an armful of leaves down to soften the blow when falling from the stairs.
How to make a hut from branches?
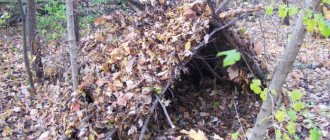
- To build a hut, you first need to choose the right place, for example, a group of fallen trees, the south side of a hill, the inverted roots of large old trees.
- To build a hut in the forest without tools, you need to make a base - a hole or a small depression in the ground.
- After this, apply a frame of branches, preferably coniferous ones, but if there are none, then any will do.
- On top of the branches, you can put a large piece of cloth, film, oilcloth, and pour snow on them. This will create reliable protection from the cold.
- The next step in construction is the interior of the hut. To soften and warm the day of your home, you need to lay down spruce branches, dry grass, or hay.
- At night, the entrance to the hut must be covered with branches or hay to keep warm. Despite the fact that the hut is made of snow, it will be even warmer than in a wooden shelter.
What is needed to build a hut
A hut can be built from different materials, depending on the area. Usually this:
- branches and sticks;
- spruce branches;
- straw;
- leaves;
- tree bark;
- plant stems;
- earth and clay;
- snow.
You can use “artificial” materials that you brought with you or found in the forest. At a minimum, it will be helpful to bring plastic sheeting in case of rain and some thin rope to secure the joints of the structure.
How to build a hut without tools?
To build a hut without tools, available materials in the form of dry branches, leaves and trees will be useful. For support, the easiest way is to take a tree fallen at an angle, but before construction, make sure that the tree is reliable so that it does not fall later under the weight of the load. Cover the top with branches of coniferous trees or alder, if nothing happens, with any other branches.
We recommend reading:
How to choose equipment for a winter hike
Another option for building a lean-to hut with your own hands in the forest without tools (when only one part of the hut is closed) is possible by using a pole consisting of a strong long branch, which is inserted into the gap between the branches of two neighboring trees. After this, as in the previous version, large branches are placed on one side, and everything is sprinkled with leaves on top.
Hut
Types of huts and choice of location
Depending on the needs and available resources, different types of shelters are built. Usually huts are built on a flat surface, but they can also rest on a tree - in this case, make sure that it is alive and healthy, otherwise its dead branches may fall on your head. The support can be a mountain slope, but this option is associated with the risk of landslides.
Important: When choosing a location, avoid dry river beds, especially in the mountains, as in the event of a rainstorm, a powerful rushing stream of water can appear, which can cause serious injuries and even death. Even a dry stream can cause a lot of problems if it rains.
You should not install a shelter close to the shore of an unfamiliar river or lake, as the water level can change rapidly and flood you. In addition, many insects live near water, including those dangerous to health. Build your hut as far as possible from open sources of water. It is better to choose hills rather than lowlands.
How to build a hut from boards?
- First of all, you need to make a frame for the future hut from boards on the ground using two poles with spears at the ends.
- Now you can lay out the boards by burying one end of the board in the ground and attaching the other with nails to a horizontal pole. The result should be a figure similar to the roof of a house. The boards need to be laid as close to each other as possible, fastening them with slats.
- Next, we place one log on both sides inside the hut, and put boards on top, fastening them to the logs with nails.
- To decorate the front and back sides of the future house, we prepare triangular parts from tarpaulin, fabric, polyethylene and any other available material and attach them to the building. The hut is ready!
Construction of a hut at the dacha and in the village
The construction of a hut from boards in the country is not very different from the above method of building a hut on the ground. Also, first a frame is made, then the base or slopes are made using boards and logs, and to decorate the front side, triangle-shaped figures are cut out and attached to the building with nails , but there are some details.
So, when building a hut house, you should take care of its durability and versatility.
- It should protect from bad weather, heat and excessive sun; this can be done by finishing the inside of the house with a tarpaulin or plastic film, which will protect from rain, and in hot weather it can be removed and allowed to dry out.
- It is better to treat the boards with a special agent against parasites and destruction
- Anyone can build a hut at their dacha with their own hands, even if there are no boards or logs at hand; on your dacha plot you can build a hut from fabric and hoop.
- To make such a house, you will need a strong branch, to which a fabric-covered hoop of the required length is attached; several ropes are tied to the hoop and pulled in different directions, thereby expanding the space of the future hut.
- You can use dry grass, hay, leaves, branches as a roof, or leave it open.
tree house plans for kids callforthedream treehouse on stilts – Cementicreativi.com
Construction of a hut in the city
Building a hut in the city with your own hands is most often limited by space, time and materials.
- We create a blank for the future hut from cardboard, cutting out two rectangles of a size that would be suitable for the size of the future hut.
- After this, we attach the blanks to the plastic pipes along the edges, and connect them together to give stability to the structure
- We throw a suitable blanket on top and tie it to the pipes with ropes, and put pillows inside the hut.
Making a hut with your own hands is not so difficult, the main thing is to find all the necessary tools, but sometimes you can build a hut without using additional materials.
Author of the publication
offline 3 years
Nika
10
I am interested in hiking and traveling, photography and videography. I have been going hiking since childhood. The whole family went and went - sometimes to the sea, then to the river, to the lake, to the forest. There was a time when we spent a whole month in the forest. We lived in tents and cooked over fires. This is probably why I am still drawn to the forest and, in general, to nature. I travel regularly. About three trips a year for 10-15 days and many 2 and 3 day hikes.
Comments: 0Publications: 668Registration: 10/23/2018
Nika Survival in the wild, Articles, Shelter
How to build which one
Any construction requires certain preparatory work. The “zero cycle” of hut construction comes down to choosing a more or less level area, cutting off the bumps on it, clearing away debris and lining it with a drainage ditch if there is no suitable place on a hill. Next, each type of hut has its own characteristics.
2-slope
The only tool needed to build a double-slope hut is an ax, but a person experienced in nature can do without it, breaking dead wood between two trees, like using firewood for a fire without an axe. You will also need a knife, but this goes without saying; there is nothing to do in the forest without a knife. The main thing is that there is enough suitable wood material nearby.
The basis of the frame of a gable hut (item 1 in the figure) is a pair of load-bearing (supporting) pillars made of stakes with a height of 1.5-1.7 m with flyer forks at the upper (tapering) ends. Stakes are needed with a thickness of 7-8 cm, made of durable wood that has not been touched by rot. The pillars need to be buried in load-bearing soil (not in soft litter!) by at least 20-25 cm. Since the robbers of old times did not take a sledgehammer into the forest, and shovels may not be at hand, you can roughly hammer them into the points butt (lower) ends of the stakes and press them into the ground, slightly turning and rocking. After deepening, the soil around the stakes is trampled down.
Design and method of building a gable hut
When the pole stakes are securely installed, a ridge beam made of poles of the same thickness, but as even and smooth as possible, is inserted into their fliers. Then, not very strongly pressed into the ground, rafter beams are installed from thinner poles, from 5-6 cm, 1.5-2 times longer than the above-ground part of the pillars. The number of rafters is 2-3 per 1 m of hut depth. You need to leave more side flyers on the rafters, orienting them with the bends up when laying them. In the rafter fliers, sublattices are placed from the most even and smooth poles with a thickness of 3-4 cm, onto which the sheathing of spruce branches is hung (item 2). Sheathing made from other materials is applied as follows:
- straw sheaves are laid in rows, slightly shifted upwards, and fed downwards to be placed on the rafter flyers. Overlap – from 25-30 cm;
- reed sheaves are placed in a row immediately in place;
- layers of moss and bark are laid in strips from bottom to top, with an overlap of 10-15 cm. The layers of each row are secured by stringing them onto rafter flyers. For this purpose, holes are drilled in the bark with a knife;
- heaps of grass covering are thrown in bulk.
It is usually recommended to tie the ridge beam to the fliers of the posts, but a rope in the forest is also a very necessary thing, and you can’t carry it with coils on yourself. Therefore, the rafters are cut a little longer than necessary and with the topmost flyers oriented diametrically opposite to the rest. When installing the frame, the lower ends of the rafters are stuck into the ground, slightly bent with a bow, and the bends of the upper flyers are inserted under the ridge (highlighted in color and shown by an arrow in position 3). Under the weight of the sheathing, a double-pitched hut on such a frame will be quite stable in the wind. The construction is completed by covering the ridge with bark, moss, etc. (shown by arrows in position 4). How to build a gable hut without ropes, see also video tutorial:
Video: gable hut without nails and ropes
Execution options
The 2-slope hut has several modifications. One or the other is built depending on the conditions of the hike/stay in an area of a certain nature.
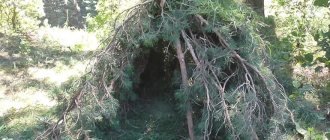
Spruce forests are usually dense forests, and a hut made of spruce branches can almost always be built between 2 trees instead of pillars, pos. 1 in Fig.:
Varieties of gable hut
If you take the poles from spruce too, and tie the frame with spruce roots, such a hut will last for many years. If you go to an area that is known to be sparsely wooded, then it is better to take with you a sheet of thin tent fabric or plastic film with a thickness of 150 microns (preferably 250 or more), and a roll of propylene twine. All this without eyelets, fasteners, etc. will not hold a backpack, but to build a hut-tent (item 2) you will need only one ridge pole (and perhaps 2 more for poles), and it will take no more than half an hour to arrange housing for the night .
In the same spruce forest, between two trees, a permanent winter hut is being built, pos. 3. To prevent the moss or earthen covering (see below) from giving off dampness inside (which is detrimental to health in winter), it is advisable to braid the frame with the same spruce roots, willow or willow twigs, etc., that are found nearby; the warm outer skin is laid on the fence. You can hang a door at the entrance of such a hut and install a potbelly stove with a chimney inside: the structure will last, with a small annual renovation of the outer cladding, for at least 5-6 years.
Tricks with spruce branches
In a dry, clean forest it can be difficult to find bark or moss to cover the ridge of a hut. If it (the hut) has a single slope, then it is generally impossible to cover the ridge with something like a roof valley, and rain will splash through the gaps in the top row of spruce branches. You can get out of the situation in this way: start covering with old small spruce branches, pos. A in the figure:
Covering the hut with spruce branches of two types
Possibly fir, if available. options for southern spruce forests are thuja growing nearby. Juniper is good, but it’s better not to touch it, it’s from the Red Book. And the ridge is covered with this year’s lush spruce “paw”, pos. B. If the hut is double-sloped, the ridge paws cling to each other; in a lean-to hut - by the protruding ends of the rafters, as in Fig.
Note : options for constructing a “one-and-a-half-roll” hut-shelter are shown here in the figure:
Single-pitch
A single-slope shelter hut should be oriented with its slope facing the wind, i.e. against his direction. If there is still a lull, it is against the prevailing morning winds at this particular point. It is not indicated on weather maps, so you need the appropriate one. experience and knowledge of local conditions. Otherwise, especially in an extreme situation, it is better to gather your strength and erect a conical hut, see below.
Structurally, a 1-slope hut is half of a 2-slope hut, pos. 1 in Fig., and is built in the same way, see above. Group height 1.2-1.6 m. depth 2.2-2.6 m; single - 0.7-1.1 m and 1.1-1.4 m. Here and there - depending on height (in the group - the tallest). Heating – fire-node, pos. 2.
Device and method of heating a lean-to hut
It’s not worth making side battens; it’s better to cover the sides with spruce branches (item 3), make them fall asleep and cover them with litter, etc. The ideal place to build a one-slope hut is a wild, littered forest. Firstly, there is enough material in abundance. Secondly, the tops of dead trees indicate where the wind most often blows. Thirdly, you can often find a depression with a trunk hanging over it, pos. 3: the construction of a shelter is simplified, and overnight conditions are improved. For more information about building a single-slope hut-shelter, see the video:
Video: lean-to hut in the forest
Shed options
A lean-to hut is not necessarily an overnight shelter. If you sew it along the pillars from the ridge to the bottom, you will get a vertical wall. You can hang things on it that in other types of huts you sometimes have to look for a long time in the morning.
A camping base (residential) single-slope hut is built on a suitable slope, on the left in the figure:
Single-pitched huts for camping, basic and long-term residential
A lean-to hut for long-term use is quite a capital structure, on the right. The pillars and ridge require logs from 12-15 cm in diameter; on the rafters, poles from 7-8 cm; for purlins - from 4-5 cm. Frame assembly - on steel fasteners (nails, staples).
Conical
The advantages of a conical hut are explained, firstly, by the absolute spatial rigidity of the original geometric body. The second is an interesting hydrodynamic effect: inside the tapering pipe in front of its mouth, even at a very low flow rate, something like a dynamic shutter is formed, limiting the current at the mouth. Anyone who, for example, poured water from a tap into a bottle with a funnel, has encountered this phenomenon. The gas-air cloud under the top of the cone-shaped fire hut may be invisible, but it radiates heat well, mostly straight down to the people's floor. In the same club, hot carbon monoxide CO (carbon monoxide) and other unburned flue gases are oxidized by air oxygen, since the hull’s lining is not gas-tight. This provides additional heating, but you cannot build a large fire or make a heated hut small. Carbon monoxide is slightly heavier than air (μ = 30 and 29, respectively). If the carbon monoxide cloud drops lower and cools down, the fumes will reach the bottom, where they may already be sleeping. If the hut is too small, you can get burned as soon as the fire is lit.
Note: the likelihood of burning in a heated hut is reduced to zero if a trained dog spends the night there. A dog's nose smells carbon monoxide in minute concentrations, but it is imperceptible to humans.
The structure and dimensions of a wintering conical heated hut are shown in pos. 1 pic. (dimensions in cm). Capacity – up to 5-6 people.
Construction of a conical hut with heating
Minimum size for one or two people (with a dog) approx. 3 m in diameter and the same in height, pos. 2. The supporting poles of the frame with a thickness of 4-5 cm for a forest hut and from 2-3 cm for a country children’s hut (item 3) are tied at the top (items 3 and 4); You don't need much rope for this. The supporting frame is braided with rods, sling braid and other materials suitable for strength and elasticity, hung with spruce branches (item 5), or another covering is applied, see above.
Cone hut options
The frame of a conical hut for one warm season can be made of very thin poles, from 2-3 cm, on a central support in the form of a tree trunk, pos. A and B to follow. rice. Of course, you can’t light a fire in it. Light, unheated conical huts are often built by hunters and fishermen: they require little material and labor. The most prey hunt is for waterfowl, but fish are not found on land. Therefore, hunting and fishing huts near the water are built with a platform (pos. B) so as not to get unpleasant sores. In general, many types of hunting huts are known, but this is a separate extensive topic.
Options for constructing a conical hut
Note : for information on building an overnight conical hut in the forest, see the video:
Video: simple forest hut
and a selection about a basic taiga hut of the same type:
Video: conical hut in the taiga - from construction to arrangement
Tent and arch
How the frame of a tent hut is built is shown in pos. And fig. There, in the inset, there is a diagram of a frame with a lower hoop for installation on a solid surface, for example. rocky ground. The dynamic rigidity of a prestressed structure allows this; In this case, elasticity is not a completely correct expression technically.
Tent huts
The same dynamic rigidity makes it possible to make a quick-assembled tent frame from ready-made elements with connecting nodes, which is sold in factory kits. We sell transportable ones for stationary long-term huts and carryable ones for camping ones. If you take thicker poles for the frame (from 7-8 cm), place them more often, every 40-60 cm, and braid them thickly with vines, you will get a spectacular hut-gazebo in a dacha or personal plot, pos. B. Beautiful, strong, quite durable (the wattle fence will secure the structure after the poles dry), there is no need to purchase anything, lay a foundation or generally carry out excavation work, except for filling the floor and path with crushed stone.
Construction of a lean-to arched hut
An arched hut is technically similar to a tent hut, but in a mixed forest with dense undergrowth it can be set up very quickly: a couple of young trees are bent down and tied to larger trees, braided with twigs, and a cover is applied (see figure on the right). If four suitable trees are found, not a single-slope, but a gable-tunnel hut-tunnel is built in the same way. Both are suitable not only as shelter, but also for hunters, because... perfectly camouflaged on the ground. It is also possible to frame an arched hut-tunnel in low forests entirely from thin branches or vines, see for example. plot:
Video: hut made of branches in a deciduous forest
About dugout huts
The earthen hut is actually a different topic, because... is long-term housing. Which has recently been discovered to have an interesting quality – profitability, so let’s take a brief look at the dugout huts.
As stated above, the “trick” of an earthen hut is not in the recessed floor, but in the earthen (preferably with moss) or turf cover, pos. 1 in Fig.:
Earth huts
It is better to build an all-season earthen hut-wintering conical, with a stove and chimney (item 2); summer or storage - gable with continuous lining of the fronts and a door, pos. 3. Recently, campings have become increasingly widespread in the West - recreational institutions in the form of towns made of permanent earthen huts, pos. 4. Rustic in appearance, the apartments are equipped with everything necessary for comfort: comfortable bathrooms, king-size four-poster beds, satellite and cable TV, Wi-Fi routers, etc., including hydromassage boxes and saunas. The payback to date is record-breaking, since the prices of holidays, with an eye to “fitting” into the landscape and environmental friendliness - mom, shall we go to the Bahamas?
Phyto huts
This is also a relatively new trend in landscape phytodesign: a living green hut on the street, i.e. outside: in the city yard, dacha, local lawn. It’s not such a common case when casual aesthetics are organically combined with obvious benefits. Plus, complete safety for children: there is nothing to burn inside, nothing will fall out and nothing will fall on the firebrand.
Sheathing is not applied to green huts; options for its execution 2. First - climbing plants are planted along the contour, annual (pos. 1 in the figure) or perennial, pos. 2.
Living green huts
The second - the frame ribs stuck/dug into the ground are cut out from straight branches of well-rooted trees and shrubs: willow, willow, willow, etc. The conical shape (pos. 3) gives better survival rate, and the tent and arched shape (pos. 4 and 5) – denser foliage. You can do an interesting thing with a conical green hut: before applying the top trim, cut off the bark on the touching sections of the rods (not in a ring!). The established stems will grow together and send shoots upward. One of them will overturn the others, and after a few years you will get an original tree gazebo.