Prepare your sleigh in the summer - says a Slavic proverb. If a sled is not needed, then warm shoes are what is in demand in winter: by outdoor workers, by athletes in winter sports, and simply by pedestrians standing at frosty stops.
But shoes don't always keep you warm. Additional insoles will not help even when you wear several socks. What is the solution: endure the cold again or come up with something, or try something invented by someone?
Ship insoles
Global companies also offer a solution, but at inflated, from the Russians’ point of view, prices for their products for warming feet in winter shoes. To roughly understand what they are, just go to websites that sell heated insoles and look at their photos.
Insoles filled with electric heating elements for long-term use or disposable use are inserted into boots or boots. They were initially, most likely, developed using space technology, and then reached ordinary consumers in countries with cold winter climates, including Russia. This was the case with the now famous “Velcro”, which today is used everywhere in everyday life.
As always, the craftsmen did not stand aside and will tell you what heated insoles are. They themselves contributed to the electric heating of the legs. Let's tell you more about this; it is possible that many people use recommendations for making shoe heat convectors on their own.
DIY heated insoles
This homemade product will be useful for all those people whose feet are constantly cold. Of course, these are, first of all, fishermen and hunters; we also cannot forget about the sellers in the markets who stand in the cold for days. Such insoles can be used not only in winter, but also in spring, autumn or even summer, on rainy days. With them, your feet will always be warm and dry, and this is the key to health. The device works very simply, and anyone can do it.
How heated insoles work The author used a nichrome thread with a diameter of 0.2 mm and a length of 25.5 cm as a heating element. As a result of measurements, it was found that such a piece of wire has a resistance of 8.9 Ohms. In total, the system uses two modes, one provides for operation from two batteries, and the second from three. In the first case, the insoles will be constantly warm. And the third case is needed to make them hot, but not a state of discomfort or burn. Before installation, it is recommended to do a test run in both modes.
In order to check whether the nichrome is the optimal length, you need to put the wire in a handkerchief or other similar fabric, and then, connecting it to the battery, hold it between your palms. If it gets too hot in your hands, the length of the wire needs to be increased. Thus, you can choose the optimal heating temperature for the insoles.
When operating two AA batteries, the calculated current will be about 270 mA, and from three about 400 mA. Based on these figures and knowledge of the capacity of the batteries used, you can calculate the operating time of the insoles before discharge. Materials and tools for assembling a homemade product: - nichrome wire with a diameter of 0.2 mm (length 60 cm); — two felt insoles; — about three meters of MGTF wire; — compartment for installing four AA batteries; - three-position switch; — two sets of mini jack connectors (plug with socket); — four crimp sleeves (0.2 mm sq.); — 1 m of heat-shrinkable tube; — strips of fabric with a Velcro-type lock; - hot glue.
Homemade assembly process:
Step one.
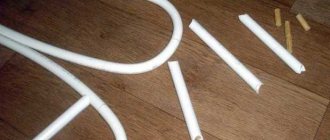
Connect the wire to the nichrome To connect the MGTF wire 0.2 mm. sq. The author used crimp sleeves for nichrome. First, the sleeve is put on the nichrome, and then its end must be inserted into the stranded MGTF, cleared of insulation. A sleeve is installed at the joint and then crimped. A special crimping tool is well suited for these purposes, but all this can be done just fine with pliers. The length of the wires is taken such that it is 50 cm from the insole.
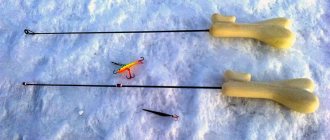
Where to lay the wire, everyone decides for themselves, depending on which part of the leg is cold. The author's toe is cold, so nichrome is placed in the front of the shoe. You can see in the photo exactly how to lay the wire.
Step two. Fixing the wire
To fix the wire, you can use thread and a needle. It must be carefully sheathed to form the desired pattern. As for the other end of the wire, a headphone plug is soldered to it for quick connection to a power source.
Step three.
Installing the battery compartment and testing the device In total, the author uses three batteries, but the case is selected to accommodate four. One compartment is used to install a switch and a mini jack socket. After soldering, the elements are fixed in place using hot glue. If it so happens that there is no cover on the battery compartment, then this is not a problem; the batteries can be pressed with a rubber band.
In order to fix the power source on the leg, you need to drill holes on the other side of the compartment, using them to attach a piece of tape with Velcro. Now the device can be easily attached to the leg and removed just as quickly.
That's it, the heated insoles are ready. According to the author, the homemade product works very well and only uses two batteries; so far there has been no need to connect third ones.
Source
Become the author of the site, publish your own articles, descriptions of homemade products and pay for the text. Read more here.
What to make a “stove” for feet from?
An insole or orthosis is inserted into a shoe for a number of functions. And more for medicinal purposes - for pain in the foot and joints due to arthrosis and injuries, correction. Not a word about the heat conservation function.
Only in the comments are there messages about how to make simply warm insoles - from felt, foil foam and construction insoles. We will offer ideas on how to make heated insoles. Anyone can cope with this task.
Below are step-by-step instructions on how to make insoles with your own hands. Let's show the example of insoles with autonomous heating from a mini-battery (battery) with adjustable temperature.
There are a number of factors to consider. First: choose insoles with a base that does not conduct heat well - so that they do not “sink” into the sole, but warm your feet. Insoles made of felt with a thickness of 0.5 centimeters are suitable according to their characteristics.
Second factor: experiments have shown that the area of the feet that freezes most in the cold is the toes. So they need to be heated, and the blood heated in them will insulate the rest.
And this will save on energy costs, because electric current is generated not by a powerful car battery, but by the one that powers smartphones and tablets. That is, the battery must fit in the pocket of a person whose feet are heated by the insoles. The best heated insoles on charge.
The heating element of the homemade device is a wire with a predominance of two types of metal - nickel and chromium. It, wound in a spiral for greater power, serves as a heating element for household electric stoves. For insoles, a wire ten times shorter (48 cm) and much thinner (0.3 mm) is sufficient. It can be taken from any non-working 300 watt heater. Sometimes you can buy it at an electrical store for 20 rubles.
Buy a voltage regulator from four volts and above in a Chinese store. If you don’t want to bother with homemade products, buy factory-made electric insoles with charging in the same market.
How does heating work?
If you consider the option of using copper wire with a varnished coating, you will see that the design is very functional. First you need to calculate the length, make a heating platform, which is placed under the main insoles. It is important to remember that there must be an insulating layer (it can be made from hot glue).
Read here - How to choose a good router for your home: review of the best models, TOP rating of routers in 2021 and the nuances of their placement (135 photos)Secure the on/off button to the tongue, in the lacing area. Anyone can make electric insoles with charging if they really want to.
But the master himself assembled the convector on insoles
The heating thread was laid across the insole so that when walking with bends in the sole, the wires would not move. The entire length of the nichrome is sewn to the base.
There is room for a second layer of heating element. It will be mounted on a leather base, and it transfers heat well to the feet. In this case, little energy is lost, and the skin does not warp from the heating of the elements. The leather insole is sewn to the bottom - the seams will pass between the nichrome threads.
Two nichrome contacts are removed from the insole, two stranded copper wires up to one and a half meters long each (plus and minus the battery) are soldered to them.
Note!
Why do you need interior dolls?- How to choose shoes that don't go out of fashion?
What you need for a hike in the mountains in summer
Let's move on to the winding
Depending on the saturation of the wire winding, the surface will heat up. Everyone can adjust the amount of heating of a certain zone based on their needs. The calculation is made individually.
For example, you can do this: more heat goes to the toe, medium heat in the heel area, low heat in the middle of the foot. By choosing this variation, you will need 10 m of wire.Next, mark the layers for protection on the paper according to the pattern, draw and cut out. After this, you need to cover the heating base with paper insoles on both sides. Do this using hot glue.
There are many ideas on how to make heated insoles, but we will look at this one. Practice has shown, or rather even proven, the effectiveness of this method.
"Power station" for insoles
The main element is a 7.2-volt nickel-metal hydride battery with a current of 5000 milliamps per hour. Without additional charging from the mains, the battery will warm your feet for 5 to 11 hours of continuous operation. The heating of shoes depends on the above parameters - voltage and current.
A 12 volt battery is better. The maximum heating is 60 degrees, but the adjustment keeps it at any comfortable level, and not overheating. It’s worse than frost – it will raise blood pressure in people over 50.
What to make warm insoles for the winter from?
The classic version of insulated liners is felt insoles. The material is dense and holds its shape, so it does not require a base.
Another original homemade lining option:
- Preparing and cutting out the base
- We make 2 fabric parts, with an allowance of 1 cm
- We take woolen threads and weave them together with a braid
- We sew our pigtail to the base in a circle, from the edge to the center, until the entire space on the workpiece is filled. We cut off the braid and sew the end tightly to the base so that the threads do not unravel.
- We put the fabric part on top, stitch it, cut off the excess at the edges
By the way! To ensure that the insoles can be worn in any frost, there is a little trick: glue foil to the wrong side! It will retain heat. Similar technology is used in many modern products.
A simpler version of the insulated lining can be made using thin insoles technology, but with warm material sewn into the middle. An old wool sweater, unwanted fur, or sheepskin clippings will do. If you use an additional trick and glue the insole with foil, then your feet will definitely be warm!