Compass on a thread and a needle
In order to make a high-quality compass at home or on the go, you need to understand how navigation devices of this type work. Any magnet tries to take a parallel position relative to the Earth's magnetic field lines, which run in the direction from north to south. The compass needle is a small magnet that, in any position, tries to take a position along these invisible lines.
This allows a person to determine the location of the north using the device. When assembling a compass yourself, the first priority is to make a magnetic needle. It must be positioned so that nothing prevents its free rotation. In this case, it will help a person determine the direction to the north.
The ideal arrow for a compass is a magnet of a rectangular, oblong shape. However, it is difficult to purchase, and if a person needs a navigation device in an emergency, it is almost impossible. In this case, the compass is made from scrap materials. For example, from a sewing needle and thread.
Compass on a thread and a needle
They are taken on almost every hiking trip, so these things are one of the most common materials for a homemade compass.
The classic version of making a compass at home looks like this: take a medium-sized needle, rub one end with a magnet, and then hang it on a thread. In field conditions, this method is often impossible to perform. It is unlikely that anyone will take a magnet with them, expecting to accidentally get lost.
In the field, a compass on a thread and a needle is made like this:
- Take a needle. If there is none, you can use other thin and light metal objects (paperclip, wire, parts of various devices and equipment).
- Take a thread. If you forgot to take it too, you can pull the thread out of your clothes. The length of the thread must be at least 40 cm. This will prevent the arrow from getting caught on various objects.
- The thread is tied to the needle in the middle. It is important that it does not twitch from side to side, otherwise the readings of the device will not be accurate. The second end of the thread is held by hand or tied to a stick.
- The end of the needle is rubbed against wool or silk fabric for 2-5 minutes.
- The magnetized end of the needle is marked. This is done with paint, pencil, earth or bark. You don't have to do this at all. The main thing is not to forget which part of the needle the person rubbed.
- The metal is suspended by a thread. Next, you should wait until the needle calms down and balances, after which the magnetized end of the needle will point to the north, and the opposite end to the south. To the left of north is west, and to the right is east. When using magnetic-type navigation devices, it is important to remember deviation.
Important! Any iron object located near the compass closer than 15 meters can cause deviations in the compass readings. If the iron is located very close, the instrument needle will not be able to take a calm position and will be constantly in motion.
https://fenix-life.ru
How to make a compass compass was lost or broken in the field ?
To do this, you need certain available materials, an understanding of the principle of operation of the device and a little ingenuity.
The principle of operation of the compass is based on the phenomenon that any magnet tends to position itself along the lines of force of the Earth's magnetic field. The power lines are oriented from north to south. Consequently, the magnet will be oriented in the same direction. The compass needle is a small magnet.
In order to make a compass, we need a magnetic needle and the ability to position it so that as little extraneous forces as possible prevent it from turning along the lines of force of the Earth's magnetic field.
A linear magnet would work best as a compass needle. And of the materials at hand, steel is best magnetized
Therefore, it is best to make a compass using a sewing needle as a magnetic needle. You can use a pin, a piece of steel wire, strings, for example, or other steel objects. Any small steel strip can also work - a regular razor blade, for example, or half of it.
How to make a compass using a needle.
To make a compass using a needle as an arrow, it must be magnetized. To do this, you need to rub it on a magnet or stick it to it for a few minutes.
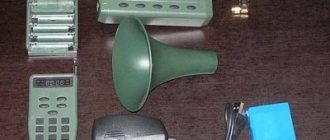
You can use a magnet from the speaker of a radio, audio player, or from headphones to them.
How to make a compass when there is no magnet?
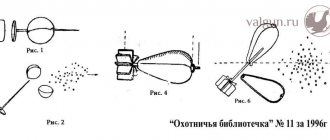
For magnetization, in this case, you can make an electromagnet using a battery and a piece of thin wire.
Having wrapped the needle with some insulating material, paper or fabric, for example, we wind as many turns of wire around it as possible, creating an electromagnet winding.
We connect the ends of the wire to the battery terminals.
Moreover, it is important to know that the end of the needle to which the end of the wire connected to the negative terminal of the battery will point to the north.
What if we have neither a magnet nor a battery?
Then you can magnetize the needle by vigorously rubbing it on silk or woolen fabric.
Or your own hair. (More details about this original method in the video at the end of the article).
The needle is also magnetized if one end of it is heated red-hot over a fire, cooled in air, and the other end rubbed between the fingers.
To make a compass, you need to ensure that the needle floats on the surface of the water - in a puddle or in a container of water. The container should be made of non-magnetic material, and there should be no iron objects or power lines nearby.
Sometimes the needle floats on the surface due to surface tension forces. But it’s easier to make it float by smearing it with some kind of fat.
You can also put it on some floating object - a piece of paper, a piece of wood, a piece of bark, cork or foam. Or stick it in a straw.
If the conditions are met correctly, the needle will be positioned in the north-south direction.
If we don’t know which end of it points to the north, we can navigate by celestial bodies or local objects.
Let's think about how to make a compass when there is no water in which to float an improvised arrow.
In this case, you can make a compass by hanging a needle or, for example, a razor blade on a thread, tying it to the center of gravity. The thread must be of sufficient length and must allow the “arrow” to turn freely.
If the wind and nearby iron objects do not interfere, it will be located in the north-south direction.
In cases where the compass fails, it is important to preserve its needle. By placing it on a needle, a thorn, or, in extreme cases, a fish bone, we can always determine the direction to the north.
To make a compass that can be carried, it is enough to make a case for it from available materials.
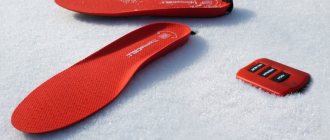
How to make a compass from a needle and water
To use this method, you need to have a needle, a magnet, a wine or champagne cork or polystyrene foam, and a bowl of water. The cookware must be made of ferromagnetic materials. One end of the needle is made by magnetic friction against silk or wool or by contact with a magnet. The second end, on the contrary, should not have a magnetic charge. To do this, it must be scorched over the fire of a lighter or match for several seconds.
After processing the needle, its magnetic end is marked with some color. Next, a small piece of cork or other material that can float is cut off. It is important that it can ensure that the needle remains on the water, but at the same time, you should not make it very small, otherwise the tension and resistance of the water may affect the accuracy of the instrument’s readings.
Compass made of needle and water
The needle is attached to the float. This can be done with tape, glue, or simply by pressing firmly. Water is poured into the plate. A floating object with a needle placed on it is placed in the liquid. In order for a homemade compass to provide accurate information about the location of the cardinal directions, the bowl is placed on a flat, stable surface.
For your information! A compass made using this method is not inferior in accuracy to industrial analogues.
Do-it-yourself compass experiments and experiments in geography (grade 5)
Sometimes on long trips there is an urgent need to correctly determine the cardinal directions. It may even happen that the life and health of the expedition members will depend on this. If you have a compass, it doesn't matter. What if it fails or is lost? Then the options are: determine the cardinal directions by the stars, the sun, signs, or make a primitive compass yourself. I just want to tell you how to make a compass yourself, using only available materials. We will look at several variations of such homemade devices.
DIY compass made from a needle and a container of water
We will need:
- A glass or ceramic container with fresh water (metal ones are not suitable as they will distort the magnetic field).
- Needle
- A piece of floating material (cork, polystyrene, foam rubber)
Assembling a homemade compass
Cut off a small piece of floating material. The most important thing is that it is of such a size as to ensure the buoyancy of the needle attached to it and at the same time that it is of such a size that the forces of surface tension of the water and the drag forces are negligible - this is necessary to ensure the accuracy of the readings.
Our needle will serve as an arrow. First you need to make sure that one end of the needle is magnetized and the other is not. If you have magnets at hand (they are present in the speakers of the player, receiver, electric motors, etc.), then you can magnetize the needle-arrow with their help. If there are no magnets, then you can simply hold one end of the needle over the flame for 25-35 seconds, after which this tip will be demagnetized (if you were interested in physics at school, you understand why this happens). So, the arrow is ready. Its magnetized end will point to Serer, and the non-magnetized end will point to the South.
We attach the needle-arrow to the float. The most convenient way is to carefully pierce the float with a needle along the axis of symmetry. This fastening is simple and at the same time reliable. All that remains is to simply place the float with the arrow in a container of water so that the walls of the container do not interfere with the rotation of the arrow. The compass is ready, all that remains is to calibrate it.
If you know which tip of your needle was magnetized and which was not, you can immediately judge where north is by the position of the magnetized tip. If you don’t know, then the following facts will help you determine where North and South are: the place where the sun rises and where it sets (Sunrise-East, Sunset-West) or the position of the polar star. Using these signs you can easily calibrate your homemade compass.
We attach the needle-arrow to the float. The most convenient way is to carefully pierce the float with a needle along the axis of symmetry (if the float is voluminous). This fastening is simple and at the same time reliable. Next, place the float with the needle in a container of water so that they do not touch the walls of the vessel. The compass is ready with your own hands, all that remains is to calibrate it.
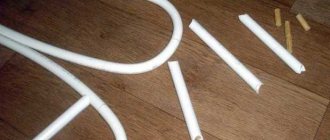
DIY compass without using liquid
We will need:
- Safety razor needle or blade
- Transparent bottle
- Thin thread or fishing line
Assembly of the structure
We make a compass needle and magnetize it, as described in the previous instructions. To make an arrow, you can use a needle or a safety razor blade. You can also make an arrow from half a razor blade.
We tie a thread or fishing line to an improvised arrow at its center of gravity. We place the arrow inside the transparent vessel so that it is suspended. The vessel will protect our structure from the wind.
We calibrate the resulting compass using the method described in the last paragraph of the previous instructions and obtain a device ready for use.
As you can see, making a compass yourself is not that difficult. On the one hand, we looked at some interesting solutions, but if you dig deeper, it becomes obvious that we have expanded our knowledge base with extremely useful information! Happy travels, friends.
And you will also find an interesting video from the network on our topic:
Compass made from a paper clip
The paperclip is also suitable for making a homemade compass. True, first you need to magnetize it using silk, wool or a magnet. The paperclip is placed on paper, cardboard, or, if you need a navigation device while hiking in the forest, on a piece of wood and lowered into a container of water. It is important that the paperclip does not have the opportunity to catch on anything. This will radically distort the readings. Wind and waves also affect accuracy.
If everything is done correctly, the complex will point to the north and will help you find the direction to your home even in the deepest forest.
Compass made from a paper clip
How a homemade compass works
The magnet has the properties of attracting iron, steel and other magnets. A magnet has a south and a north pole, and the north pole of one magnet and the south pole of another magnet attract each other. The Earth's core is rich in iron, so the Earth is a magnet, with north and south poles. The Earth's magnetic field is not strong enough to completely attract all other magnets to the south or north poles, but strong enough to turn them around.
Since the magnetized needle, inserted into the cork, floats on water, it can freely rotate and unfold in accordance with the magnetic poles of the Earth. This is the simplest homemade compass that can tell you where north is and where south is. If we put our homemade compass on a piece of cardboard, then after the needle points to the north, we can mark all cardinal directions on this cardboard. And then you will always know which way is north, south, west and east.
The South Pole is the only place on Earth where any direction points north.
This is interesting: Instructions on what to do after a nuclear disaster, nuclear explosion
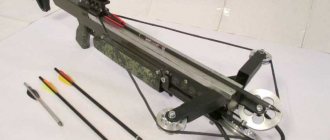
Compass made from blade and battery
If you don't have a magnet or silk at hand, you can use a battery, razor blade and wire to make a compass.
The blade is wrapped in thin paper. Next, 6-8 turns of wire are wound around it, the ends of which are connected to the phases of a battery with a power of at least 2 volts. The structure is left to charge for a few seconds, after which the blade is freed from the wire.
Important! If the wire is used without insulation, it is important to prevent the turns from touching. This may cause a short circuit.
The metal is placed on a piece of wood or other floating object and lowered into the water. The end of the blade that was attached to the “minus” will point north, and the “plus” to the south.
A homemade compass is made as follows
1. Swipe the north pole along the needle, from eye to tip, at least ten to twenty times. This will magnetize the needle.
2. Cut a small piece from the end of the cork. About ten, twelve millimeters will be enough.
3. Pass the needle from one circle to the other.
4. Fill the bowl with water (halfway will be enough). Place the cork and needle in the water.
5. Set up your homemade compass on a flat surface and watch what happens. The end will point north.
This is interesting: What should be included in a tourist’s personal equipment
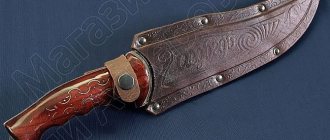
From blade and bottle
First you need to magnetize the blade. This can be done using magnetic elements of various devices. Souvenirs that are plastered on the refrigerator of any self-respecting traveler are also suitable for these purposes. In hiking conditions, it is enough to hold the metal over the phone or walkie-talkie.
In addition to the blade, you can take a needle or paper clip. A thread or fishing line is tied to a knot in the middle of the future compass needle. The design is placed in a transparent bottle. This is done to protect the device from the wind.
Compass made from blade and bottle
The magnetized end will indicate where north is. If a person has forgotten which part of the metal he touched with a magnet, this can be found out by the position of the celestial bodies. The North Star is located in the northern part of the sky. At noon the sun is in the south.
How to make a compass out of paper
The paper will not be able to indicate in which part of the horizon north is located. However, this material can be used to make a working model of a compass or for children's play.
- Cut out an even circle.
- We put a scale with divisions on it with a pen or pencil.
- An arrow is cut into which a needle is inserted.
- The pointer is secured to the paper with a rope.
A compass made of cardboard or paper is an excellent model for studying the properties of a navigation device. It will be especially interesting for children who will be able to get acquainted with the designation of cardinal directions, the concept of a degree scale, etc.
Cardboard compass
How to make a homemade compass from plastic caps
All previous options are good for one-time determination of direction. If a person plans to repeatedly use a homemade compass, the device can be made from plastic covers. You will need 2 of them. It is important that one of them fits tightly into the other.
The magnetic element for the arrow can be taken from an old keyboard. To secure it inside the case, packaging plastic is used. Tin plates are taken and bent in such a way that they can be reliably magnetized to the ends of the future arrow.
The first half of the plastic holder is installed in a cover of a smaller diameter. A magnet and the upper half of the holder are placed on it, after which the second half of the case is attached using glue.
Take a working compass, with the help of which the direction to the cardinal points is determined. The corresponding markings are applied to the body. In order to determine the north-south direction, the device is placed in a non-metallic container with water.
What material is better to choose for the arrow?
When making a homemade compass needle, materials that have ferromagnetic properties are used. In other words, the object must be able to accumulate magnetic energy.
The easiest way to identify such material is a magnet. Feromagnets are attracted to it. In everyday life, almost all iron products have such properties. However, not all objects can be used for a compass needle.
Magnet
The main criterion when choosing is weight. A heavy object will not be able to easily rotate and point north. And the magnetic force may not be enough to cause it to rotate. Therefore, the file and pliers can be immediately put aside.
Suitable for compass needle:
- needle;
- pin;
- a piece of wire;
- small nail;
- razor blade;
- fishing hook.
All these objects are capable of accumulating magnetic energy and maintaining it on the surface for some time. The most convenient for operation will be objects that have a small mass and size.
razor blade
Pin
Small nail
Needle
A piece of wire
Fishing hook
If the need to manufacture a compass arose due to mechanical damage to a standard device, it is recommended to save its needle. In the future, it can be attached to a needle, a plant thorn, or a thin stick and used for its intended purpose. In this case, the accuracy of the readings will not be affected.
Most often, a sewing needle is used to make a homemade compass needle. It is easily magnetized, retains energy for a long time, has a compact size and low weight. In addition, this item will be found in the equipment of most tourists, because this category of people most often resorts to making a navigation device in camping conditions.
Important! It is better to be prepared for emergency situations in advance. Magnetizing a needle, hook or blade before a hike does not take much time, however, it can, on occasion, save a person’s life.
Magnetization methods
In order for the needle to become a compass needle, it must be magnetized. It happens that the material already has a certain amount of magnetic energy. It's easy to check. It is enough to hang the needle by the middle and try to change its position in space. If the metal remains motionless, the needle just needs to be magnetized. If it turns to a certain point, the metal already has magnetic energy. You can safely start making a compass.
You can magnetize the arrow in three ways:
- Magnet. This is the easiest way. The needle is placed close to the magnet and left in this position for 8-12 seconds. During a hike, the material can be extracted from a mobile phone or various accessories. If a person believes that these devices can still be useful to him, the future arrow is placed on the phone or walkie-talkie. A steel knife also, in most cases, has magnetic energy and is suitable for transferring it to a needle.
- With the help of electricity. In order to use this method, a person will need to have an insulated wire and a current source on hand. The needle is wrapped with a wire, after which an electric current is sent through it. A magnetic field arises between the turns, the core of which is the needle. You can use regular batteries or a phone battery as a power source.
- Improvisation. You can impart magnetic properties to an object by rubbing it against silk and wool. This is reported in the 7th grade school physics course.
Magnetization using electricity
Electrification by friction
Magnetizing an improvised arrow
In order for the needle - the future compass needle - to rotate in the Earth's magnetic field, it must be magnetized.
Often, ferromagnetic objects used as arrows may already be magnetized.
It is with this, it seems to me, that most misconceptions are connected, where people believe that they were able to magnetize an object, using in fact completely unsuitable methods for this. For example, they try to magnetize the needle by rubbing it on the hair. In other words, in this case there is an error in determining cause-and-effect relationships.
In the field, checking whether an object is magnetized or not is quite simple: you need to make a compass out of it and see if the needle turns. We will talk about exactly how this is done further.
In this case, after the “arrow” has completely stopped, you need to turn it in one direction, then in the other. If such an arrow constantly returns to the same position, then it is magnetized and there is no need to additionally magnetize it. By the way, the serviceability of a compass made in production is checked in the same way.
If the arrow was not magnetized, then it can be magnetized in two ways.
Method number 1 - using a magnet. This is the easiest and fastest way.
To do this, just place the arrow next to the magnet. In the wild, it is often suggested to remove the magnet from the speakers of your headphones or phone. However, in my opinion, this is irrational: the phone may still be useful. Everything is much simpler: just put the arrow on the phone or walkie-talkie itself so that it becomes magnetized, but it’s even easier to put it on a steel knife, which, as a rule, has magnetic properties.
There is no need to hold the arrow near such a magnet for a long time: usually a few seconds are enough.
The sides of an improvised arrow are determined empirically using the stars or the Sun. That is, the cardinal directions are determined by the luminaries, and then it is determined which part of the arrow points where. And we talked about how to determine the cardinal directions by the Sun and stars here (Orientation by the Sun) and here (Orientation by the Polar Star).
Method No. 2 - using a coil and current. This method is more complicated and requires an insulated wire and a current source.
In this method, an insulated wire is wound in one layer around a needle in the form of a coil. If the wire turns out to be uninsulated, then the needle can be covered with dry toilet paper or a piece of polyethylene to insulate it from contact with the wire, and the turns should be made so that they do not touch each other.
An electric current is passed through the coil, as a result of which a magnetic field appears inside the coil, and the needle becomes the core of this electromagnet.
Where can I get electricity for this method? It's simple: most often the source of power in the wild is a flashlight battery or a phone battery, although there are other sources. The main thing is that the current is constant and not alternating, that is, a socket without additional circuits that equalize the electric current will not be suitable for this.
How to protect from the wind
In order to protect the device from the wind, a plastic bottle with transparent walls is often used. However, for some types of self-made compasses it will not be convenient. Wind barriers can be folds of terrain and other natural shelters. For the same purposes, you can use an aluminum pot or mug, which simultaneously acts as a reservoir for water.
A tourist rug rolled into a tube also does an excellent job of acting as a windbreak.
Travel mat
Glass jar
Aluminum pot
A good way to keep the shooter calm is to use a glass jar. True, rarely does anyone take this item with them when going outdoors, however, for home experiments, the jar will come in very handy.
Note! If the wind is not too strong, it will be enough to cover the device with your own body.
Wind protection
Most often, a transparent plastic bottle cut in the middle is offered as a wind barrier. This option, as for me, is not very convenient for either a “water” or a “thread” compass. In the first case, it will be difficult to keep the needle in the center of the volume, and it may come into contact with the walls, which, as we remember, leads to errors in measurements. In the second case, due to the thread being too short, forces associated with the resistance of the thread to twisting will act on the needle, which will also negatively affect the readings.
As a wind barrier, I personally would suggest natural shelters, combined with additional protection from the wind with your own body. An aluminum pot also copes well with this, providing both a container for water and protection from the wind. However, this option is only effective for a “water” compass. For a needle on a thread, you can use a karimat, twisting it into a tube and placing it vertically: this will provide good protection from the wind if the thread from which the needle is suspended is long enough.
If karimat, polyethylene or other materials for creating an artificial wind barrier are not available, the area does not have natural shelters, and the weather leaves much to be desired, then you need to use what you have, or wait until the weather calms down or clears up to move on to orientation methods according to the heavenly bodies.
Dispelling Myths
A homemade compass is used quite often by tourists and experimentation enthusiasts. Because of this, several myths related to this device have spread among people.
- Using an upside down needle as a base for the arrow. The compass must not contain ferromagnetic elements, excluding the arrow itself. Otherwise, the device readings will be distorted. This is due to magnetic deviation.
- When magnetizing a needle with a wire, you need to apply electric current to it for at least 10 minutes. The process takes no more than 10 seconds. With prolonged exposure, the needle may become remagnetized, which will result in distortion of the compass readings. In addition, it is better to preserve the energy of the power source in emergency situations for as long as possible. It can be useful for starting a fire or activating communications.
- The needle is rubbed on the hair so that it does not sink in the water. It all depends on the mass of the metal. A small needle will not sink due to the surface tension of the liquid, but a gypsy needle will sink to the bottom despite all human manipulations.
- For a homemade compass, you can only use plastic containers. The material does not matter, the main thing is that it does not have ferromagnetic properties. Products made of aluminum, magnesium, copper, etc. will not affect the instrument readings.
- Salt water is not suitable for making a compass. The presence of salt in the liquid does not affect the device in any way.
A homemade compass can be used to find direction in an emergency or as fun for children. In the first case, it is recommended to use a fishing hook or a needle magnetized on a steel knife. In the second - all other methods. Such devices do not require repairs, because they are usually made for one-time use. The simple design ensures ease of use, and the use of publicly available materials for assembly allows anyone to use a homemade compass.
Did you manage to learn something new? Share about it in the comments!