Important formalities
Young people aged 12-20 years are mainly interested in making a crossbow. And here it is important to understand that the thematic product is a small weapon that can be used:
- Upon reaching adulthood;
- For sport or recreational shooting purposes;
- In a shooting range or places remote from urban infrastructure;
- For hunting, if you have two permits - to own a thematic weapon and to use it for the purpose of hunting game.
Of course, it’s always easier to wait until you reach adulthood or buy a crossbow along with documents through friends.
However, our people do not look for easy ways and most of them like to take initiatives with enthusiasm. Therefore, do-it-yourself crossbows at home are already a common topic among gun fans.
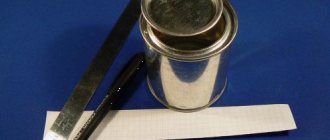
Required Tools
The crossbow combines wooden and metal parts. Therefore, to make it you will have to have on hand:
- Chisel - for creating channels and holes in wood;
- A long ruler and a square - to take measurements;
- Mallet - for beating with a chisel;
- Carpenter's knife - to make markings;
- Metal hacksaw – for sawing metal parts;
- Pliers - to hold and straighten parts, tension and bite off springs;
- Screwdriver - for attaching metal parts to a supporting wood base;
- Chisel - to chop metal;
- Hammer - for hitting a chisel;
- Metal files - to smooth the surface of the metal;
- Wood files – for processing forests;
- Drill - to make holes in metal parts and wood workpieces.
You will also have to allocate a well-lit place with a workbench for thematic work. Moreover, the latter must have a vice that helps to efficiently fix various products. A stand for a drill, a grinder, and an electric jigsaw for wood will come in handy.
As a result, more money will be spent on tools and a machine than on solving the problem of how to make a crossbow with your own hands at home. But the target audience usually already has thematic inventory. Besides, no one is about.
How to make a crossbow with your own hands
Among simple tools created with one's own hands, the bow definitely wins.
However, crossbows are also very popular. If you want to make a crossbow with your own hands, you just need to read the instructions below. A medieval design was chosen as an example due to its simplicity. Such a crossbow does not require metal welding; it can be made at home; it also does not require the presence of springs, as in its other, more advanced variations. All that is needed to make a simple medieval crossbow is the desire to craft. Initially, you need to find a suitable stick for the base of the structure. It is recommended to use bird cherry, since after drying the wood retains good elasticity characteristics. When a suitable branch is found, you should carefully saw it off, completely remove the bark and leave it to dry in a warm place. Typically the drying time is about 5-7 months.
Step-by-step instruction:
In addition, it is recommended to immediately bend the stick so that it does not crack during processing and fixation, as well as during use. If bird cherry is not available in the area, you can use elm or other alternative wood.
It should be remembered that for good strength, durability and elasticity of the launching part of a home crossbow, you need to stand it well. Moreover, in this case, the chances of a crack during operation of the crossbow will be significantly reduced.
To have the opportunity to practice and to avoid the need to wait again, it is recommended to prepare several sticks at once.
You can use any type of board or dry wood on the stock of a homemade crossbow. It all depends on how accurately you want to replicate the medieval model of the weapon.
Once the wood has been selected and processed, a notch needs to be made in the front of the wood to accommodate the crossbow bow. You can make a notch with any tool from a metal file to a regular knife.
The next step in making a crossbow with your own hands at home is to drill holes for the bow bolts. They are placed at a distance of 8-10 cm from the front of the bed. Previously, holes were made with red-hot metal, so you can also use this method if you don’t have the right tools at hand.
Moreover, if you don’t have any bolts at hand, you can use the same wood.
The upper plane of the stock should have a groove in which the crossbow bolt will be placed. Often this groove is made round, but it is recommended to plan it triangular to increase the accuracy of the bolt.
When everything is ready, you can fix the bow. This is applied to the cutout made in the front of the stock and tied tightly with rope to the previously installed bolts or their wooden alternatives. This will be enough, but for a tighter fixation it is better to use glue.
The last element of a homemade crossbow is the organization of the trigger mechanism. Usually the simplest lever type is used. The crossbow drawing below shows how such a system works.
When the shackle-lever is released, the pin instantly releases the bowstring, and it launches the bolt forward. It is important that this system does not have any safety mechanisms, so the bolt must be installed only before firing.
The created crossbow must have a tension force of about 40 kg, so the design will not be included in the list of edged weapons. The bowstring is tensioned by hand, so additional mechanisms are also not required.
Crossbow design
At first glance, a crossbow is a simple bow with a supporting base. In fact, its design provides:
- Shoulders – bow for stringing arrows;
- Block - an element for attaching the shoulders to the stock;
- Bowstring - a tensioned support for arrows;
- Guide – channel for fixing the boom;
- The trigger mechanism is a means of controlling the shot;
- The stock is a supporting frame for all of the above elements, as well as the basis for a comfortable grip of the crossbow.
Depending on the user's requirements, the crossbow can be supplemented with a stirrup, sight, forearm, butt, and belt. But first it is better to limit yourself to the basic kit.
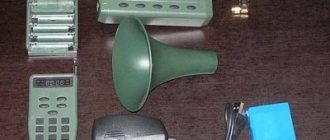
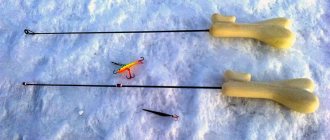
Equipment
There are no special installations for equipping a crossbow with a winter fishing rod. Depending on the conditions of the reservoir, the entire set of winter equipment for fishing rods in still water is used. More often it is one jig or a sinker with a hook and a hook. Any installation is suitable for working the tackle to rise from the bottom. Naturally, a heavy sinker at the end and a retractable leash will not work. When biting, the entire equipment must rise - this is the basic principle of operation of a winter fishing rod with a crossbow nod. The crossbow only works with bottom lifting rigs.
A crossbow requires a fishing rod with a reel. This is necessary for an accurate working trigger. Excess fishing line on tackle with reels cannot be removed up to a centimeter.
In fishing stores you can occasionally find ready-made crossbows. However, more often they are imperfect and made without taking into account all the necessary details (for example, without a limiter). Therefore, fishermen make such guards themselves. No special knowledge or skills are required for this - you can assemble the tackle literally on your knees with the simplest tools using available materials. Let's look at how to make a crossbow for a winter fishing rod with a nod.
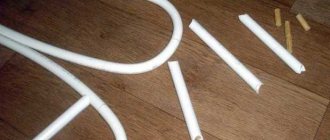
Making onions
Many are in a hurry to make a stock, although in fact, first of all, you need to take the crossbow’s shoulders with your own hands. They are a strip of metal that is attached to the front edge of the stock to give it the appearance of a bow.
The shoulders are made in the following way:
- A 650x100 mm plate is cut out of 5-8 mm spring steel;
- Three holes are made in the center of the workpiece for attaching it to the end of the stock;
- The workpiece is polished and leveled;
- Rollers are attached to both ends of the plate to smoothly tension the boom.
Moreover, the rollers must be pre-built into the supporting housings. But if the string is short, then it can not be threaded through the rollers, but traditionally attached to the ends of the bow by winding.
The thicker and smaller the shoulders, the more difficult it is to pull them. But the speed of the arrow's flight and its penetration potential increase. True, you should not chase the corresponding indicators, because the block and the entire fastening system will bear a large load.
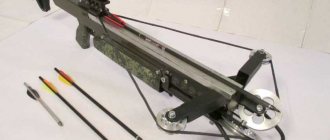
How to make a crossbow with your own hands: manufacturing features and recommendations from professionals
Despite its age, the crossbow is still able to compete well with some types of weapons. Unlike its ancestor, the bow, this design has an automatic arrow release system, thanks to which the shooter can concentrate on aiming without wasting energy on pulling the bowstring. Given the popularity of this weapon, many craftsmen are interested in how to make a crossbow with their own hands. To do this, you should take into account many nuances, know the design features of a modern crossbow, the types of such weapons, factors influencing the firing range, etc.
Making pads
The block is an element that presses the shoulders to the stock, i.e. fixing the bow and responsible for its reliability when pulling the arrow. Depending on the design ideas of its manufacturer, the block comes in different shapes. In this case, the requirements for the block are the same:
- Firstly, the element must consist of 8-10 mm steel;
- Secondly, the block should press the shoulders to the stock in the center, on the sides and even on top;
- Thirdly, the arrow must fly out through the block, so the first one comes with a hole or opening.
Often the block consists of several plates. The main thing is that they are not too heavy. Otherwise, the crossbow will be difficult to use, because he will be mowed down with each shot. And if this is a mini-crossbow with your own hands, then it will be completely inconvenient for a normal grip.
Note!
Do-it-yourself compressor: selection of materials and tools for assembly at home + step-by-step instructions for making and assembling yourselfHomemade products for the garage with your own hands: options for products for arranging a garage, detailed diagrams and drawings for creating with your own hands
- Do-it-yourself press - design features, choice of manufacturing materials. Step-by-step instructions for making it yourself + simple diagrams and drawings
Crossbow sight
The sighting device of a crossbow consists of a rear sight and a front sight. Vertical adjustments are made entirely, mounted on the cover of the trigger mechanism, and horizontal ones - with a front sight mounted on the bracket of the elastic element.
There can be many design options for these devices, depending on the possibility of manufacturing, the availability of ready-made sights for sports bullet weapons, etc.
It should be borne in mind that the flight path of a crossbow arrow is quite high, so the rear sight must be installed significantly higher than the front sight. The angle of elevation of the aiming line (Fig. 1) depends on the weight of the arrow, the tension of the string, the shooting distance, etc. In our crossbow, at a distance of 50 m, it is approximately 6 degrees.
Making the trigger mechanism
One of the complex processes is working with the trigger mechanism. The fact is that it is a set of several steel parts:
- Trigger;
- Sear for holding the bowstring;
- Two springs for fixing the hook and sear;
- Two plates for the supporting body;
- Bolts and nuts.
Usually crossbow drawings show only the closed trigger mechanism without a detailed description of it.
A 6mm steel sheet is used to make the hook, sear and plates. But before sawing it, it is recommended to draw each detail on a piece of paper and then cut it out.
By placing paper pieces on a sheet of metal, it will be easier to cut the latter with a grinder or hand saw. Moreover, the workpieces must be sawed so that they have a 2-mm margin at the edges, which can be ground off with a file.
After the workpieces are ready, holes for fasteners must be drilled in the plates. Next, a hook with a sear is placed on top of one body plate.
Note!
Do-it-yourself winch: classification, manufacturing materials, description of work stages + instructions for DIY constructionDo-it-yourself clamp - step-by-step production and description of options for using a clamp
DIY knife | A step-by-step description of how and from what materials to make a homemade knife
The next step is to tighten the moving elements with two springs. After this, you need to make sure that the trigger mechanism is working and close it with a second strap.
Making a stock
The stock is made from solid wood, which is very easy to process. Moreover, the supporting part may have a butt for conveniently attaching the stock to the shoulder or a slightly convex edge with slots through which you can stick your hand to hold the handle of the crossbow with your hand.
Each user of a themed weapon chooses the shape of the stock for himself, guided by its convenience and the size of the workpiece. Therefore, solving the problem of how to make a crossbow with your own hands cannot be done without sequentially making a stock:
- First you need to draw a sketch and draw a drawing;
- Next, transfer the dimensions from the sheet of paper to the forest area;
- Cut out the workpiece;
- Adjust the size of the workpiece according to the sketch and drawing.
For fitting, the workpiece is compressed in a vice and leveled using a file and sandpaper. First you need to use a coarse-grained base, then a fine-grained one.
The main thing is that the workpiece does not touch the jaws of the vice. Otherwise, the latter will leave a mark on the surface of the array. This can be avoided by placing rags or planks in advance between the jaws of the vice and the workpiece itself.
Note!
DIY vices: simple and reliable homemade vices from A to Z (190 photos)- Do-it-yourself vibrating table - selection of materials, components and assemblies for a vibrating table with a step-by-step manufacturing description
- Do-it-yourself grain crusher - operating principle, types and features of creating a device for processing grain crops
You can make a crossbow with your own hands at home, if there are no logs nearby, using a 30x50x6 cm board. This lumber must be made of durable species - oak, hornbeam, walnut, pear.
But the first experience is easier to obtain using easily processed pine. In the end, the crossbow is repairable, and this feature is facilitated by the ability to replace the stock.
When the stock is ready, you need to make a large recess in it for the trigger mechanism, as well as holes for the block with shoulders. The corresponding parts are attached to the stock, after which you can begin making the guide and bowstring.
DIY crossbow trigger mechanism
Hello everyone who wants to make a crossbow with their own hands! to make a crossbow trigger with your own hands at home .
If you have never worked with metal, then to make a trigger mechanism you will have to strain, because... you will need to use a hacksaw or grinder, drill, file, etc.
Materials for making the trigger mechanism
Components of a crossbow trigger
To make the trigger you will need the following materials:
- A stainless steel sheet from the front part of the door lock (you can replace it with any other suitable size 10x15 cm and at least 2-3 mm thick).
- Three bolts for a 12 and 6 nut wrench.
- Two bolts for a 10mm wrench and two nuts.
- Two springs.
Making a trigger mechanism for a crossbow
- First, on sheets of checkered paper, draw two parts of the trigger mechanism - the trigger and the hook for the bowstring.
Trigger diagram
Bowstring hook diagram
Angle steel for making previous parts
Making a guide
The guide is usually called a metal strip into which the arrow goes deep and along which it slides during the shot. Accordingly, the bar must be straight and smooth so that the arrow does not squint with each shot.
Before you start making the guide, you need to cut a channel under it with a chisel, 1.5-1.8 cm wide and 1.5-2.0 cm deep. It is cut at the top and in the middle of the bed.
The channel begins in the area of the hole for the trigger mechanism and ends at the edge of the stock - next to the block. The depth of the channel around the entire perimeter must be the same so that the guide sits evenly everywhere on the crossbow; drawings from a spring, which look no less complex than from a guide.
Next, a strip in the form of a metal profile pipe without one wall is immersed into the channel. The plank must be completely submerged so that the edges of its sides do not protrude outward. Also, the guide should not dangle, so the dimensions of the channel are adjusted precisely to it.
To fasten the strip to the channel, you can drill holes for screws at the bottom of the first one. But the caps of the screws can interfere with the arrow, so the guide is often fixed with epoxy glue.
Making a bowstring
You can check the balance of the level of the shoulders and the guide, the smoothness of the trigger mechanism and the tightness of the rebate of all fasteners only by tensioning the bowstring on a homemade crossbow with your own hands. It is made in the following way:
- Two self-tapping screws are screwed parallel to each other into a long board at a distance of 50 cm from each other;
- Two self-tapping screws are wrapped with waxed linen rope four times on each side so that eight threads are formed between them;
- The four strands in the middle are wrapped with waxed rope to form a rigid 8cm base;
- The previous winding is done with the remaining four threads;
- One rigid base is put on one self-tapping screw, the other threads are twisted so that they intertwine with each other;
- After weaving four threads with the other four, the second rigid base is put on a self-tapping screw, and the resulting cable is wrapped with thread to finally fix the braid.
The string remains to be cut into the shoulders. But if the latter include rollers, then the rope for making a rigid cable should be 2.5 times longer. Moreover, you will have to wrap only four threads, not eight. After all, the finished bowstring will have to be inserted into the narrow slots between the rollers and their bodies.
Making arrows
Crossbow arrows are called bolts. This is explained by the fact that they come shortened - 16 inches versus 29, as different do-it-yourself crossbow videos demonstrate. The diameter remains the same - 6-9 mm. The arrow itself is divided into three parts:
- Tip;
- Bearing rod;
- Plumage.
For the manufacture of rods, it is necessary to use exclusively durable wood, the diameter of which is close to the diameter of the directly supporting base. To make the workpiece round, you will have to:
- Clear the stick of bark and excess wood;
- Insert the workpiece into the chuck of a drill or screwdriver;
- Start the power tool holding it with one hand;
- Grasp the open part of the workpiece with sandpaper and move it from one end to the other to sand the surface.
The output will be a smooth rod, which remains to be completed with a tip and feathering.
Wide tape is used for the plumage. You need to cut two small rectangular sections from it in order to wrap these sections around a round rod. After wrapping, the tape is carefully pressed, and the edges are trimmed to the shape of the feathers.
It is easier to assemble the tip from a triangular tip and a tube by welding these metal elements to each other. For welding, you can use an inverter with electrodes or a gas lighter with solder.
The result is a crossbow capable of hitting a target at a distance of 20-40 meters. Accuracy can be improved by mounting the rear sight on top of the trigger mechanism. More experienced shooters supplement their crossbows with optical sights or collimators.
Crossbow arrows
Our crossbow is designed to fire arrows with a diameter of 8 mm and a length of 350 mm. They can be easily made from a duralumin (D16T alloy) tube with a wall thickness of 0.5 mm. The arrow is equipped with a tip and fletching in the same way as is done for archery. It should be borne in mind that the shank of an arrow for a crossbow, unlike an arrow for a bow, should not have a cutout for the bowstring. It is convenient to carve it out of wood in the form of a cork and insert it into the end of the tube using glue.
In conclusion, I would like to express the hope that making a crossbow with your own hands will give you a lot of pleasure, and shooting from it will give you the opportunity to have a good time in the fresh air. Just do not forget that a crossbow, like any weapon, requires a responsible attitude and compliance with all safety measures when shooting.
Source: robinclub.ru