Pike Perch Pike perch Crucian carp Carp Roach
All fishermen and hunters sooner or later think about a high-quality, reliable tent heater. Today, there are many different models on store shelves with different characteristics. Craftsmen offer many of their own methods for making a heater with their own hands. You can watch and get acquainted with them on our website - videos and photos, fortunately, there are enough.
Alcohol lamp
Alcohol has an excellent property - it does not smoke when burned. That is why it was often used as a “raw material” for tent heaters. The alcohol lamp does not have a complex design. It can be made from scrap materials without any special tools.
Almost any can for a heater is suitable - beer, baby food or paint, for example
Tools and materials for making a spirit lamp:
- Tin can – maybe from beer;
- A strip of checkered leaf;
- Marker, knife and ruler.
On the can you need to step back a third from the top down and draw the most even strip. The existing leaf must be attached to the jar using glue or tape.
The cuts are made along the edge of the sheet
Next, you need to use a knife to evenly make holes with a diameter of approximately 0.9 m along the leaf. After these steps, we hasten to congratulate you - the alcohol lamp is ready.
It is important to learn how to properly light a homemade heater and adhere to fire safety rules in a tent.
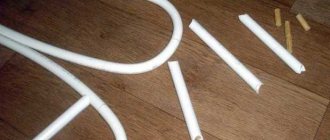
What you need
- To make a portable heat exchanger you need:
- aluminum pipe with a diameter of 25 mm and a length of 350 mm - 18 pcs.;
- galvanized sheet approximately 1 mm thick for making the body;
- riveter with rivets;
- drill or drilling machine and drill bits;
- sheet bender;
- a fan (preferably with speed control) and a power source for it.
- You will also need a hammer, chisel, core, measuring and marking tools.
How to light a heater correctly?
You need to pour alcohol into the jar. Then the heater must be placed on a non-flammable surface and shaken so that a little alcohol flows out of the holes. Then you need to ignite the existing alcohol from the outside. When the alcohol lamp goes out, these steps must be repeated several times.
Beautiful flame, even mesmerizing, right?
Step-by-step guide to making a heating pad
First we modify the design of the can. Today's design will have three functions: a device housing, an infrared reflector, and a container for alcohol. We perform the operation with a stationery knife. We take scissors and open it. After manipulation, you get a device body, an infrared reflector and a container for alcohol. Now open the package of stainless kitchen shavings for washing dishes. We stretch it and place it inside the jar. We thread it through. Here it must be secured with a clamp. The catalytic fireplace is almost ready. Now we’ll add alcohol and test it. Pour in alcohol and you can light the fireplace. Look what's happening. The catalytic process has started: there is no fire, but the chips are red and emit a lot of heat - this is infrared radiation. Very warm. The result is a simple and interesting design of a catalytic miniature heater. You can easily repeat it at home, check it, write in the comments what you got.
DIY electronics in a Chinese store.
Gas heater
This version of the heater is a little more difficult to make with your own hands. However, a homemade heater has many undeniable advantages, thanks to which it is popular among our fishermen.
Advantages of a gas heater:
- Large heating area - it can heat even a small cave;
- More heat compared to similar homemade heaters.
Materials for making a gas heater:
- Small infrared ceramic heating pad;
- Gas spray – you can use “dichlorvos”;
- Burner nozzle with a special tap;
- A small piece of 4-6 mm oxygen hose.
“Semi-finished products” for the manufacture of a gas heater
When choosing a ceramic burner, you need to pay attention to small models, because they will be powered not from a large cylinder, but from a small cylinder. In addition, there is no need for extra expenses on a hike.
Bottom:
We bend the lower part of the body from a galvanized sheet, rolling the part from the burner side or from both sides.
The part should occupy half the area of the bottom, under the other there will be a gas stove.
We make a valve for the pipe to reduce heat loss.
We bend the lid and make a hole for the fan, which will distribute warm air throughout the tent, and secure it.
We secure the cover with the fan using rivets.
We make the legs so high that the fire of the gas stove is closer to the aluminum pipes.
We connect the power source to the fan, the gas cylinder to the burner in compliance with safety regulations, and put the plastic pipe on the metal one and take it out of the tent.
To reduce heat losses, you can organize an air intake for the burner from the outside - connect a second pipe from the street to the burner. Cold air, bypassing the warm room, will go into the chimney along with carbon monoxide.
Solid fuel mini-stove
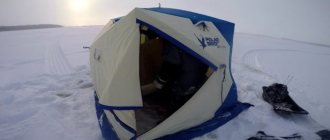
Long gone are the days when modern portable gas stoves did not exist, and primus stoves were a rarity. Fishermen at that time used homemade mini-stoves to heat their winter tents - welded from sheet iron, or hastily welded together from some metal containers. Such stoves usually ran on wood, although other solid fuels, such as coal, could also be used.
One of my acquaintances, a railway worker, an avid bream fisherman in the world, in the late 80s regularly fished on our surrounding reservoirs - the Revda city pond and the Volchikhinsky reservoir. He heated his tent with a homemade coal stove. According to his reviews, “it was so hot that I was sitting in a T-shirt.”
There were a great variety of designs for these stoves. Here, as they say, who was good at what. However, the principle was the same everywhere - a firebox, a stand (so as not to melt the ice) and a chimney pipe that went outside through a special hole in the wall of the tent, edged with non-flammable material like fiberglass. Simply put, a miniature potbelly stove.
Nowadays, mini-stoves are being pushed out of use by more efficient and compact devices for heating a tent. However, this does not mean that no one heats their tent with wood these days. In rural areas, especially in some villages far from cities, this is still a very popular method, sometimes the only possible one.
- Pros: cheap or free fuel, good calorific value.
- Disadvantages: bulky design, complete uselessness if there is no firewood in the fishing area, the need for a large amount of fuel (the aforementioned friend carried a medium bucket of coal when fishing). In addition to this, I had to periodically throw firewood into the stove, distracting myself from fishing.
Advantages of heat exchangers for winter tents
Let's see what's good about these devices:
- Accelerated heating of the interior of the tent;
- No excess moisture;
- More efficient absorption of heat generated by the burner;
- Compatible with any type of gas burners;
- Compact design;
- Built-in chimneys to remove combustion products.
There are also disadvantages:
- Takes up free space;
- Requires power supply;
- Requires a good chimney and its outlet outside the tent space.
Heat exchangers are ideal for travelers and ice fishing enthusiasts who have the opportunity to move a large number of auxiliary devices and accessories with them - for example, in a car.
Construction of a heater from a pipe
This homemade design is also called a thermal gas gun. It produces significantly more heat than previous heaters and absorbs more energy resources. Also, such structures are often equipped with chimneys, which makes them bulky and difficult to carry.
The diagram will familiarize you with the principle of operation and design features of a gas heat gun. The heat flow generated by the device is distributed using a fan
To assemble the heater yourself, you need to collect the following material:
- three meter pipes of various diameters (two 8 cm and one 18 cm);
- steel plates with which the fastening will be carried out;
- Metal sheet;
- gas burner with piezo ignition;
- axial fan.
You will also need a variety of tools: drill, welding machine, tape measure, level, grinder, metal scissors. Pipes can be replaced with cylinders or fire extinguishers of suitable diameters. A grinder will be needed to cut the bottom and top, as well as shorten the workpieces.
Working in intensive mode to heat a room of 15 square meters, a forty-liter cylinder is enough for about a week. While working, the gun dries the air, so you need to humidify it
In a pipe with a diameter of 18 cm, two holes of different diameters are drilled: 1 cm and 8 cm. They need to be drilled opposite each other.
A 30 cm section is cut from a pipe with a diameter of 8 cm, which will represent the combustion chamber. Fasteners are welded to this pipe and a hole with a diameter of 1 cm is drilled in it. Then this pipe is inserted into the first pipe.
You need to cut a plug from a sheet of metal. It will close the gap between the heater body and the combustion chamber. A combustion chamber is welded to the body, and a pipe for exhausting hot air is welded to a hole with a diameter of 8 cm. After this, the plug is welded. After making sure that the gas burner is tightly attached to the combustion chamber, you can insert the hose through the centimeter holes.
A fan is installed at the back of the device, and a smoke exhaust is installed at the top. In order for the heater to stand stably on the surface, the legs should be welded. A gas heat gun efficiently heats rooms and uses gas economically. However, when using it, you should adhere to safety precautions.