A sheath is a case designed for the convenience and safety of storing and carrying edged weapons, which includes special-purpose knives, daggers, dirks, swords, sabers, scimitars and other types.
As a rule, manufacturers offer weapons with a sheath, the material of which is most suitable for this type of product. It varies in cost, so it can be available to any buyer.
What materials are used
What the sheath can be made from will be decided by the master. His choice depends on his skill, financial capabilities and his ideas about their beauty and practicality. Various materials are used: wood, birch bark, fabric, plastic, metal.
Tree - thousands of years in the service of man
Wood, which used to be one of the main materials for sheaths, is now used if there is a need to emphasize the ethnic identity of the instrument.
It is indispensable if you need a very durable case that will preserve the sharpness of the blade and protect the owner from cuts.
The wooden case is durable and reliable. Real craftsmen are able to turn it into a work of art by decorating it with carvings or adding metal inserts with characteristic patterns.
If you decide to make a knife sheath from wood, you should pay attention to the fact that they are quite heavy, and if not properly cared for and handled, they can dry out or crack from a strong blow.
Best skin properties
Leather is one of the oldest natural materials used by humans to make sheaths. It has many positive properties that have allowed leather sheaths to be made for centuries: lightweight, comfortable, and easy to make. It has one more important characteristic: the knife is removed from such a sheath completely silently, which gives an advantage in an unexpected attack on an enemy or animal.
Leather sheaths are still widespread today. They are soft and easy to use.
Use of modern materials
In addition to traditional natural materials, modern materials with the necessary characteristics are used. Among them is Kydex, which is characterized by thermoplasticity, which allows it to be used for the manufacture of holsters and sheaths.
Products made from it are characterized by a long service life and a neutral reaction in an aggressive environment. They do not deform from moisture, frost or heat, repel dirt, and have good impact resistance. Its main disadvantage is the lack of aesthetics. In addition, when removing or inserting a weapon, a click is heard, and with prolonged use, the edges of the sheath lose their appearance.
Nylon used for the production of sheaths is gradually losing its popularity. Its main advantages remain its low price and the ability to produce products in different styles. But it wears out much faster than leather or Kydex.
Both fabric and plastic
But thick thick nylon fabric Cordura is much more reliable than it. It is not afraid of moisture, temperature changes and has a high margin of safety.
New generation materials are increasingly used in the manufacture of sheaths, so products made from various types of thermoplastic are becoming popular. It is neutral to moisture and can be easily processed into the desired shape. As for temperature changes, especially its significant decrease, only high-quality plastic can “survive” them without loss. Cheap samples crack and crumble in severe frost.
Plastic scabbard
Plastic sheaths are less difficult to make than wooden sheaths. The following materials and tools will be required:
- saw and drill;
- plastic pipe;
- construction hair dryer;
- leather fastening for sheath;
- sandpaper;
- pencil;
- drill with a thin drill bit;
- bartacks and riveter.
Initially, you need to create a basic blank from a plastic pipe. Cut a piece 2 cm larger than the knife blade with a part of the handle that will be recessed in the sheath. Cut the pipe in half lengthwise. Heat it with a hairdryer at +400 degrees, wearing protective gloves. As the pipe softens, insert a knife and shape the plastic to resemble the tool itself.
Then let the plastic cool and become hard. Use a file to saw off excess parts of the material along the length and width. Use a pencil to mark where the rivets will be inserted. Drill holes with a drill, attach the leather parts with rivets, securing them with a riveter. If necessary, you can paint the sheath in any color with plastic paint. This will make them easier to find in the grass if they fall. It’s not difficult to build a sheath, the main thing is to be careful and follow the correct sequence of actions, then you can save a lot on your purchase.
A knife is an indispensable attribute for every hunter, fisherman, tourist and mushroom picker. Therefore, many are interested in how to make a sheath for a knife - the tool must be securely fixed to reduce the risk of losing it, but at the same time, removal should take only a few moments. Experienced craftsmen can make sheaths from birch bark, leather, plastic, wood and other materials. Let's tell you in more detail how to make a knife sheath with your own hands.
Making your own sheath
Knives are not always sold in sheaths, and it often happens that the cutting tool is in working condition, but the sheath has already worn out or become unusable due to careless handling. In this case, you can try to do it yourself, but you will need the skills and equipment necessary for the work.
How to make a case yourself
Making a sheath with your own hands requires certain skills, as well as the availability of different sets of tools, depending on what material is used.
Making a leather case
To make a knife sheath from leather, you will need a minimum set of materials and tools. First of all, you will need well-made, high-quality leather. In addition, you will need thick strong threads, braid or cord, scissors, an awl, paper for making a template, a pencil, a ruler, tape, as well as special glue and medium-grit sandpaper.
Initially, you need to make a template (pattern) for the cover. The work is carried out as follows: first, the outline of the blade is applied to the paper with a margin of 2-3 mm, then on another sheet - the entire knife. The template needs to be cut out, glued and tried on to make sure that the knife will fit in the paper sheath. They shouldn't be too tight, but not too big either.
If necessary, size adjustments are made, after which the patterns are placed on the base, traced and cut out.
The leather fragment intended for the blade must be soaked for five to seven minutes in very warm water. This is important: the material will become elastic and soft. Then it is applied to the blade so that part of the handle is also captured, tied and left until completely dry. During this time, the skin takes the desired shape.
The next stage is marking on the second part of the workpiece, to which the first is applied with holes made with an awl, and neat marks are made through them with a pencil. The free part of the second fragment is folded in half and sewn together: this is a belt loop.
Then both parts are sewn together with strong thick threads or connected using an awl with a hook (crochet hook), which pulls the cord into the hole. The last operation is grinding with sandpaper, which eliminates irregularities, burrs and roughness.
Leather sheaths can be made not only for a knife, but also for other weapons: a sword, a scimitar, a dagger. But if you don’t have the skill or it’s insufficient, you can go to the website of the Caucasus-souvenir online store. Here you will find magnificent hunting knives in comfortable and durable leather sheaths, excellent throwing and camping knives, other cutting tools and high-quality edged weapons in genuine leather sheaths.
Wooden scabbard
If you are interested in learning how to make a sheath out of wood, you should read the recommendations of experts. They advise preparing two wooden planks corresponding to the size of the knife, a jigsaw, a medium format chisel, and good quality glue (Moment). The manufacturing technology is no different from working with leather. The only difference is that the inside of both blanks must be covered with suede or leather so that the knife does not “rattle” in the case, and the blade does not become dull.
You need to connect both wooden pieces using glue. For stronger adhesion, press down both fragments, but do not overdo it, otherwise the wood may crack. The finished product can be polished, decorated with carvings or covered with leather.
Birch bark scabbard – it’s not that simple
Many novice home craftsmen are interested in how to make a sheath from birch bark. It seems to them that this material is very simple and easy to process, which means it will not be difficult to make a birch bark case. However, they are mistaken, because choosing a piece of birch bark that matches the length of the blade is not at all easy. This means that it will have to be assembled from several fragments.
And although the “birch bark” technology is not much different from the procedure for creating a leather case, it will have to be made from horizontal birch bark strips. For convenience, you need to use a vice to fix each layer. The work will require care, accuracy and a significant investment of time.
Is it possible to make a sheath out of plastic?
Many people wonder how to make a plastic sheath on their own, because they are usually made in industrial production conditions. But experts say that their creation is simpler than wooden ones, and production is available at home.
However, to do this work at home, you will need more “serious” tools and materials: a saw, a drill with a set of drills, a riveter with rivets, a hair dryer, a knife, belt fasteners, sandpaper and, finally, a plastic pipe from which it will be made knife case. Not everyone has such a set, so only experienced craftsmen can work with plastic.
You can make sheaths from various materials in your home workshop, and in Ali Askerov’s Caucasus-souvenir online store you can purchase various types of knives, sabers, checkers, scimitars and other weapons made by famous craftsmen. It is placed in a sheath made of various materials. The design of the products demonstrates the skill and subtle taste of the manufacturers. You can view the full catalog on the store's website.
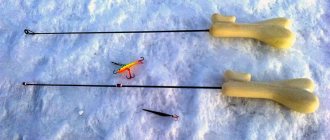
Leather knife sheath
A knife is a necessary attribute of a hunter’s activity. The best knives are made from the strongest types of steel, so they last for many years. What kind of sheath is suitable for quality knives? The most popular ones are leather ones, because they are durable, but soft, easy to use. Popular brands are considered to be Yakut and Kizlyar (Russia). According to the type of fastening, cases are vertical and horizontal, for open and hidden carrying. Often, hunters choose a Finnish type sheath, universal or tactical with a Molle fastening system.
Read also: Alloying element that gives steel heat resistance
The benefits of using a leather holster are:
- the knife is perfectly held by friction against the skin, and you can make any movements without fear of losing the product;
- the case looks stylish, beautiful, and very comfortable;
- A leather sheath can be adjusted to a specific knife using fixation straps.
It is best to carry the tool in a leather sheath in a hidden way with the handle down - this position will be the most favorable. Leather is easy to work with, so even a beginner without any experience in such matters can build a sheath.
Materials and tools
To sew a homemade sheath, you need to select all the necessary devices and materials in advance. First of all, this is a piece of leather that can be taken from old boots or a thick jacket. There are different ways to make a sheath, so some accessories may not be useful. Here is their complete list:
- A4 paper or cardboard;
- durable nylon threads (you can replace them with a thin cord);
- leather glue (it’s better to take epoxy or “Moment”);
- tape or cling film;
- pencil and ruler;
- sandpaper;
- sewing awl with hook;
- scissors, stationery knife;
- brush;
- office clips;
- drill with 1 mm drill bit;
- kitchen fork;
- vodka;
- paraffin;
- shoe wax or shoe polish;
- stain;
- PVA glue;
- cotton fabric impregnated with epoxy resin.
Operating instructions
First you need to make a pattern for the sheath. To avoid cutting yourself, cover the blade itself with tape or cling film. Wrap tape around the entire tip several times to create a durable protective layer. Then you can start creating the pattern:
- put a sheet of white paper on the table;
- place the knife on the paper, carefully outline it with a pencil (if the knife has a guard, you also need to outline it);
- cut the workpiece.
Next, you can start working with the leather. A piece of material is laid out, a pattern is applied to it, and traced. Another part of the pattern is drawn in a mirror image or laid out on the back side of a piece of leather and lines are drawn. On each side of both patterns, add 1 cm per seam. The parts are cut out with sharp scissors. Also, a pendant 2.5 cm wide and an insert 1 cm wide should be made from leather.
The order of work will be as follows:
- Make holes in the hanger using an awl. Cut off all excess leather and thread the straps through the holes.
- Use an awl to make holes in the main piece of leather. The size of the holes is a couple of millimeters smaller than the width of the belts. Three holes in two rows are enough.
- Fold the leather piece in half and iron it well at the fold. Glue the skin at the seams using epoxy, Moment or another reliable product. Press the edges well with paper clips.
- After the glue has completely dried, trim the edges to a neat shape to smooth them out. Sand the curved parts well with sandpaper.
- In a small bowl, mix 1 part PVA glue and 2 parts vodka. Shake the resulting product thoroughly. Apply it with a brush to the leather case three times, each time waiting for it to partially dry.
- After 15 minutes from the last time the workpiece was coated with glue, when it has not yet completely dried, draw straight lines along the edges. The easiest way to do this is with a regular fork.
- Using the marks, drill small holes for the seams using a drill and the smallest drill bit (piercing the glued skin with a needle will not work). Cut grooves connecting the holes to conveniently place the thread in them.
- Sew the sheath along the length. Afterwards, you can apply stain to them and let them dry completely without heating. Repeat the procedure until the desired shade is achieved.
- To complete the work, sand the leather with the finest sandpaper to make it soft, soak it in cream, wax, and dry it again at room temperature.
Survival knives are actively used by lovers of extreme recreation and various hikes. They will also require a sheath, and for such products it is better to make a case with an insert inside. You can make them to order or try to make them yourself:
- Take a cotton cloth and carefully wrap it around the blade. Melt the paraffin and coat the fabric thoroughly. Form a sheath tab.
- Make a pattern on paper using a knife. Transfer to the skin, also circle, cut through. The product must have allowances.
- Place the fabric blank on the leather one, roll it up, coat it with glue, and secure it with clothespins. After the glue has dried, carefully stitch the sheath with a thick nylon thread along the holes made with a drill.
- Cut off excess parts and set the edges on fire. Then sand the product with sandpaper.
- Make a pendant from pieces of leather. Cut the part in the shape of the letter P, make small holes at the edges. Thread the straps and tighten them. Mark the attachment points on the scabbard, make holes, and insert the pendant.
- Cover the finished product with cream and dry.
If we make a sheath from a piece of old, too rough leather, before sewing it needs to be softened a little in hot water, then dried in a towel.
Read also: Metal file photo
Minuses
The disadvantages include such difficulties that the case will require constant care, although any material requires care. Controversial minus. Some argue that it is difficult to work with, and some, on the contrary, make the sheath literally “on the knee”. Again quite controversial.
And the fact that the case turns out to be soft is yes, true, but to give rigidity to the product, you first need to choose a stronger material. And the second important point is that to give it the necessary qualities, as a rule, a wooden insert is used. This is at the request of the owner of the homemade product.
Leather knife sheath.
Materials and tools
In fact, as mentioned above about leather tanning and drawing, this manufacturing process is for professionals. The same applies to the wooden insert. The article is intended to help the common man, not a leather specialist.
The list will include various tools, and where to use them will become clear to you further:
- You will definitely need leather, preferably naturally tanned and thick;
- shoe thread or nylon thread, reliable and not rotten;
- to process the ends you will need wax or paraffin;
- for the role of a fastener, if there is one, use a holster screw, otherwise you can take a rivet from a jacket or from anything else;
- glue, preferably “PVA”, “Moment” for gluing various materials or special for leather;
- pencil, ballpoint pen, sheet of paper, ruler;
- awl, needle, sharp scissors;
- a stationery knife or better a shoemaker's knife;
- sandpaper of different grain sizes;
- brush, stationery clips;
- fork, marking wheel, drill with drill bit 1 mm in diameter;
- tape, cling film or insulating tape;
- stain or leather cream.
Some items may or may not be needed, or may replace each other; the list is compiled with reserve. Having prepared everything you need, you can start working.
Manufacturing process for a hunting knife
Take care of the cleanliness of your workplace. Table lighting should be organized from different sides.
Leather sheath for a hunting knife.
And wash your hands before starting work:
- The first step is to wrap the blade in many layers of tape or cling film. This will protect your hands from cuts, as well as the blade from getting glue or moisture on it. Grab a little and the handle. Don’t be afraid, if the blade has become a little larger in size, a supply will not hurt.
- More “advanced” masters do not use templates. But in our case, mock-up development will save you from cutting errors, and beginners absolutely need this process. To do this, you need to trace the blade on paper with a pencil. Roll it up like a real sheath and place the blade there. Check how it sits in the layout, whether its movement is free.
- After making sure that the knife fits well in the mock-up, you need to transfer the mock-up cutting to the leather. Do this carefully and carefully. It is better to trace with a ballpoint pen from the wrong side.
- After marking, you need to carefully cut the workpiece out of the leather with scissors. Don’t be afraid, cut with a margin of a couple of millimeters. Anything unnecessary can be removed later.
- You definitely need such a part as a “spacer”; it follows the main contour and is glued to a smaller part of the workpiece; try on the blade while doing this. To eliminate errors.
- At this stage, you can glue most of the workpiece with a small amount of pre-prepared glue. Don't worry if the edges are uneven - this will all be corrected a little later.
- We wait for the glue to dry, which may take 24 hours, and cut off large irregularities with a stationery knife or something sharp. Then we sand the entire side surface with coarse-grain sandpaper and bring it to perfection with fine-grain sandpaper.
- After sanding, you can begin marking the seam. Carefully trace the outline with a pencil and use the marking wheel to apply marks. This can also be done with a fork. Choose a pitch of approximately 5 mm, as you like.
- If your skin is thick, then you need to use a drill with a drill of the smallest diameter and make holes. If you see that a “prick” with an awl is enough, then make holes with it. But keep in mind that in this case it is better to perform the operation on both sides. Immediately mark the holes for sewing on the fastener.
- You can stitch across the entire surface of the sheath, and after marking the clasp, cut it out of the leather and sew it on. It’s better not to “rack your brains” with the seam; a line on one side goes in one direction, and when returning, do it on the other.
- Don't forget to sew on a holster screw or rivet. Having completed all minor operations, rub the sheath with stain or cream. It will look like new ones from the store.
There are quite a lot of layout options on thematic resources, it’s not forbidden to peek there too, but use your imagination, and your sheath will be unique.
How to make a sheath out of plastic
Making a knife sheath from plastic with your own hands is relatively not difficult - easier than wooden ones. But for this you need to have certain tools. To work you need:
- knife;
- drill;
- saw;
- plastic pipe;
- riveter with rivets;
- sandpaper;
- belt fasteners (you can just use a narrow strip of leather);
- construction hairdryer
Not every household has such a set. But if you have everything you need at hand, you can start making a knife sheath.
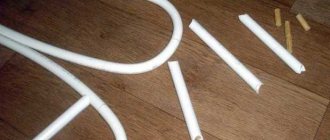
- Saw off a piece of plastic pipe - the length should be 1-2 centimeters longer than the blade of the knife and the part of the handle that you plan to “sink” into the sheath.
- Cut the pipe lengthwise.
- Heat the workpiece thoroughly with a hair dryer set at 400 degrees. Remember to use protective gloves to avoid serious burns.
- When the plastic warms up and becomes soft and pliable, insert a knife into it, exactly as far as it will go when carrying it, and crimp the pipe, giving it a suitable shape.
- Let the plastic cool and harden.
- Cut off the excess - length and width. Use a pencil to mark the places where the rivets will be inserted - the optimal distance is 1-2 centimeters.
- Carefully drill through the marked areas with a thin drill bit. If you want to get a belt loop, fold a piece of leather in half and also make a couple of holes in it to attach to the sheath with rivets.
- Insert tacks into the holes and use a riveter to secure them in place.
- All that remains is to paint the sheath in a suitable color. Of course, black looks the most elegant and strict. But bright colors - red, orange, blue - are more noticeable. If you suddenly lose your knife and sheath in thick grass, it will be much easier to find them.
Homemade plastic sheath
That's all. Now you know the whole procedure and, if you wish, you can easily make exactly the sheath you need.