Without exception, all lovers of outdoor recreation will appreciate the advantages of tents. You can throw a noisy party in the open air or spend an unforgettable romantic evening in the lap of nature. The canopy will protect from the sun in hot weather and provide shelter from sudden rain or strong wind. You can put it in many places - a cottage, a garden, any area suitable for leisure.
Thanks to its simple design, consisting of a slatted base and a fabric canopy, making a tent with your own hands is not difficult, even with minimal experience in construction. It is enough just to organize this process correctly, choose the right tools and materials. Then the building will turn out beautiful and reliable, serving its owners for many years.
What types of tents are there (types)?
If you have an idea to make a tent, you first need to decide for what purpose it will be used and how often. Depending on the needs of future owners, you can choose different options.
Giving tents can have the following design:
- folding (such awnings can be purchased at almost any travel store, they are easy to assemble and disassemble, and can be used both at home and during trips to nature);
- stationary (a lightweight gazebo that can be assembled when it warms up and disassembled when it turns out to be unnecessary);
- pavilion type (this type of building has a stationary base in the form of a platform made of wood or concrete, around the perimeter of which support posts are installed and a fabric or mesh frame is stretched).
The easiest way is to buy a tent for your summer cottage in a store and assemble it as needed. For example, when you urgently need to set an outdoor table for the arrival of a large group of guests.
The best choice for a country house is a gazebo-tent or a full-fledged pavilion. They look luxurious, and to make them does not require large financial investments. All work can be done independently or with minimal participation of specialists.
How to make a garden shed from PVC pipes
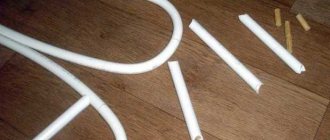
PVC pipes are so easy to use that craftsmen constantly find different uses for them. You can use them to build an original garden shed and even a full-fledged gazebo. The process will not take much time, and the result will please you. Despite its simplicity, the design of plastic water pipes will be reliable and will perform its functions perfectly.
For a DIY garden shed you will need PVC pipes for the frame, 4 pieces of reinforcement, fabric for the awning, twine (if necessary) and flower pots if desired. Be sure to check that the pins fit inside the pipe. The internal diameter of the pipes is 12 mm and they are connected to each other using tees and fittings.
The awning is made of any dense fabric; the edges can be pulled to the pipes with nylon twine, or the edges can be sewn to thread the pipes inside.
Stages of building a canopy using PVC pipes
- To begin with, let's determine the dimensions of the frame; the ends of two prefabricated pipes are bent in the form of an arch, and pieces of reinforcement are hammered into the ground at the attachment points. You can install flower pots on the fittings and use them for planting flowers.
- One individual arch is too weak, even to simply support the awning. Therefore, it is more reliable to connect two arches with a transverse piece of pipe (or two), using tees of suitable diameter.
- For the canopy, you can use ready-made curtains, the edges of which have already been stitched under the rod. Ordinary fabric will not withstand rain and wind, but this is not necessary here. The entire structure can be disassembled in a few minutes and the fabric is removed from the PVC pipes. In addition, the curtain can be easily moved along the pipe to find shade at any position of the sun.
- Depending on the project, the method of attaching the trim may be different - sometimes you can use the top trim as a cornice on which the fabric will be placed like curtains. In any case, you need to ensure convenient adjustment of the shading level of the gazebo and high-quality protection from wind and rain.
Preparing the place
Before you start building a tent with your own hands, you need to choose a place to place it. This is an important stage, which determines how firmly the canopy will stay on the support. The comfort of people who will spend time under it also depends on the location of the canopy for relaxation. It is unlikely that anyone will enjoy being in a dark or insect-infested place.
The following will certainly come in handy while working:
- shovel;
- buckets;
- hatchet;
- scrap.
To make it more convenient to collect garbage, it is better to prepare special containers (bags, containers) in advance. Packaged waste is much easier to transport and will not interfere with subsequent stages of construction.
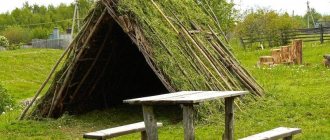
DIY tent tent. How to build a tent for a summer residence with your own hands
This is exactly the case when: “Do you want checkers or go?” No matter what you build this thing out of, it will look equally disgusting.
Well, except that you can choose the color: black or blue.
At the same time, it performs its functions properly. Such a shelter is quite capable of protecting from wind and light precipitation.
Why is it even needed if we live in a world where tents exist?
- Well, first of all, look at the name of the channel :) Making an awning with your own hands will cost less than buying a tent. I love it. Even Chinese and from Avito.
- Secondly, the tent takes up much more space and weighs much more.
- Thirdly, there may be cases when there is simply no tent. None at all.
A pack of garbage bags and a couple of rolls of tape can also be thrown into the emergency backpack, which I already wrote about
, and in the trunk of a car and anywhere.
Of course, it won’t be possible to spend the winter in such a hut, and it’s probably not worth bringing a lady into it. But being homeless for a couple of days in warm weather is easy.
Construction stages
As expected, we first take a responsible approach to choosing the material. The thickness of any plastic bags, even the largest ones, is minuscule. Therefore, we take the largest ones, 160 liters.
As a more reliable alternative for a tourist awning intended for constant use, we can offer thick film for greenhouses…. yes, anything, even shower curtains from FixPrice. But all these options will be more expensive. We care about the purity of the experiment here, so now we use canonical material.
Features of territory preparation
The area where you plan to start installing the tent yourself must meet the following requirements:
- installation is possible only on a flat surface;
- the soil is quite dense;
- there is a distance between the awning and the nearest objects.
The structure is placed in such a way that it is convenient to use. It is necessary to take care of the design side - it is good if the design is in harmony with all nearby objects, and does not interfere with the flow of light into windows, garden plants, etc.
Tent: design, functions, advantages
A tent is a mobile outdoor structure that protects from rain and hot sun. Basically, the frame of this structure is made of aluminum, profiled metal or plastic pipe covered with waterproof material.
An open garden tent with a gable roof will be an excellent place to relax
The functional features of the tent depend on the type of material from which it is constructed.
The design with light shade fabric is designed to protect vacationers from the hot sun, and the frame with a water-repellent coating will protect from heavy rain. Sometimes you can see tents with a polyethylene cover, but such material has a short service life, does not allow air to pass through, and therefore it will be very hot inside the structure in the summer. Models with mosquito nets, which are used as covering material for walls, are also popular.
A collapsible country tent with a mosquito net will protect you from both heat and mosquitoes
Depending on the size and purpose of the tent, there are:
Regardless of the type of tent, it must have at least three protective “walls” made of thick fabric.
To protect against flies and mosquitoes, a mosquito net is hung on the front of the tent.
A hexagonal tent for a summer residence can become a decoration for the site
Types of tents
There are different types of tents that can be installed on a summer cottage:
The tent-awning for the dacha is a simple design
A gazebo tent for a summer residence can be used in winter
You can take a tourist tent for hiking with you
Tent pavilion suitable for celebrations
There are certain rules for choosing a design depending on your needs and capabilities:
An open tent with lattice supports for a summer residence looks very unusual
Photo gallery: types of tents
What is better - a tent or a gazebo?
Many summer residents often have a question: what is better, a gazebo or a tent? The fact is that both designs have their positive and negative sides, as well as their similarities and differences. Let's see what characteristics tents and gazebos have, and which option is better to choose for your personal plot.
Table: comparative characteristics of the gazebo and tent
| Alcove | Tent |
| Can only be stationary or portable | Can be collapsible or stationary |
| Requires foundation installation or pouring | Can be assembled and installed outdoors without a base |
| Has a high degree of strength and reliability | In strong winds, the collapsible structure may “fly away” |
| Can be used at any time of the year | Designed for warm seasons only |
| Only durable building materials are used for walls and roofing (wood, metal, tiles, slate, metal tiles, chipboard, fiberboard) | Light but durable fabrics are used for walls and roofing (tarpaulin, synthetic fibers from polyester, polyethylene coverings, etc.) |
| You can build a structure of any shape | Can have any shape |
| Impossibility of transportation | Collapsible design can be transported in a car |
| Construction takes several days | Quick installation (several hours) |
Creating a quality platform
When the territory has been selected, this area should be cleared of grass and weeds, debris, and stones. If you plan to install a tent for children or a collapsible version, it will be enough to mark where the support pegs will be driven in in the future. If desired, you can lay a rolled lawn on the selected area.
For a stationary awning, additional work should be done with the soil layer. To do this, a perimeter is outlined and then 15 cm of rock is removed in depth. Then the resulting depression is filled 2/3 with clean sand. A layer of granulation is placed on top. After drying, flooring can be laid on this surface.
There is another type of foundation preparation - using concrete. In this case, the hole is dug at least half a meter deep. It is completely filled with mortar, and supports are embedded into it along the perimeter. The resulting platform after hardening will be very durable; boards, saw cuts, and terrace slabs can be laid on it.
How to make a tent with your own hands?
A variety of materials are used in the manufacture of summer cottage tents. The frame is usually installed from natural wood or metal. Various types of moisture-resistant fabric and special insect repellent nets are used as covering. It is imperative to draw up a detailed drawing and estimate of the materials used in construction.
Types of tents
The basis of any tent is vertical posts connected to each other by horizontal rods, making the structure quite rigid and stable. Fabric is stretched over the frame, forming a roof and, in some cases, side “walls.” The tent awning must be waterproof.
The shape of the tents can be:
- rectangular,
- square,
- multifaceted.
According to the frame design:
- metal,
- plastic,
- wooden.
For short-term recreation in nature, it is better to choose a small square tent; it is more compact and does not take up much space when assembled.
If you like to travel by car, stopping for a long time in one place or another, or going out into nature for several days, then a tent-tent is what you simply need. Several functions are combined here: sleeping places, a relaxation and eating area.
The model and size of a tent for a summer residence is a matter of taste and price; it can be modest or quite large in size, complex or simple in design, because it does not need to be transported in a car every time; the storage location will be a country house or a barn.
For a summer residence, it is better to choose models with metal fasteners and a frame coated with powder enamel paint - additional protection against corrosion.
An interesting model for a country holiday is a tent with sliding curtain walls. In good weather you can enjoy the beautiful landscape; the moved “walls” will protect you in bad weather. The side walls often have mosquito net inserts, which allow air to pass through and protect against annoying insects.
A tent with side walls made entirely of mosquito netting will protect against insects, but at the same time will allow the penetration of daylight and a light breeze on a hot day.
Models with lattice racks in the form of trellises, which can be made of a metal profile or wood, deserve attention. This tent design will make the impromptu gazebo more solid and decorative.
The structure with a tension awning can be used as a carport. Such a canopy will protect the “iron friend” from the scorching sun, rain, “bird surprises,” from foliage and needles of deciduous and coniferous trees.
Tent assembly
When all preparatory activities are completed and a high-quality site has appeared on the agreed area, the next stage of construction begins - the installation of supporting elements.
When carrying out the work you will need the following tools:
- hacksaw;
- hammer;
- motor drill;
- screwdriver
For measuring operations:
- level;
- roulette;
- ruler.
When assembling ready-made gazebos made of metal or aluminum, you will need Phillips and flathead screwdrivers and wrenches. Self-tapping screws, nails, etc. are used to assemble a wooden base.
Installation of load-bearing racks and roof
When making a tent with your own hands, you should install supports. If the site is made of concrete, then they are installed at the stage of hardening of the base. For wooden or metal options, you will have to drill holes.
Depth of holes for installing racks:
- steel - 50 cm;
- made of wood - 70-90 cm.
Depending on the shape, a different number of support pillars is required. For a square one, 4 are enough (you can install the 5th in the center of the frame). For more complex (round, oval) buildings, the number of racks is usually larger and amounts to 8-10 pieces.
The support pillars are installed strictly vertically, leveling and compacting the hole with soil. It is better to use 100x100 cm timber, having previously treated the material with anti-rotting compounds.
Assembling a metal frame
Our tent is designed for a really large family, or perhaps a group of several families.
The frame is light and reliable, as it will be made of a pipe installed in a base fixed by the foundation. All we need is to work intelligently with the dimensions, which must match exactly.
We immediately cut out the main posts, corner and wall, which will hold the wood or metal sheathing for mounting the tent cover. The sheathing can be very light, since the tent is covered with fabric. But this does not mean that it is necessary to sharply reduce the quality indicators of materials for assembling the frame.
The finished pipes are installed in mortgages in the foundation, leveled and tied together with a temporary connection. Next, pieces are cut from the same pipe, which, when assembled, will become the ribs of the main structure. Fasteners are welded or screwed onto these pieces of pipe, just like to the pipes of the main frame. If all the dimensions match, you can remove the temporary fastenings and try to assemble the entire frame into a whole structure.
Roof installation
The roof of a wooden structure must have slopes; rafters are installed for this purpose. Or you can simply make the supports on one side 30 cm longer. The metal pins will be connected to the roof using steel angles, connectors, etc. The gazebo is already ready and created in accordance with the drawings, so no additional actions are required. A tent with a folding roof is assembled in accordance with the instructions and drawings, since in this case there are specific manufacturing and installation features.
After installing the frame, the tent is almost ready with your own hands - all that remains is to hang the awning. It is better to order one from a textile agency, but if you have the appropriate experience, you can sew it yourself.
Step-by-step instructions for building a tent with a mosquito net
The top layer of soil must be removed and a cushion of sand and granules made
The earth around the pillars can be compacted, but for reliability it is better to fill it with concrete mortar. If the tent has a pitched roof, then the rear posts should be 30 cm shorter than the front ones so that water can flow freely from it. If a cone-shaped roof is planned, then another pillar can be concreted in the center, which will be at least 50 cm higher than the side ones.
Before installation in the ground, support pillars are treated with paint or wrapped with roofing felt.
Metal corners are used to fasten the cross bars
We additionally attach rafters to the top of the supports for strength. The upper awning will be mounted on them.
To increase the strength of the tent, the rafters are tied with transverse lathing
During the daytime, the top awning of the tent is enough to hide from the bright sun
To protect against insects, it is convenient if the mosquito net consists of two parts and closes with magnetic latches
Options for mounting a tent in the ground and on asphalt
When installing a prefabricated tent on the ground, you need to use additional safety guy lines.
This will increase the rigidity of the structure and extend its service life. The guy ropes are installed using special pegs 15–20 cm long, which are driven into the ground around the perimeter of the tent.
Guys are used to strengthen the structure against wind gusts.
If the tent will be mounted on asphalt, additional metal rods are used. To strengthen them, special holes are drilled, rods are inserted into them, which are then filled with concrete mortar. After the concrete has hardened, guy wires are attached to the rods.
Making a children's tent
To build a tent for children, you will need a hoop made of plastic or metal (the larger the diameter, the better), fabric (2 pieces). One of them is 1.5-2 m high (its length will depend on the reach of the hula hoop). The other part of the textile is about 2-3 times smaller; it will be used to create the dome.
The assembly procedure itself is described as follows:
- The main piece of fabric should be sewn onto the hoop like a curtain. This is done using loops of threads of matching color (you can use braid). The result will be a blank for the future awning.
- Next you need to make a dome. To do this, you need to cut 8 isosceles triangles from the remaining piece of fabric. The base of each of them must be ? from the diagonal of the hoop, the length of the remaining two sides is ? hula hoop cross sections. All the triangles need to be folded and sewn together along the long sides to ultimately form a dome.
- The second part of the textile is also sewn onto the hoop. A fabric loop is attached to the top of the dome.
If there is no suitable wood, you can build an L-shaped beam with a hook at the end. It will serve as an excellent basis for a DIY children's tent.
DIY rain awning
Don’t be nervous, I’m comparing))))) let’s see what’s written here….
To protect your tent from rain, you can make your own reliable awning from greenhouse film and tarpaulin. Such an awning is easy to carry; it requires a very simple set of elements; it is easy to make it yourself.
The success of a tourist trip very often depends on weather conditions. When going on a hike, the average tourist carefully studies the weather and if he sees that heavy rain, a hurricane, hail or some other cataclysm is approaching, he prefers to stay at home. For a survivalist, capricious weather is just an additional challenge, which is more likely to motivate you to go on a trip at any cost than to stay at home.
Challenge the weather from a survivalist
It is not enough to challenge the weather; you also need to know how to face its challenges. For example, how to protect yourself and your group from heavy rain in nature. One option is to make a tourist awning, which will always come to the rescue and protect the tent from moisture during a rainy night somewhere far from civilization. After all, even the most severe survivalist will find little pleasure in waking up in a tent completely wet from the rain, and if as a result of this you also get a cold, then you can say goodbye to hopes for a successful trip.
Elements for making an awning
An awning that is convenient to carry and requires a minimum of funds for its creation. Surely everyone will like this recipe. To create it you need: greenhouse polyethylene film measuring 3x1.5 meters and a thickness of about two microns, 8 pieces of tarpaulin 15x30cm, 8 eyelets (metal sewing blocks).
We make and attach the awning ourselves
First of all, we cut the greenhouse film made with a sleeve so that we have a 3x3 meter square. We sew four pieces of tarpaulin at the corners of the film, another 4 - in the middle of the sides. It must be sewn in such a way that the tarpaulin bends in half and covers 15x15cm sections of film on both sides.
When the tarpaulin is firmly and securely sewn, in the middle of each square we carefully make holes into which we insert eyelets. We put a ring on the eyelets on the back of the tarpaulin, and the metal sewing block itself is ivy. To flatten, you can use a metal ball and a hammer (the ball is placed on the grommet, then a blow is applied to it, as a result of which this kind of “bushing” is flattened).
The next point in the program is the selection of a strong rope that will pass through the holes. When it is found, the awning is ready. You can go hiking with it in any weather. In nature, we insert a rope into two holes located in the middle of the awning and tie them to trees or high stakes; the remaining holes are attached to the ground using pegs and ropes.
Source:www.spezrezerv.ru
- Notify about new comments.
id350560863 02/18/2016 at 10:28 pm # Reply
That's what I need.