Design options and site selection
Once it has become clear which trees are suitable and which are not, it is important to consider a few more details.
Not just any oak or maple tree is suitable for building a treehouse. Firstly, the support must be large enough. Secondly, the tree must have a large number of branches, which will indicate the presence of a powerful and developed root system. After the object has satisfied the master in all visual parameters, it is necessary to conduct an additional check. Its essence is as follows: you need to take a wooden stick and hit the trunk several times. If a dull sound occurs upon impact, then the wood inside is rotten and decrepit and cannot be used as a support.
Construction will require a lot of effort, since the structure consists of branches that must be searched throughout the forest. Weather and terrain are also taken into account.
To make a hut, you need to choose the type of construction:
- With one ramp. The standard shelter is of an open type, i.e. the shelter consists of several supports and a roof. The roof is installed on poles and rests on the ground.
- Added. Choose an area with trees close to each other and cover them with branches, forming a house.
- Underground. A dugout in winter will really save a person’s life. There is no wind, there is no rain in December, January and February, which means the roof will not leak. Taking into account good thermal insulation, the heat is retained throughout the day. The downside is that digging a pit takes a long time, and without a shovel it’s impossible.
- With two slopes. A two-part shelter consisting of central supports and two shields made of branches. The roof is placed on pillars and the pole is closed. The back part is completely closed, and the entrance is partially covered with bushes or poles.
- Conical. The good thing is that the roof will not leak, because the angle of the roof is too sharp. Due to the narrow entrance opening, minimal heat is lost. They start with a central post, around the perimeter of which branches are driven in a circle.
A lean-to shelter is convenient because you can light a fire near the sun lounger and warm yourself, and predators will not dare to approach.
To build a shelter, choose flat clearings with dense bushes and trees, areas near rivers and reservoirs, and rocky slopes. Densely spaced plantings will protect the building from strong winds.
Having selected a good site for the night, the site is cleared of debris, branches, leaves and thorns. They prepare stones for the fire and go in search of poles.
Step-by-step construction of a hut
Nature provides great ideas for constructing buildings. Wasps, ants, and beavers build durable and stunning homes with a unique design. A person needs to understand the essence of the building and apply the theory in practice.
For temporary stays in the wild, survivalists prefer to make lean-to, tent and cone huts. For long-term living in the forest, they build a dugout or a primitive house made of logs. In winter, a thick layer of snow is laid on the roof - this will not only protect the structure from heat loss, but will also provide good camouflage.
The first stage of construction begins with the prepared beams being sawed to the required dimensions, and the support for the pillars is also being installed. Next, the pillars are directly installed into the prepared supports. The next step at this stage will be the installation of beams. First, external structures are mounted, and then diagonal ones, between the installed pillars.
The second stage of erecting a treehouse is the installation of the crossbars. This operation is carried out right on the spot. It is important to firmly fasten all the beams, clamps and pillars together in order to understand exactly what the entire future structure will look like.
The third stage is strengthening the frame. At each corner of the spacer, the necessary frame should be strengthened further.
The fourth is working with the frames of the house. At each right angle, it is necessary to bolt the existing trim to the support posts.
The fifth stage is installation of the moving connection. You need to find a thin tree trunk and fix it between the slats and the beds. Fastening in this way will help make the house movable.
After completing these main stages, you need to do the following: install the suspension structure for the hut, check all the components, attach the beds to the tree trunk, arrange the flooring, make railings, install a children's slide.
Winter hut in the ground
If there is little snow on the ground, you can make a shelter with a depression. Earth is a good thermal insulation material that will provide shelter from the cold. But frozen ground is extremely difficult to dig (digging, chiseling).
Your best bet is to find an existing hole in the ground, such as a hole left by a large old tree falling (when the tree falls along with its roots and soil). Adjust this hole to the required size, and build a canopy of one kind or another on top. To make the frozen ground more pliable, you can light a fire and warm it up.
Important: The construction of such a shelter in winter is associated with a lot of physical activity, as a result - clothes become wet from sweat, and then hypothermia may follow. In this case, it is better to take off some of your clothes in advance.
How to make a tree house with your own hands: building a hut
After the stage of choosing a tree has been completed, you can begin building the object. The primary task of the builder is the construction of the hut platform, which is the foundation for it.
In order to build a strong platform for a house, it is necessary to place two beams at the selected height on opposite sides of the tree trunk, securing them not with nails or screws, but with anchors. It is also worth adding that to attach one beam to the trunk, one bolt with a diameter of 6 mm and a length of 10 to 15 cm is sufficient. If you attach a beam to two or more bolts, this can negatively affect the health of the tree, which will lead to its rotting and destruction.
The second step after installing the beams parallel to each other is to install additional supports. They should be placed on adjacent sides of the trunk. They should be placed perpendicular to the previous two. They should also be higher and ultimately form a cross. At this stage of construction work, it is important to think about safety. It is recommended to tie the beams that will be attached to the tree with cables or ropes to the upper branches.
After this stage has been completed, you can begin installing the rectangular frame, which will become the basis for the floor in the treehouse. The supports for such a platform will be four beams installed lower than the first two, parallel to each other. In addition, the installation of these wooden supports must be carried out at an angle of 45 degrees.
The next step in the construction of the facility will be the arrangement of the floor. In order to build it, you can use any wood products. It is recommended to use ordinary nails as fasteners. At the same stage, you need to think about placing a place for a hole through which in the future it will be possible to get into the treehouse.
There are things in the world that literally every child dreams of. It's not just a game console or a bicycle, the child also wants to have a place where he can feel like a master. Therefore, many kids are always looking for some kind of headquarters or play base. So why not make it easier for them?
Of course, building such a house will require considerable effort, but it will not be wasted. You just need to show diligence, think through everything carefully and prepare so that the design of the house is safe and reliable for the child.
The project described below for the construction of a children's treehouse was developed taking into account safety, maximum preservation of trees and reliability of structures. This design is completely autonomous, so it can be installed absolutely anywhere, even where there are no trees.
The house is based on a universal triangular structure; in principle, there is no need to bury support pillars deep into the ground - if there is a rocky, flat area, the house will rest well on it.
Of course, the resulting structure will not be small, it simply cannot be built in one day, but it will be interesting for children, especially if they are involved in the work.
You need to start work by making a triangular frame.
- At an angle of 30 degrees, it is necessary to cut off one end of each front leg of the future house, as shown in the drawing. After this, the legs are screwed to the beam with 10 cm screws. This process is best done on the ground.
- Next, you need to temporarily fix the corner ends in the center of the support. The ends are secured and a bar is also secured over her legs.
- Next, you need to drill a through hole through the legs and the central pillar. Carefully make a recess at the ends of the hole for the washer, nut and bolt head. After this, tighten all the bolts tightly.
- Assemble the rear frame.
- Now you need to prepare a plumb line and level. You will also need an assistant to install the frame. This stage is the most difficult, but if you have a flat area, the process will be much easier.
- It is also necessary to determine which of the four leg positions is the lowest. To do this, you can use a long straight board and a level.
- The assembly begins with this very leg, secured in such a way that it becomes plumb. It is imperative to check that the beam is located at the required height and is secured evenly.
- The same is done with the remaining legs. Once again, you need to check that everything is secured evenly, perpendicularly and parallel.
- After this, diagonal crosses are attached to the legs and secured with screws.
- Next, you need to drill two holes on all legs and tighten with bolts.
- Finally, two more holes of smaller diameter at the intersection of the brackets must be tightened with 10 cm bolts.
Next, you can begin assembling the site of your future home.
- First of all, it is necessary to strengthen all the corners of the frame with a platform using metal brackets.
- Nail the suspension anchors to the rear and front connecting beams.
- After this, you can cut the floor boards 2.5 m long. It is also temporarily necessary to screw one board in the middle of the frame, and then begin laying the boards starting from the back.
- Before securing the outer boards, you need to cut a hole for the hatch. It is advisable to pre-drill holes at the ends of the boards so that the wood does not split during fastening.
- When you reach the center, you need to remove the temporary bracket. Make a connecting element from boards so that it is located between the beams.
- Secure the plywood and remaining floor boards to the bottom.
- Screw cross-shaped brackets to the back legs of the future house and remove the excess length.
Next you need to start assembling the stairs:
- Screw two steps to the beams, which should be positioned at the same angle as the legs to secure the ladder.
- Attach the beams to the platform.
- Screw the steps to the stringers with 10 cm screws, starting from the top.
- On the right side of the stairs, screw the railing into the stringer.
House assembly
After this, you can proceed directly to assembling the house:
- First, you need to assemble the lining of the side walls on the ground.
- After this, you need to screw one wall through the bottom plate to the platform.
- Assemble the back wall and mount it on the platform.
- Make sure that it fits snugly against the bottom plate of the side wall.
- After this, you need to install another side wall in parallel.
- Attach temporary brackets to the inside of the back wall.
- Mount the front panel without rods and rafters; they are added after installation.
- Connect all the parts together, install two halves of the wall on the site.
- Fasten them with staples to make the wall quite stable.
- Attach the sheathing and make sure that all the cutouts for the rafters are located in the required place.
- Cut the front panel to fit around the rafter.
- Next you need to screw it to the door frame and rafters.
- Remove all curly braces.
- Attach boards to the rafters starting from the front edge of the house roof.
- Trim the side panels and screw them to the rafter tails.
- Install window frames and door frame.
Installation of railings
The final stage will be the installation of railings.
- The railings must be screwed to the handrails and all sharp corners must be rounded.
- Nail or screw the balusters to the beam as well as to the bottom of the handrail. In this case, the distance between them should be no more than 10 cm.
- Finally, you need to install a safety chain with a latch.
It is necessary to remember that all children will test the strength of the house, so there is no need to skimp on equipment or purchase low-quality materials.
We figured out how to make a tree house with your own hands. You can come up with the interior design of a children's house yourself and discuss this issue with your child. You can install a bunk bed there, put a table, benches, shelves and much more.
To build a hut or hut, you need to choose a suitable place. Under no circumstances should such a hut be installed in narrow gorges, on river banks, or at the bottom of canyons. Regardless of whether the hut will be erected in Russia or in another country, floods, sudden downpours or rainfall can occur everywhere. The main options for hut location:
- Hut in a mountain forest. For this area, it is best to select attached-type structures for construction. This means that one of the walls of the halabuda or two walls will be made of stone or wood - part of the rock. In this case, you should try to avoid precipitation. Therefore, it is not recommended to place huts in hollows with obvious traces of water flows. Otherwise, the rules for constructing a hut are the same as for a regular tent. The entrance to the hut should be located on the opposite side of the peak. It is necessary to make a ditch around the perimeter so that when it rains, water flows into it.
- Hut in a lowland forest. In a flat forest, you can build a recessed, classic or attached hut. The location is chosen based on the weather. In cold weather without rain, the hut is placed in a recessed place, which will be a temporary shelter for it. During rains, these structures must be located on an elevated place.
The structure of the hut according to its type:
- Classical. This type of structure is made in the form of a fire pit for cooking. During construction, two poles or branches are installed vertically. The third is placed on them in a horizontal position. Bandaging is done using improvised means, stems, flexible branches, vines. But there are several more installation options here. For example, two poles or even branches that need to be cut with a knife are placed at an angle to each other at the exit from the structure and the back wall of the hut at a distance of about 2 m. After this, the main pole is laid horizontally on it. If a wigwam is being built, then in this case the poles are laid in a circle at an angle to each other in the form of a fire pit; a living growing tree can be used as a support for them.
- Added. This can also include a wigwam, which will be created on the basis of poles resting on a rock in a mountainous area. The walls are made in the same way as those of the above-mentioned classic hut.
- In-depth. This type of hut is similar to the classic one, but is located in a hollow and is a cross between a hut and a dugout. In this case, only the top is covered.
Scheme of building a hut on the ground
To build a hut or hut, you need to choose a suitable place. Under no circumstances should such a hut be installed in narrow gorges, on river banks, or at the bottom of canyons. Regardless of whether the hut will be erected in Russia or in another country, floods, sudden downpours or rainfall can occur everywhere. The main options for hut location:
- Hut in a mountain forest . For this area, it is best to select attached-type structures for construction. This means that one of the walls of the halabuda or two walls will be made of stone or wood - part of the rock. In this case, you should try to avoid precipitation. Therefore, it is not recommended to place huts in hollows with obvious traces of water flows. Otherwise, the rules for constructing a hut are the same as for a regular tent. The entrance to the hut should be located on the opposite side of the peak. It is necessary to make a ditch around the perimeter so that when it rains, water flows into it.
- Hut in a lowland forest . In a flat forest, you can build a recessed, classic or attached hut. The location is chosen based on the weather. In cold weather without rain, the hut is placed in a recessed place, which will be a temporary shelter for it. During rains, these structures must be located on an elevated place.
Shelter
This is an easy building in terms of complexity. It will not save you from frost and wind, since the second half of the shelter is open. A temporary shelter provides protection from sun and rain. Used in summer or late spring, when the air temperature allows you to comfortably spend the night outside.
Step-by-step installation:
- Choose a clearing with two trees or install 2 supports in the ground. Fallen trees will serve as such pillars. To sleep lying down, provide a width of at least 200 cm.
- You will need several poles with a cross-section of at least 5 cm. This thickness will support a layer of spruce branches or branches from bushes and moss. The poles are placed on the crossbar and pressed into the ground. The distance between the elements is no more than 10 cm. The branches are installed so that they extend beyond the crossbar, forming a canopy.
- Spruce branches, dry leaves, ferns, and straw are laid on the roof. Form a thickness of 20 cm.
A thick flooring of branches is installed inside the overnight shelter. Spruce branches, moss, leaves or straw are placed on top. A fire pit is made near the open part of the building.
How to build a hut in the forest in winter
The main task of a winter shelter is to preserve heat. Materials with low thermal conductivity should be used: snow, spruce branches, straw. In addition, it is important to reliably protect yourself from the wind.
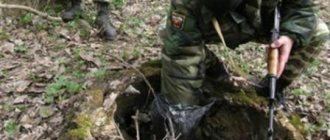
The simplest solution in winter is a snow cave:
- You need to find a large enough snowdrift and dig a hole in it. It is better not to make a large hole, otherwise it will be difficult to warm it up.
- You should lay spruce branches or straw underneath, otherwise your clothes may get wet from the melting snow;
- You can heat the interior with fire (it is better to use gas or dry fuel, but you can also try to make a fire), then you should make a hole in the roof for ventilation;
- In case of strong winds, the entrance can be closed, leaving small openings for fresh air to enter, although in this case there is no constant possibility of getting out.
A more comfortable, but also more complex option is the famous Eskimo invention - the igloo . A well-built igloo allows you to survive frosts down to -40 o.
- You will need to cut blocks from dense compacted snow and build a house from them. To save time and effort, it is best to build an igloo on a slope, then fewer blocks are needed;
- Usually the blocks are laid in a circle, so that the top blocks gradually move towards the center, forming half a sphere. In this case, the builder himself is in the center of the building, laying blocks around himself;
- At the end there is an exit, and do not forget about the ventilation holes.
To avoid freezing in the winter forest, hunters also use a hut with a node . It is quite simple to build:
- Build a lean-to hut that will protect you from the snow;
- A node is made on the open side of the canopy: two long logs are laid on top of each other and secured in this position with pegs or supports. A fire is lit between the logs along the entire length of the structure;
- Nodya burns slowly and provides a stable supply of heat to the shelter, allowing you to survive a frosty winter night.
Gable shelter
Such a shelter, unlike a lean-to building, will save you from snow, hail and strong winds. The design differs from a simple hut in the presence of a rear wall and an entrance.
A gable shelter is made according to this plan:
- The length of the structure is 200 cm, the width on the ground is 150 cm and the height is 150-200 cm. At the edges, 2 supports with spears are installed at the edges. The crossbar is placed in the grooves. The connections are secured with ropes.
- Thick wooden rods are driven into the ground at an angle on one side of the frame with minimal gaps. On the reverse side they do similar work.
- The back wall is formed from even branches. These pieces of wood will have to be trimmed to make the top of the back triangular. The rods at the top are connected with a rope to the main poles located along the edges of the product.
- The entrance is partially covered with sticks so that the opening is not a triangular one, but a rectangular one.
- The gaps in the shelter are covered with small branches. A thick protective layer is formed, but the strength of the supports must be taken into account. If you put a lot of wooden rods and add moss, the structure may collapse. After uniform pressure is distributed on the roof, the remaining gaps are closed with moss.
- A lounger is made from poles, moss and leaves 25 cm thick. It is better to make a primitive bed so that there is a gap between it and the ground.
Plastic film will completely protect a person from rain inside the hut. Only oilcloth is laid on the first layer of branches, covered with another, and then leaves are laid on the roof. If you fix the film before laying the moss, the material will slide off the structure. Rainwater will not flow into the room if grooves are made along the perimeter of the shelter, diverting streams to the side.
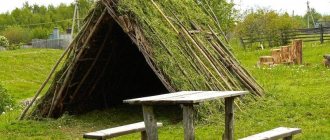
Cone option
A structure similar to a tent or wigwam provides good protection from adverse weather, especially rain and snow. The advantage of the structure is the use of a fire indoors. However, you will have to think about the chimney.
Step by step assembly:
- If a fire is not used inside the hut, then a thick support is installed in the middle of the future tent, dug deep into the ground.
- From the post at a distance of 100 cm around the circumference, poles are driven in and placed on the top of the post.
- The upper part of the structure is tied with a rope and pulled together. Excess protruding branches are cut off.
- The poles are covered with a thick layer of moss or spruce branches.
To use a fire indoors, you will have to make the hut in the forest a little different. At the beginning of construction, a pole is placed, strong sticks are dug in around the perimeter and placed on the central support. The branches are fixed horizontally at 4 levels. Thin branches or moss are placed on the crossbars.
All connections are connected, except for the middle post, it is removed so that free space for the fire is created inside the room, and a hole remains in the roof for smoke to escape.
What is needed to build a hut
A hut can be built from different materials, depending on the area. Usually this:
- branches and sticks;
- spruce branches;
- straw;
- leaves;
- tree bark;
- plant stems;
- earth and clay;
- snow.
You can use “artificial” materials that you brought with you or found in the forest. At a minimum, it will be helpful to bring plastic sheeting in case of rain and some thin rope to secure the joints of the structure.