Outdoor recreation can bring many pleasant moments and new experiences. To make your impromptu vacation enjoyable, you need to take care of a place to stay. For this purpose, summer and winter tents of different capacities and shapes are used.
But what to do if you couldn’t find a suitable tent or its cost is too high? There is only one way out - to make a tent from scrap materials with your own hands. Fortunately, this process does not require major capital investments, and the production itself will take a minimum of time.
How to make a tent yourself
Most tourists prefer to buy ready-made tents, because the modern market offers a huge variety of models: summer, three-season and for winter fishing. But, if you do not have the opportunity to buy such a design, you can sew it yourself.
Figure 1. Step-by-step manufacturing diagram
The easiest way to make a tent is in the form of a house. It is suitable for fishing, for the garden, and for outdoor recreation. To make a simple two-person shelter, you will need a piece of water-repellent fabric approximately 14 square meters in area, 20 metal washers with a diameter of 1.5 mm, narrow strong tape 9 meters long, 15 meters of braided rope and rubberized fabric (about 6 meters) that will act as the bottom (Figure 1).
The frame of such a tent, if desired, can be made from PVC pipes. But, if you need a lightweight and mobile design, it is better to do without them.
The product is manufactured step by step as follows:
- First, cut two pieces of fabric measuring 0.9 x 1.8 m.
- On the longer side you need to put marks every 65 cm. Similar actions are performed on the short side.
- The fabric is cut at the joining points so that you end up with the entrance to the tent and its back wall.
- Next, all joints need to be stitched. To make the seams strong, it is advisable to reinforce them with tape.
If you don't have a special water-repellent fabric, you can use regular fabric. In case of bad weather, this structure is simply covered with film. In addition, it is advisable to sew rings along the edge of the tent, with the help of which the shelter will be fixed to the site. Typically, such rings are placed at the bottom of the awning, but they can additionally be installed at the place where the awning is attached to the frame.
How to make a tent with your own hands step by step
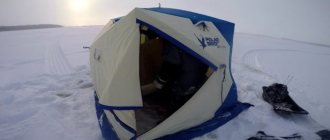
Shelter for winter fishing can be made of different designs and from different materials. Therefore, we will dwell on some options in more detail.
From skis and awning
This shelter is far from new and many fishermen have had to deal with it when testing the product in harsh winter conditions. Let's look at the manufacturing instructions:
Made from polyethylene
If you don’t have a tent, you can make one from the most affordable material - polyethylene. In this case, the fisherman himself serves as the frame, and an ice pick or a drill stuck into the ice is suitable for the stand. From below, the material is folded inward and attached with any objects that are at hand. You can also make a large bag out of oilcloth that will be put on the fisherman.
The advantages of the product include minimal manufacturing costs and speed of installation. If you do not consider it necessary to spend money on an expensive shelter, this option will be the most suitable.
Let's consider another design of a simple tent made of polyethylene and plastic pipes. Instead of polyethylene, you can use a suitable fabric. In addition to the materials listed, for manufacturing you will need connecting elements, as well as a soldering iron. Polyethylene will be required 3 m wide and 4 m long. A piece of film is unrolled and separated, since the material, as a rule, has a double layer. Then a triangle or quadrilateral of the desired size is made from it.
After fitting, a frame is soldered from plastic pipes in the form of two or three triangles, which will be installed at the ends of the product. The triangle is made in such a way that adapters, tees and other elements have a transition to a larger pipe diameter, which will make the structure collapsible. As a result, the required element is soldered to the plastic tube on one side, and a larger diameter pipe is inserted on the other.
The polyethylene in one of the end parts of the structure is collected with an accordion and threaded into a ring, after which it is pulled together tightly. To prevent the material from tearing, the ring must be smooth. At the other end, at the entrance, the film is also pulled into a bundle at night, but a small hole is left for the flow of fresh air.
Types of tents
Regular summer camping tents can be made in the form of a house, a dome, or be pitched. A winter tent is considered more complex, which should protect residents from precipitation and low temperatures.
You can also make a tent for children with your own hands. This design is even simpler and can be made in just a few hours.
Since the winter tent is considered the most difficult to manufacture, we will look at what types of such shelters exist. By the way, such a homemade awning can be used in the forest in the summer, but to do this you will have to make a choice in favor of lighter materials for the awning (Figure 3).
So, durable and resistant to precipitation come in the following types:
- Umbrella:
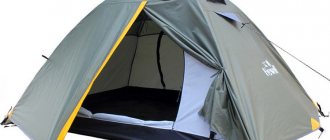
the simplest version of an awning, which can be installed in just a few minutes. This is possible thanks to a special umbrella roof structure. The frame of such an awning is made of plastic or duralumin tubes, which are connected to each other with a durable rubber band. The frame is covered on top with a tarpaulin or other synthetic waterproof fabric. The only drawback of this design is the low level of vapor permeability. - Frame:
installed on arches. This design is suitable for camping, but fishermen are not very fond of such tents, since even after installation and fastening the tent is not very stable in strong winds. The design of a frame tent is very simple. As a basis, several arc frames made of fiberglass and duralumin are used. The shape of the tent can be any, and the frame is covered with an awning on top. - Automatic:
the most modern and easiest to install option. The base of the tent consists of thin and flexible metal rods. With their help, the tent can be quickly unfolded and then assembled into a compact cover. The disadvantage of this model is considered to be low resistance to adverse environmental factors. That is why it is used for one-day fishing or short recreation in nature.
Figure 3. Main types of shelters: umbrella, automatic and frame
All types of tents described above can be made with your own hands, using detailed drawings and step-by-step instructions.
What types of tents can there be?
Depending on the choice of one type or another, it will be decided not only how to make a winter fishing tent with your own hands, but also further ease of use.
Here are some popular winter fishing tents:Umbrella design. The easiest tent option to use and make. As is clear from the name, the model opens like an umbrella.
Read here - How to make a fishing hook at home: master class with photos
In order to make a dome of this type, duralumin rods are used. And the fabric layer itself is synthetic, covered with a tarpaulin to protect it from wet precipitation.
Automatic option. This is a very popular tent design among anglers. All this thanks to incredible ease of use.
The frame opens on its own, like a spring. The fabric is stretched over it and the tent is assembled. The most inconvenient thing is that the frame is very brittle and, due to the lightness of the tent, it blows away with the slightest breeze.
Check it out here too!
How to make a fishing screen: description and step-by-step instructionsFishing knots diagrams: the best fishing knots for all occasions
How to make a fishing hook at home: master class with photos
Frame. This is the most rarely used type of tent. Assembling and disassembling the frame takes a lot of time, it is difficult to call it stable, and it is not particularly durable.
Drawings and product diagram
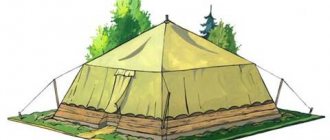
Drawings of simple tents can be found on the Internet and used as a basis for drawing up an individual product diagram (Figure 4).
Figure 4. Drawing of a summer and winter tent
In order for the finished product to be of high quality and comfortable, you need to draw up a plan for its production on paper. First you need to measure the required length and width of the future awning. To do this, it is necessary to take into account the physical parameters of the residents, in particular their height. In your calculations, it is advisable to focus on the height of the tallest person, adding about 50 cm to his height. Then you can not only sleep comfortably in the tent, but there will also be enough free space to place personal belongings.
Next, you need to draw up a pattern on paper or directly on fabric. Keep in mind that any tent consists of a floor, a roof and four side walls. There will be a zipper sewn into the front (front) part. Once the pattern is drawn, you need to transfer it to the fabric and cut out the details.
Manufacturing of fasteners
The production of fastening elements for a two-person canvas tent deserves special attention, because the stability of the structure and its ability to withstand the wind will depend on their quality.
We are talking about pegs and screws that are used during the installation of the awning.
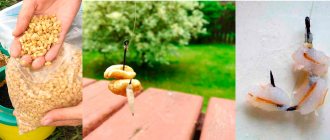
The material from which the fasteners are made depends on the season of the intended holiday. For example, if you are going outdoors in the summer, it is better to make the fasteners from light metal so that the folded tent is easy to carry. If desired, they can be made from any available materials while in nature. Strong branches with a sharpened edge will do so that they can be easily stuck into the ground (Figure 5).
If you want to make your own metal fasteners, be prepared for the process to take a long time. For this purpose, it is best to use long metal rods or strong screws. The top needs to be bent into a ring, and the bottom of the screw is already sharp enough and will fit into the ground without any problems.
Figure 5. Homemade fasteners can be made from thick wire or self-tapping screws
As for the screws, it is better to use a threaded metal tube to make them. For ease of use, it is advisable to secure the handle at the top.
Types of structures
A camping tent can look different. The chum model looks very unusual. The large structure is made of waterproof fabric, and the frame is usually made of steel. The size of the tent even allows you to make a fire inside, since there is a special hole in the upper part through which smoke escapes. The chum has only one entrance, and installation is impossible without a pole.
A dome tent resembles an igloo in appearance, which makes it stand out from conventional structures. Its base is rectangular, and the frame is created from two arcs. The coating can be either single-layer or two-layer.
A tent for winter fishing can also be produced in various variations. Many of them, however, are also used for summer holidays. The “umbrella” model is considered one of the simplest due to its elementary assembly and installation of the structure. As a rule, strong but lightweight materials are used for the frame, and everything is covered either exclusively with synthetic fabric or its combination with tarpaulin fabric.
We suggest you familiarize yourself with How to cut a hole in slate for a pipe?
The “automatic” model, which is installed under the influence of a spring, is popular. This design is easy to carry and install, but folding it back can cause some difficulties, especially for inexperienced fishermen. In addition, the stability of the tent is very weak, and gusts of strong wind can simply topple it. The frame collapsible variation is assembled from several arcs that form the base and an awning covering it.
The main stages of manufacturing the structure
In previous sections, we have already looked at how to cut the base for a tarpaulin tent. Now let’s look in more detail at how best to sew a product so that it can withstand strong gusts of wind and not get wet in the rain (Figure 6).
To strengthen the tent structure, follow these instructions:
- All panels are sewn together with a double seam. To further strengthen its edges, it is advisable to coat it with rubber glue. This is guaranteed to protect the interior of the shelter from moisture penetration.
- A pre-washed braid should be secured to the ridge. In this case, it will not shrink and will serve as the basis for a reliable roof.
- Any stripes that are on the surface of the awning must be sewn along the edges, capturing both the fabric and the loop. This will provide a reliable connection and at the same time protect the awning from moisture.
- It is advisable to provide a ventilation hole with a sleeve in the rear wall.
Figure 6. The main stages of making a homemade shelter
If you were unable to get waterproof fabric, you can sew a tent from ordinary tarpaulin and additionally make an awning from film, which can be thrown over the shelter in case of heavy rain.