Choosing the right place
Some novice travelers believe that a tent can be set up absolutely anywhere. Moreover, this misconception is often confirmed by sellers in travel stores. However, to make your vacation comfortable, you need to know where to put up your tent. When setting up an overnight stay, you need to consider the following:
- The tent should not be pitched in a place where there are stones, sharp branches, tree roots or an anthill. Particularly vicious insects can greatly spoil the sleep of a careless tourist.
- When camping in hilly areas or mountains, it is important that your head is positioned higher up the slope when sleeping, even if the slope on which the tent is pitched is slight. Otherwise, the next morning you will suffer from a migraine.
- The possibility of sudden rain cannot be ruled out for sure. Therefore, it is important not to pitch the tent inside a hole or crater. Otherwise, at night the water will flow directly into the shelter.
- When setting up a tent, you need to think in advance about the place where the fire will be lit. The tent catches fire very quickly and must be protected from fire. In addition, it is important that smoke does not penetrate into the tent.
- It is not recommended to install a tent directly next to a body of water. This place is usually damper and colder.
Every novice traveler must understand where to pitch a tent, otherwise he will not be able to avoid a ruined trip.
Types of tents
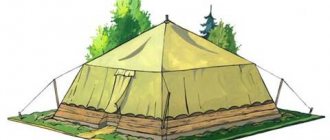
Before you understand how to set up a tent for the night, it is important to find out what type it is. Most often in stores you can find hemispherical (frame), tunnel (half-barrel) and gable (house) tents. The last view is already outdated. The gable tent was very popular in the early days of backpacking. But lately people take it with them on hikes extremely rarely. The thing is that such a house takes a long time to assemble, has poor wind resistance and is quite bulky.
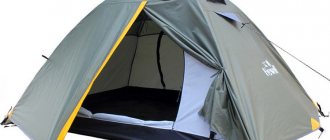
Half-barrel tents are also difficult to set up. But this type has a big plus - it has quite a lot of space. Undoubtedly, the best-selling tent is the hemispherical (frame) tent. It is quite easy to assemble and has high strength.
How to set up a tent?
In order to understand how to pitch a tent, you should first find out what kind of tent you have. Today, there are mainly three types of tents on sale: gable (house) , hemispherical (frame) and tunnel (half-barrel) .
1. Gable-type tents (house) are now somewhat outdated, and you can see them in stores less and less often. Their disadvantage is that they take much longer to set up than other tents. In addition, they are not wind-resistant enough and are quite bulky. Tents like these were good at the beginning of hiking trips, but now they are no longer taken anywhere. However, if you suddenly have a tent-house, we will briefly tell you how to install it. To install a gable tent, you must first install the roof - and then stretch the bottom. The roof is installed using two vertical posts placed inside or outside the tent. After the vertical base is installed, carefully stretch the bottom of the tent and the awning. Please note that the awning may not always lag behind the inner wall. In this type of tent this is a normal phenomenon...
2. The hemispherical frame tent is undoubtedly a top seller in travel stores around the world. It is easy to assemble and disassemble, it is quite wind-resistant and durable. Such a tent is installed using arcs - of which there are at least two. The simplest tent of this kind is set up as follows: After choosing a place, spread the inner tent (the one with mesh and a black bottom) on the ground. After this, assemble the poles by inserting their parts into one another - and lay the poles crosswise over the inside of the tent. Then, depending on the design of the tent: a) the arcs are either inserted into the holes in the corners of the inner tent, and then attached to it using special hooks; b) or they are first threaded through special fabric grooves, and after that they are attached to the bottom of the tent. In any case, after the shenanigans done, you have a white inner tent. Secure the arcs on top of it, tying them with special ropes that are located on the tent. This is necessary for a more rigid structure. Now we put the awning over the tent, not forgetting to match the exit located on the awning with the exit located on the inner tent. The awning can be fastened to the poles from the inside (this way it will stick to the tent more firmly), or you can simply start attaching it to the ground with pegs. Using pegs, it is necessary to stretch the vestibule - and the awning itself: if it is not adjacent to the inner tent, condensation from breathing will not accumulate on its walls. Otherwise, you have a chance to wake up among wet things: with breathing we release quite a lot of moisture. So stretch the pegs as much as possible. The inner tent itself does not need to be stretched with pegs: it stands perfectly on the ground on its own thanks to the frame. If you still decide to do this, stretch it before covering the tent with the outer awning and securing it. Storm guy lines (bright ropes along the edges of the tent) need to be stretched only if the tent is in an open area and you are afraid of strong winds. If you are camping in the forest, these stretchers are completely unnecessary. In addition, people passing by the tent will definitely trip over them.
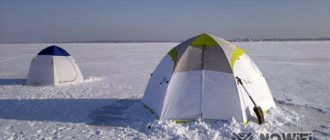
3. Half-barrel tents are a little more difficult to set up (the previous type of tent can even be set up alone!). However, they have much more free space, the awning is very far from the inner walls (they will never be wet), and the half-barrel vestibules can usually accommodate several more people (which will allow the whole group to get together in bad weather). When installing a half-barrel tent, you should remember that its frame consists of several semicircular arcs parallel to each other. The stability of your tent depends on how they are secured with pegs. Therefore, it is advisable to leave more space for the tent in order to better spread it out. In the half-barrel design, the awning is usually first stretched on arches, to which the inner tent is then fastened from the inside. Therefore, you first need to try to stretch the awning itself - and then first attach the tent to it from the inside, and then stretch the bottom of the tent with pegs so that there is more space. In dry weather, the inner tent can not be unfastened from the awning: time for installing the half-barrel is saved. But in the rain, it’s better to unzip the tents, shake them out separately, and dry them separately from each other as soon as possible. Otherwise, the weight of your backpack will increase significantly due to the water accumulated by the tent. NOTE: recently, hemispherical tents have gained popularity, where first the awning is stretched on arcs, and then the tent is attached from the inside. Sort of hybrids of the second and third types. The advantage of such tents is that the inner tent can be easily unfolded in the rain under the upper awning - and it will remain dry. In addition, in good weather, you can simply set up an external awning, put things under it, or sit down yourself, and not fool yourself with installing the entire tent. Installing such a tent is extremely simple: first, arcs are threaded into the awning from above, which are fixed on it, and then the inner part is fastened from the inside.
Setting up the tent on site
Many novice travelers are interested in how to pitch a tent outdoors. The installation process for the most popular hemispherical (frame) tent is as follows:
- First you need to lay out the inner tent on the ground.
- Then you will need to install the arcs. First you need to collect them. Namely, insert frame elements into each other. This type of tent must have at least two arcs. Then everything depends on the design of the tent. The poles can be inserted into holes in the corners of the inner tent, and then secured using hooks, or threaded through fabric grooves and attached to the bottom of the tent. Then the arcs should be fixed with a rope to the tent itself. Due to this, the entire structure will become more rigid.
- After the steps have already been taken, it is necessary to pull the awning. It is important to compare the inlet on the awning with the outlet on the inner tent. The awning can be attached in two ways (to the arches or to the ground with pegs).
Steps
Part 1
Finding a Tent Site
- Finding a suitable camp.
Whether you're camping, in the backyard or in the backcountry, you should look for the right space that will provide you with the most comfortable spot for your tent. There are several factors to consider, but the first is to make sure the area you choose is legal and accessible for camping.
- If you're in a state or national park, make sure you set up your tent in an area where camping is permitted. These sites are often marked with numbered metal signs and are provided with picnic tables, fire pits, and sometimes water.
- If you are in the backcountry, make sure you follow the rules of the park or preserve where you are camping. Different parks have different requirements for how close to the water you can pitch your tent or how close to the trails.
- Wherever you camp, always avoid private property to avoid the disappointment of an angry camper in the middle of your camping trip. Never camp in a place where you are not allowed to do so.
- Look for a flat surface for the tent.
Once you've chosen a suitable campsite, it's time to choose a spot to pitch your tent. There are several factors to consider, and the first one should be your comfort. It is difficult to sleep in a tent that is pitched at an angle, so it is recommended to find a flat surface, preferably with bushes.
- Find an elevated location if possible. If it rains, you should not be below where the water will flow. For this reason, avoid dry coves, small turfs and holes. You don't want to wake up in a puddle!
Ideally, the tent should be placed in such a way that it remains in the shade throughout the next morning, especially if it is hot. And while dome tents are wind-resistant, it's also a good idea to find a spot out of the wind in case you're away from the tent. The last thing you want is to come back to an empty campsite! Placing your tent on the western slope of the hill will be the best way to comfortably spend the night and cool mornings inside.
- Never pitch your tent under trees. When it rains, it's tempting to think that a tree canopy will be a safe alternative to an umbrella. Unfortunately, there is a risk of lightning and other hazards. A tent won't stop a tree from falling if something happens. It is better to stay away from such danger.
Ideally, you should place the tent against the wind, which is coming from the direction of the fire. Make sure that any embers or sparks do not fly towards the tent to avoid fire hazards.
- A smart idea is to pitch your tent on the non-windy side of the toilet if you plan to camp long-term for a long time.
Once you install it, it will no longer be possible to clear the area of stones, branches and other debris. Do this work ahead of time and you'll be on your way to a much more comfortable night's sleep.
- If you can, look for dense areas with pine needles if you are near fir trees. Pine needles can provide an excellent soft natural mattress that will help keep you comfortable.
Part 2
Setting up a dome tent
- Place a waterproof tarpaulin underneath.
While most tents are sold without one, purchasing one is necessary because a plastic or vinyl tarp provides moisture protection between the tent and the ground. While there's no need to use a tarp to keep your tent from leaking from underneath, if it rains, you'll be glad you have one.
- Fold the tarp according to the shape of the tent, but it should be slightly smaller in size than the tent. If there is a risk of rain, you should not have any open corners. Don't worry about laying the tarp down perfectly because you can do that once you set up the tent.
Remove all tent components and inspect them to ensure all components are present and in good condition. You won't be able to set up a tent with broken or missing parts, so make sure everything is in place. Each tent will be slightly different, depending on the size, style and brand, but the basic components of new dome tents should be universal. Should be:
Connect the fasteners.
All scarf fastenings should not exceed 1.8 - 3 m in length when latched, fixed or screwed. All racks will assemble slightly differently, but most modern mounts are connected to a band that allows them to simply snap into place without much effort. First fasten them, then lay them on the ground.
Insert the poles through the tent flaps.
Align the tent over the tarp with the poles where they should be to make sure everything is in the right place. Shawl bases have long crossed X-shaped posts that extend through the flaps. When you are sure they are positioned correctly, push the post through the flaps and leave it on the ground. Insert both posts.
- Different tents may have several different pole sizes, so you'll have to use your wits to figure out what goes where. You can read the instructions. This can be the most difficult part of setting up a tent if you don't have instructions, but try holding the tent to see its shape and what should go where.
Insert the tip of each pole into the holes at each corner of the tent to lift the tent up and begin to take shape. The poles should bend with a slight force, helping the tent to straighten. This is usually much easier to do with a helper as you stand opposite each other and see the curve of each post in tandem. A friend will also help support the tent.
- When you set up the poles, you may want to shake the tent a little to help the whole structure settle down. All dome tents will be slightly different.
The tent should have vinyl hoops or small holes in each corner and in the center of each side of the tent that you use to place the tent on the ground. Click on the posts to secure the tent.
- If you plan to sleep in a tent right away, you may want to leave it untied, especially if you're in an area with a lot of coverage and little wind. If you are going on a hike or in windy weather, you need to attach the scarf to pegs to prevent it from blowing away.
On some tents it is attached with Velcro in different places, on others it is attached with bungee cords for stretching on the poles.
- Some people choose not to install a flysheet over their tent if they are sure it won't rain. Some awnings cover the windows so you won't be able to see what's going on outside. But, as a rule, it is better to be on the safe side and use an awning.
Once you've set up your tent, place corners of the tarp under the flysheet to make sure nothing is left outside. If even a small piece remains outside, it could risk water entering the tent from below when it rains.
Part 3
Packing the tent
- Let the tent dry.
The tent should be completely sun-dried before you dismantle it to avoid mold growing inside. Remove the awning, stands and everything inside and shake it carefully.
Roll up the awning and tent.
Never fold a tent like a shirt or flag. To avoid wrinkles, you need to roll up the tent and put it in a bag. This will help keep the tent solid and waterproof, which is an important step to ensure the tent's viability. First, bag the tent and awning, then everything else.
Fold down the fasteners and posts.
Once you've folded the tent and flysheet, place the poles and tent poles in the bag, away from other materials, being careful not to snag or tear the tent. Sometimes the posts and mounts come with separate bags to help keep them together.
If you are the happy owner of a tent, pay attention to this one, with which you can inflate the inflatable base of the tent as efficiently and quickly as possible!
What should not be done by those who like to spend the night in the forest?
Some people who already know how to pitch a tent make the following mistakes:
- Use polyethylene so as not to stain the bottom of the tent. However, with slanting rain, such a nuisance will happen even faster. If you decide to use polyethylene, then its corners need to be folded and attached to the bottom of the tent.
- There is no need to pitch your tent on low beaches of mountain rivers. Due to rain, the water level in the river can suddenly rise and flood the shelter overnight.
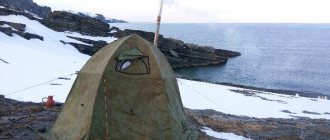
- You need to be especially careful if the tent is placed in the mountains. It should be located away from avalanche areas. For example, on slopes where there is a thick layer of snow. It is strictly forbidden to stop overnight on snowy cornices.
Every lover of long trips should understand how to set up a tent correctly. As a rule, only a couple of people in a group of travelers know about this. Some people forget that hiking is not only relaxation, but also a big responsibility.