When reading articles about terrain orientation, you may come across the phrase “azimuth determination” more than once. This term is familiar to many from school. However, the modern school curriculum does not go particularly deep into the concept and information of how to determine azimuth, providing the opportunity for professional workers and tourists to familiarize themselves with it in more detail.
Its study is required to plan routes and stops, and draw up a travel schedule in unfamiliar areas. Without this basic concept, it is also difficult to read a map. At the same time, for each case and for a new place, there are different rules. Familiarization with the concept should begin with information about what azimuth is.
For whom and why is azimuth calculation needed?
Knowing the rules for finding azimuth can be useful for the following tasks:
- Choosing a route to reach a goal.
- Selection of landmarks for movement.
- Determination of the current location by 2 specified points.
Calculating azimuth, planning and drawing a specific route often makes it easier for tourists to get to their final travel point. Mushroom pickers, hunters, and foresters are also familiar with the term in general terms. However, there are a number of professions whose representatives, without a shadow of a doubt, will answer the question of what azimuth is and how to find it on a map or compass. These include:
- astronomers;
- surveyors;
- cartographers;
- geographers.
Sailors, astronauts, and pilots are also closely related to this concept. Despite the advanced technical support of the controlled vehicle, they may need knowledge at any time to navigate the same type of terrain when faults are detected.
Types of azimuths
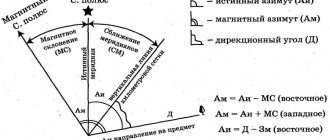
There are 2 types known: true and magnetic. Their difference is that the search for true azimuth is carried out relative to the geographical location of the cardinal points. Magnetic azimuth is sought relative to the magnetic north pole.
Orientation of directions, true and magnetic azimuths
If the tourist knows the magnetic and true azimuth, then it will not be difficult to make and plan a further trip if he has a topographic map of the surrounding area and a compass in his pocket. To convert one indicator to another, you need to make a series of mathematical calculations. Mathematical operations depend on the side of the horizon in which the error occurs.
Differences between two azimuths
Magnetic declination is the difference calculated between azimuths. If you ignore the indicator, then when drawing up a hiking plan you may make errors and serious mistakes. This rate is not constant and varies depending on your location.
In some outskirts, such an error can be significant and mislead the traveler. At the equator, a deviation of even 1 degree can throw you off course by tens of kilometers.
Based on knowledge of the side of the horizon towards which the compass needle deviates, you can calculate the degree of declination and its direction to the east or west. If the deviation occurs to the east, then the summation of the true meridian and declination is performed. If to the west - subtraction. This rule works for the transition from true to magnetic.
The indicator is written in the lower half of the page on the maps. It is recommended that you update your maps regularly - data may change annually. You should select the most detailed maps of cities and countries so that if an error is detected, you can navigate the smallest turns of paths and rivers.
Finding magnetic azimuth
Algorithm for calculating the magnetic azimuth value:
- Choose a landmark and stand up straight.
- Place the compass in your palm, raising your elbows to chest level.
- Align the arrow with north on the limb.
- Place a match or toothpick in the center of the case above the dial. Its end is oriented towards a given object, and its body intersects with the compass needle in the center.
- The number obtained as a result of subtraction is the magnetic azimuth, calculated in degrees.
Methods for determining azimuth from a map
To determine azimuth using a compass and map, select one of the three available options.
Method 1
To find out the true azimuth, you need to stock up on a protractor:
- The map is laid out on the ground. It is important that it is smooth and not distorted during calculations.
- Select the point from which you plan to conduct further search.
- You need to draw a vertical line through the place marked on the map.
- Select the second point. This will be the location relative to which the azimuth is measured.
- Connect the 2 points and, using an existing protractor, measure the drawn angle. This is the true azimuth.
Method 2
To calculate azimuth, prepare a tablet version of a magnetic compass. It is advisable to select models made of transparent plastic and with lines oriented north-south.
Procedure:
- On the laid out map, select point A. This is the place from which we will calculate the azimuth.
- Point B is the end point of the journey.
- The compass must be fixed on the map from above so that the side of the device is parallel to the intended path. The bottom is turned closer to the reference point.
- The compass must be rotated until the lines on it are parallel to the vertical kilometer markings of the map.
- As you complete the above steps, you will get a directional angle. In the future it can be converted to azimuth.
Method 3
To find the azimuth, you need to stock up on a compass and a map focused on the geographic cardinal directions.
Instructions:
- Flatten the map, and place a tablet compass on top. Its side should connect the beginning and end of a given path. The lower part of the body is close to the reference point.
- Match the magnetic needle with the north on the limb.
- An additional compass needle, oriented towards the end point of the path, will allow you to calculate the magnetic azimuth.
How to find azimuth according to the sun
Compasses or GPS navigators are most often used to calculate azimuth. They will provide accurate data. However, when you don't have them with you, you can use a mechanical wristwatch set to the current time zone.
The instructions for finding the azimuth by the sun will be as follows:
- Place the watch on the ground or other surface. Make sure they lie flat. The hour hand points towards the sun.
- A line is drawn through the center to the number 1 (or 2 for the summer period).
- Divide the resulting angle by two - this is a bisector. It leads along a north-south line. Before noon, north is on the right, that is, the azimuth is calculated against the movement of the clock hand.
Back azimuth
To move calmly in an unfamiliar area, tourists calculate the azimuth. Many reference books contain a recommendation that when making calculations it is better to immediately remember and record the return azimuth. It makes it possible to return to the starting point.
When moving in a strictly northerly direction, reverse azimuth is a 180-degree turn. It does not matter which side the turn will be made through. On your way back you will head south.
Emergency azimuth
Emergency azimuth is the direction to a selected landmark on the ground if a tourist gets lost. It can be either a linear object - a river or a road, or an area object - a village. It is better to choose large objects, this will make it easier to get to the intended place. It is difficult to get out of an unfamiliar area to a small well or a forest ranger’s house.
It is worth noting that when choosing a linear object, you should carefully study the map of the area. The road or river may turn. Moving strictly in azimuth, a group of tourists can move parallel to it, without even knowing it.
If the direction of the linear object is invariably the nearest 10 km, and the route of the intended trip is shorter, then the rule can be neglected. However, if the path lies through tens of kilometers, then you should rely on another object or track the likelihood of reaching the final goal using the emergency azimuth.
The object must be chosen in advance. That is, when going on a hike, all participants need to record the azimuth of the selected area. The resulting value is recorded on a card or a piece of paper. They are put in a clothing pocket.
Note! It is not recommended to put the calculated information in a backpack or bag, as this part of the equipment may get wet or be lost in accidents.
You can't rely on records alone either. The ink may rub off. Additionally, memorize the calculated value. Only after determining the emergency azimuth using the compass, recording it on paper and memorizing it can you hit the road.
Step-by-step instructions on how to determine azimuth
There are several methods for determining azimuth. Each of them has its own pros and cons.
Using a compass
To determine the azimuth on the ground, you must:
- Select a large object for navigation and face in its direction.
- Orient the compass to the north (align its arrow with the letter C).
- Point the sighting device on the compass cover at the object and record the resulting value.
Compass. Photo by OZON
Not all travelers have a compass with a lid. There is another option for calculating magnetic azimuth:
- Choose a significant landmark next to you and stand facing it.
- The compass must be raised in the palm of your hand to chest level, and turned until the arrow points to the north.
- A toothpick, match or just a small stick is placed above the dial in the center of the case. The end should be aimed at the chosen landmark, and the body should intersect with the compass needle in the center.
- Degree calculations are made based on the fact that north = 0 or 360 degrees.
Reference
South = 180 degrees, west = 270, and east = 90.
We invite you to watch a video on the topic:
With the help of a clock and the sun
To determine azimuth you will need a mechanical watch. In addition, clear weather is necessary for the method to be successful. Instructions:
- Place the watch on a flat, horizontal surface. Direct their hour hand towards the Sun.
- Mentally draw a line from the center to one o'clock in the afternoon (in summer) or two (in winter).
- The resulting angle is divided in half. To the right of the segment will be north, and to the left will be south. But this applies to the time before noon. Afterwards it’s the other way around.
Using a protractor
For this method you will need a map (preferably topographical). The azimuth obtained by this method is called true. How to proceed:
- Lay the card out on a flat horizontal surface.
- Determine your location, mark it with a dot, and draw a vertical straight line through it.
- Select the second point - the one where you plan to move.
- You need to connect the two points and use a protractor to measure the formed angle. This will be the azimuth.
How to determine azimuth using a compass
For orientation using a compass, calculations are made from the magnetic needle. The countdown goes clockwise and corresponds to a value from 0 to 360 degrees. In this case, 0 and 360 lead to the north. They are at the same point. The east direction is 90 degrees, the south is 180, and the west is 270 degrees.
How to hold a compass correctly
The results obtained during orientation depend on the ability to hold the device correctly. If you hold it incorrectly, the likelihood of getting lost increases significantly.
It is important to adhere to some rules that have been developed by experienced travelers over many centuries.
Central grip technique
The device is opened. In this case, the lid must be tilted 180 degrees so that it forms a straight line with the base. Open the scope. The dial should be completely visible to you. In this method, gripping the compass and clear placement of the hands is very important.
The index fingers lie on the body strictly along the lid. The thumb of the left hand rests between the rear sight and the dial, and the thumb of the right hand rests under the body, holding the device and maintaining balance. Bend your elbows and fix them in the solar plexus area and spread to the sides.
Having taken a given pose, you can begin to calculate the azimuth. To do this, it is enough to rotate around its axis until the cover points to a given object. After stabilizing the arrow, you need to calculate the angle value on the dial.
Method - compass to cheek
The compass must be installed correctly. The cover of the device is opened and fixed at an angle of 90 degrees relative to the base. Move the rear sight forward. The aiming slot must coincide with the aiming thread.
Place the compass on your cheek. The object must be viewed through the front sight line. Record the value obtained during the measurements.
What it is?
Azimuth is the angle between the direction towards the object and the direction to the north. Its calculation begins with determining the cardinal directions. The degree range of the value is from 0 to 360 (not inclusive, since 360 is the north point).
Travel compass. Photo by AliExpress
The azimuth navigation method is especially useful in conditions of the same type of landscape, when there are practically no landmarks on the ground, as well as in bad weather or when there is no map at hand.
Reference
In essence, this is a method of precise movement blindly, no matter how paradoxical it may sound.
How to correctly navigate in azimuth with obstacles
Sometimes movement in azimuth can be complicated by insurmountable obstacles that arise along a tourist’s planned route. These could be rocks, waterfalls, abysses. In such a situation, the choice of path is made based on the landscape. To avoid getting lost, it is important to follow some simple rules.
Instructions for unscheduled route changes:
- Select a large object located on the other side of the obstacle. Determine its azimuth. Select objects that lie along the vector of the planned path.
- The next step is to calculate the azimuth to be able to bypass the obstacle.
- When you pass an obstacle, you need to record changes in the route.
When hiking through the same type of terrain, you can use available means as a guide. You can make a mark on a tree or a stick stuck in the ground.
Drawing up a route in azimuth
A topographic map of the surrounding area makes it easier for tourists to move around. Paths and paths, streams and large rivers with all the twists and turns are drawn on them. Therefore, the movement of large groups on a planned hike is carried out using a map.
However, sometimes it is impossible to avoid walking in azimuth. Examples include heavy rains that affect viewing range, thick fog, desert or steppe terrain, or dense forest.
To speed up progress towards the final goal, it is recommended to draw the planned path on the map. Straight-line movement is not always correct.
In order to avoid making mistakes or reduce their number, it is recommended to divide the route into several sections of shorter length. At each point you need to rely on landmarks connecting the stopping places. Having reached the intended landmark, it is necessary to check the route sheet and, if possible, correct or supplement it.
The route sheet compiled in this way is longer. The intended path is a broken curved line. However, the likelihood of making a mistake or getting lost is much less.
To plan a route, you need to choose stopping points with major landmarks. The distance to each point is additionally determined. If a return trip is planned, then all noticed inaccuracies are recorded in a traveling notebook.
Movement in azimuth. Azimuth movement
From geometry lessons we know that the shortest path between two points is a straight line. Indeed, sometimes it is advisable to move towards the intended target in a straight line (that is, in azimuth). But here several factors need to be taken into account.
The main one is a possible loss of speed when moving through dense undergrowth, wetlands, the need to overcome ravines and rivers, etc.
The second factor is the difficulty of maintaining direction when overcoming natural obstacles. Therefore, try to take azimuth to landmarks that have significant linear dimensions or are easily distinguishable from a distance.
Third, moving through the forest directly unmasks those moving with appropriate sounds (the sound of a broken dry branch can be heard in calm weather at a distance of 300 meters).
Serif method
This is kind of one of the ways to move in azimuth. It is impossible to constantly control the position of the compass needle, therefore it is recommended to take the azimuth, find along the line of sight any noticeable object (notice) at the limit of visibility (fallen tree, stump), and then move to this object without controlling the azimuth (you should not lose the notch from field of view). Having reached the notch, repeat the operation, and so on until you reach the end point. With this method, the error per 500 meters usually does not exceed 30 - 50 meters.
Movement in the bag
This is an azimuth movement to the point of intersection of two linear landmarks, when one of them limits the deviation to the right, and the other limits the deviation to the left. A similar case is illustrated in the following figure:
From point 1 you need to get to point 2 (the intersection of the path and the clearing with power lines). In this case, it is enough to roughly take the azimuth to the intersection point and boldly run in this direction, since it will not be possible to slip past the desired point: in any case, you will either go out onto the path or into the clearing (the main thing here is not to confuse it, and to understand that you need to follow the path go to the right, and along the clearing to the left) and as a result you will get to the intersection you need.
Anticipatory movement
Its meaning is that the movement is planned not to a point, but with a deliberate deviation in one direction or another. This is usually done to reach some noticeable landmark, and then continue moving towards the goal from there. This is especially useful when the desired point is small in size, and it is easy to miss it if you take the azimuth directly to it.
Movement along the chain of bindings
A similar method has already been described for the case of georeferencing. When planning a route and driving, it is used in cases where it is advisable to lay a route along existing paths and roads. It consists in the following. To begin, select a route on the map. If it is long enough, then it is divided into segments so that the end of one section and the beginning of another falls on some noticeable landmark. Each subsequent section of the upcoming path must be remembered; to facilitate this, a legend is drawn up in the mind (straight up to the fork, then to the right, straight until a field appears on the left, etc.). After one section is left behind, you need to stop, look at the map, make sure that you are on the right path and start memorizing the next section (with a certain skill, it takes about 15 to remember 1 km of the path in a “not very trampled” forest - 20 seconds).
Errors and why they occur
Most of the mistakes that tourists make are related to the following factors:
- magnetic declination or deviation;
- compass malfunction;
- proximity to metal, including in a backpack;
- close location of power lines;
- proximity to electrical appliances.
If the last 3 reasons are quite easy to eliminate, and can be avoided altogether by showing banal vigilance, then the first ones will have to be dealt with in more detail.
Deviation from the planned path of movement most often occurs due to magnetic declination. You need to be able to calculate it. The information is printed on the card. Information from older sources may be incorrect because the value is constantly changing.
Experienced tourists recommend updating maps annually. You can enter an anomalous zone. Here the fluctuation occurs over a wide range. A striking example is the seas and oceans, where readings tend to constantly change depending on metal deposits, sources of valuable natural resources at the bottom, cracks in the earth’s crust and depth.
It is to avoid such unpleasant situations that electromagnetic navigation systems with satellite communications are installed on most ships. They already contain orientation taking into account possible errors, and the data is constantly updated.
With them you don't have to worry about getting lost. However, this technique requires a certain handling skill.
The concept of magnetic deviation is associated with the proximity of objects with magnetic properties and close to high-voltage lines. In this case, the magnetic needle deviates from the magnetic lines of the Earth.
The most significant errors and errors occur near the railway, near a car, motorcycle, and also if tourists are near the following equipment:
- smartphone, tablet, computer;
- radio equipment;
- compass;
- magnet.
Before starting orientation, it is recommended to move the instruments that affect the readings as far away from you as possible. You also need to remove your backpack with equipment. There are known cases of wandering due to the deviation of the arrow due to the equipment of tourists behind their backs.
The next factor is a malfunction of the compass. The easiest way to check is to bring the magnet closer. If the device is working properly, then the needle will deviate towards the magnet every time, no matter which direction it is brought.
And when you remove the magnet, the arrow necessarily returns to its original position. If this does not happen, then this indicates a malfunction.
If you are outdoors or hiking and don’t have a magnet at hand, don’t despair. You can check it with a regular knife or a smartphone in your pocket. Both of these items have almost imperceptible magnetic properties, but they are sufficient for testing. The steps remain the same as when checking with a magnet.
If you have even the slightest shadow of doubt about the reliability of your compass data, it is recommended to check it immediately. This will allow you to avoid errors, and in an emergency situation will prevent you from getting lost.
Errors when moving in azimuth
Knowing the azimuth does not guarantee that you will reach your destination exactly as expected. Even a slight deviation can affect the achievement of the goal.
Thus, an error of 5 degrees when passing a given path gives a deviation equal to 100 meters per segment of 1 km. To minimize the risk of error, you should carefully plan your route and also study the rules of movement:
- It is recommended to divide the planned route into several small sections. Each of them must end at a point with a given landmark;
- If there are obstacles on the way, you should go around them from the left or right side alternately. This way you level out the error;
- if the obstacle is significant, then it is necessary to control the return to the given motion vector;
- It is recommended to calculate the azimuth for the entire route, each segment and distance in advance, before starting the journey. This way you will save travel time and reduce the likelihood of making a gross error in calculations;
- If you are moving through a previously unfamiliar area, then the path you have traveled should be periodically checked. To do this, it is enough to look back and check the linearity of movement.
Note! If the path lies close to a linear landmark, then it is necessary to periodically go out to it and check the azimuth of the required direction. Orientation will be easier, more convenient, and the likelihood of making a mistake will be minimized.
Step-by-step instructions on how to move on the ground using this method:
After the angle is found, you need to be able to correctly use the knowledge gained.
Normal conditions
Compass keychain. Photo by OZON
Basic rules of movement:
- It is important to plan your route on the map in advance and divide it into many small sections. Each of them should have the end located near a large landmark.
- Having determined the degree, you should move in a strictly straight direction.
- Obstacles must be avoided alternately, sometimes on the left, sometimes on the right. This way you can reduce the resulting error.
- If there is a large obstacle on the way, then, having returned back to the route, it is worth recalculating the azimuth.
- The path traveled should be constantly checked by looking back and checking the linearity of the route.
Important!
Even a small error of a few degrees can deviate from the route by hundreds of meters.
At night
At night, landmarks for calculating degrees become invisible, so you can either take care of marking them on the map during the day, or use the stars and the Moon as “helpers.” Flashlights and spotlights are also useful if celestial navigation is problematic.
in winter
Snow covers all landmarks, making navigation difficult. To more accurately calculate azimuth, you will need to climb higher ground to determine larger objects for direction.
In the forest
Clustering of trees and felling create obstacles during navigation, forcing you to deviate from the route and constantly recalculate the azimuth. Anthills (on the south side they are flatter) and tree bark (on the north side it is rougher, often overgrown with moss) will help with determining the cardinal directions. A map on which a large landmark is selected in advance will be of great help.
In difficult weather conditions
Any precipitation reduces visibility, so it is better to draw the route on the map in advance, and stop as often as possible, mark with dots how much has been covered and in what direction. It is better to use small, closely located objects as reference points. It’s great if there is a river or stream flowing nearby, they will help you not get lost.