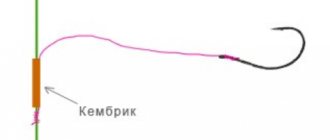
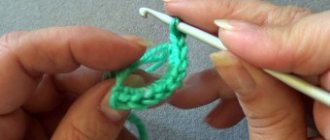
Knot formation and tightening
It should be said that it is best to tie knots only on monofilament fishing line. Braids are poorly suited for this for several reasons:
- They are too thin to knit complex knots on them.
- Braid is a very soft material; sometimes it is impossible to thread a donut through a loop; it simply bends.
- A braided knot is uneven and not as strong as a monofilament knot.
- Braid is a fairly slippery material; simple knots that can still be tied on it will easily unravel during fishing.
In the case when you need to connect something with braid, it is best to use a special American fastener or use loop knitting.
Now you need to figure out how to properly tie the hook to the fishing line and tighten the knot on the monofilament fishing line. You need to tie it in such a way that there is enough free end and so that the knot can be formed correctly - usually from 5 to 15 cm. The knot is formed and slightly pulled together to a working position. After this, an important moment begins - tightening.
The knot must be wetted before tightening. To do this, fishermen usually use their own saliva, taking a piece of fishing line into their mouth. But it will be much more hygienic to simply spit on your fingers and wet the knot with them.
If the knot is not wetted, at the moment of tightening the line will rub hard against the hook and itself, and due to the resulting temperature it may lose strength - this can then lead to breakage.
When the knot is pulled to the limit, the tightening is stopped, and the free end is cut off with small special scissors. Using your teeth for this is also not entirely hygienic; you need to take care of your teeth. It is better not to cut right to the knot; you must leave a small tip, otherwise it may come undone.
In the case when a shock leader is tied or two fishing lines are tied, cutting is allowed almost right next to the knot, but only special knots are used. Some types require a fairly long free tip.
On monofilament line
Monofilament fishing line has been used by fishermen for a very long time, and is the most common among a huge number of fishing accessories. Therefore, everyone should understand how to tie a hook to the main monofilament line.
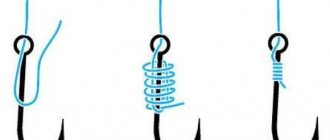
Eight
This is a very reliable knot, although it is not suitable for mounting on a thin fishing line (as a rule, other knots are used for tying to a winter fishing rod). But for tightening on thick fishing line, the knot will be ideal
.
The tying pattern is shown below.
https://youtu.be/gMk6DomvbMM
Winding
This knot is universal and allows you to tie a hook with a spatula or eye. It is important to pay attention to the uniformity of the turns and ensure that they lie as evenly as possible. Be sure to wet the line before tightening the knot, and check it for strength after tying.
The knot is tied as follows
:
Clinch
The clinch is the most commonly used knot, allowing you to understand how to tie a hook and eye to a fishing line. Many fishermen call this knot a gripping knot. Most often, this fastening method is used for thin fishing lines.
The binding diagram looks like this
:
Improved clinch
Fishermen who use thin fishing lines have somewhat improved the knot, which makes it possible to tie even thin fishing lines, so it is used for winter fishing rods. The double loop used in its installation adds strength and power to the connection.
The binding diagram looks like this
:
Knots for crocheting with eyes
The most popular type of fishing hooks. They are tied with both special knots, which involve fastening by the eye, and universal ones, in which the fishing line is attached to the body. From the point of view of the fisherman, this matters - in many types of fishing it is required that the hook hangs on the fishing line as movably as possible, and in some cases it is important to ensure maximum fastening strength and invisibility.
There are several types of ears: large, small, straight, bent towards the sting or away from it, located in the same plane as the bend. It is advisable to tie all these hooks in different ways, and they are adapted for different types of fishing.
Uni, Duncan Loop
A common knot, with the help of which a relatively movable connection to the fishing line is obtained, when tightened it is very neat and small. This knot cannot be untied, and in the case when it is necessary to remove the hook, it is cut off. This method is usually used to tie rather large hooks, as well as spinners, swivels, and jig heads.
Execution sequence:
- The fishing line is threaded through the eye, the tip is returned back along the main part.
- The end is threaded into the resulting loop five to six times, wrapping it around the main line and moving away from the hook.
- The tip is brought into the loop and the knot is tightened behind it.
- A loop is formed near the hook; it is also moistened and tightened by pulling on the main fishing line.
The advantages of such a knot are that it is very durable and the strength of the fishing line is practically not lost on it. Disadvantages - it is quite difficult to knit it on a thick fishing line. Also, the tying process itself is quite long; you will need to thread the end into the loop several times in a row, which will be difficult to do in poor visibility, for example, at night or for a person with poor eyesight.
Bayonet knot
A fairly simple way to make a knot, which is best used for tying thick cords. For hooks, this knot is suitable only when it is necessary to tie a large hook, for example, for sea fishing. The fact is that this is not the most reliable knot, it does not hold well in the water, and can slip during the current, which will lead to the loss of the hook. However, if the hooks need to be not only tied, but also untied, it will be suitable. It is also used when they want to tie an anchor, a feeder, a cord to an eye, or a lanyard to a branch of a tree or bush.
Tying order:
- The fishing line is threaded through the eye.
- The tip is wrapped around the fore-end and passed under the main line.
- Once again they wrap it around the forend and pass it through the loop.
- The knot is tightened by pulling the tip.
Spindle, rib
A relatively simple and most common crochet knot. In practice, it is advisable to use only this whenever possible. It is very durable, does not unravel, and can withstand loads well. Used on monofilament synthetic fishing lines of small and medium thickness. The knot is located on the fore-end, while the fore-end itself becomes a continuation of the fishing line, which creates good conditions for reliable hooking and correct transfer of force to the sting at the moment of hooking itself. There are two ways to tie it, and both of them form the same knot after tightening.
Method one:
- The fishing line is threaded through the eye.
- The tip is turned back, forming a loop running along the fore-end.
- The tip is wrapped around the loop five to six times, going from top to bottom to the bend of the hook and fixing the turns with a finger.
- The tip is threaded through the loop and the knot is tightened.
Method two:
- The fishing line is threaded through the eye.
- Make a loop about 7–8 cm long and thread the finger of your left hand through it. The right hand holds the hook and the tip of the fishing line.
- Using the threaded finger, make five to six turns around the forend, holding them with the other hand so that they do not fall off.
- The tip is threaded through the loop with your finger removed.
- The knot is tightened by pulling both ends of the fishing line to the sides.
The first method is more economical; it leaves a smaller tip that needs to be trimmed. However, it requires developed hand motor skills and you need to feel the line with your fingers. If it is very thin, and you tie it in the cold with frozen fingers, then it is better to use the second method.
Blind node
It is used when using a rough cord of large diameter and a fairly large hook with a large wide eye. Indispensable when you need to not only tie a hook, but also untie it, for example, if you need to change the bait often. One of the simplest ways.
Execution order:
- The fishing line is folded in half and the loop is threaded through the eye.
- The hook is passed through the loop.
- The knot is tightened by pulling the hook.
- The line is cut, leaving a fairly large tip, or not cut at all.
Using this method, you can tie not only a hook, but also a spoon, jig, feeder, and boat. A blind knot is also good if you need to tie a swivel to a soft wire, but there is no time or conditions to make another connection.
Fisherman's eight
Another fairly simple knot, but unlike the others, it holds quite well and is less likely to untie spontaneously. However, it will be impossible to untie it later on a thin fishing line. Used for large hooks with a large eye, as well as for attaching feeders, swivels, and leashes to monofilament.
Execution order:
- The fishing line is folded in half and the folded loop is threaded through the eye.
- The hook is threaded through the loop.
- The tip of the line above the hook is wrapped around the line and threaded through the loop.
- The knot is tightened and the tip is left.
This method got its name due to its shape - when tightened on a thick rope, it resembles the number 8.
Canadian eight
A very simple knot that is suitable for both large hooks and small ones, with a small eye into which it is difficult to thread a fishing line folded in half. The main condition is that it must be performed on a rough and fairly thick fishing line, otherwise it may come undone.
Execution order:
- The fishing line is threaded through the eye.
- The tip is bent, forming a loop covering the fore-end.
- The tip is passed between the fore-end and the main line above the loop.
- It is then threaded through the loop.
- The knot is tightened and the tip is cut off.
This fastening is one in which the fishing line and fore-end form one line during fishing, therefore the best conditions for hooking are created - the hook does not unfold in the mouth of the fish when hooking and the force is immediately transferred to the sting.
Bloody Knot Clinch
The method is well suited for tying jigs with an eye to a thin fishing line or jig heads to a monofilament. To tie, you need a hook with a large eye, into which the fishing line can be threaded, folded in half.
Execution order:
- A fishing line folded in half is threaded through the eyelet.
- The loop is pulled out of the eye to a distance of about 8 cm.
- The free tip should also have a length of about 8 cm.
- The tip is wrapped around the loop and the main line 5-6 times, moving up from the eye along the line.
- It is then passed through the loop.
- The knot is tightened by pulling the main line and making sure that the tip does not jump out of the loop.
- The tip can be cut almost close to the knot.
The main disadvantage is that the connection with the fishing line is not very strong; the loss of strength can be about 80% of the strength of the fishing line. Therefore, another method is often used for the same purposes - an improved clinch. However, the knot is simple, and it is one of the few options where you can cut the tip close after tightening, which is less likely to scare away the fish.
Improved clinch
It is used in the same cases as the bloody knot clinch, but can also be used for hooks with a relatively small eye. Its strength is almost 100%. For knots, this is one of the best indicators of strength. The order of its execution is as follows:
- A fishing line is threaded into the ring and the tip is returned back, forming a loop.
- The tip is wrapped around the fishing line 6-7 times. If it is more convenient, you can rotate the hook to form a twist.
- The tip is passed once into the loop near the eye.
- Then the end is taken out of it and passed through the loop that was formed at the time of the previous operation.
- The knot is tightened, the tip is cut at a distance of about 2 mm from the hook.
Among the disadvantages of this method, one can point out that more operations are required, and in the case of thin fishing line or braid it will be more difficult to perform. Also, when hooking, the force will not be transmitted parallel to the sting, but at first it may turn the hook in line with the fishing line, which is not very good.
Turtle knot
Suitable for tying small eye hooks and complex lures. It has the ability to self-untie during prolonged use. Works best on thick fishing line.
Execution order:
- The line is threaded through the eye.
- The hook slides along the line - it will only be needed at the very end.
- A loop is performed.
- Another small loop is made: the tip is wrapped around the fishing line.
- The tip is threaded through a small loop.
- The hook moves down and is threaded through a large loop.
- The knot is tightened.
- The tip is cut at a distance of at least 10 mm.
This method is quite easy to learn. In essence, it is a loop on which a simple knot is tied, familiar to everyone from childhood. That's what it's called - simple.
Salmon knot
It looks complicated, but in reality it only requires experience. The knot is easy to knit in any weather, it can be tied with frozen hands, even in the dark it can be done almost by touch. It is done in an original way - by shifting the loop onto the hook.
Execution order:
- The fishing line is threaded through the eye.
- The tip is brought back to the main line to form a loop.
- The tip wraps around the line a full turn.
- Passed through a loop formed near the eye itself.
- The resulting complex loop is moved along with the tip onto the fore-end, while the hand holds the fishing line.
- The knot is tightened.
- The tip can be cut short, almost close to the knot.
The advantage of this unit is its high strength. It can reach more than 90%. The connection with the fishing line itself is located on the fore-end, which, although it takes away some of the mobility, creates favorable conditions for hooking.
California Knot, Palomar
Very simple and at the same time very durable. To do this you need a hook with a large eye. The knot is located on the eye, but in the end the hook still forms a rigid, stationary connection with the fishing line, which is good for hooking.
Execution order:
- The fishing line is folded in half and inserted into the eye.
- The double loop is turned back and a simple knot formed by two rows of fishing line is made above the eye.
- Then the loop is threaded down and the hook is inserted into it.
- The knot is tightened by pulling the tip and the main line (they are nearby) and holding the hook.
- The tip is cut at a distance of about 2–3 mm.
Among the disadvantages of this knot, one can point out that there remains a rather large tip of the fishing line, which has to be cut off.
Bloody
A strong knot, made on the basis of a simple loop, into which a hook is then inserted. With proper skill, you don’t even need to perform any complex manipulations with the fishing line - it can be twisted between your fingers.
Execution order:
- The line is threaded through the eye.
- A loop is made at the end, into which the tip of the fishing line is inserted 5-6 times. This operation can be done by simply making a loop, holding the tip and line between your fingers and twisting them, the tip should not protrude beyond the loop in order to pass through it when twisting, and the loop should be held with the other hand along with the hook.
- The hook moves down to the loop and is pushed through it.
- The knot is tightened onto the fore-end by pulling the tip and the main line.
- The tip is cut at a distance of 1–2 mm from the nodule.
With practice, this is one of the few knots that are easy to knit with braid. The most difficult operation in this case is to thread the braid through the eyelet. If it is small, and the braid is thick and fuzzy, the task is not an easy one.
Locked up bloody
Bloody knot variant. It differs from it in that the free end of the fishing line, after the loop is put on the hook, is threaded through the loop of the fishing line and brought up. As a result, the tip points up instead of down, leaving more room on the hook for the bait and preventing the fish from getting stuck on the tip when it takes it. It is believed that this knot will hold better than the bloody one and is less likely to untie, although even this one, if done correctly, holds very well.
Gripping unit
The knot is simple, suitable for any type of fishing line, including braided line. Its peculiarity is low strength, it sometimes decreases to 60% of the strength of the main line. However, this can also be a plus - for example, when fishing in strong places, when it is easier to tear off the hook and tie a new one without the risk of the line breaking above the hook, leaving the rest of the gear there. For example, when they fish with a donka with a large number of leashes.
Execution order:
- The fishing line is threaded through the eye.
- The tip of the fishing line is brought up to the main fishing line.
- The tip is wrapped around the main line five to six times.
- Return it back and thread it through the loop near the eye.
- The knot is tightened.
- The line can be cut 1–2 mm from the knot.
The knot is located entirely above the hook. It can be performed without wrapping the tip of the fishing line, but by rotating the hook in your hand.
Tuna knot
Perhaps the most difficult knot to perform, it will not be easy for them to tie a hook the first time. It requires a hook with a large eye that is not only bent, but also sealed, otherwise the fishing line will cling to it and the knot will not work. At the same time, this knot is considered the most durable and was specially invented for tying monofilament fishing line.
Execution order:
- The line is threaded through the eye.
- The tip is wrapped 3-4 times around the fore-end.
- The tip is brought back and threaded into the eyelet parallel to the rest of the fishing line.
- The turns of the fishing line around the fore-end are moved back along the hook so that they come out and cover both the tip and the fishing line.
- The knot is tightened by holding the line and pulling the hook.
- The tip is cut at a distance of 2–3 mm.
In terms of the technique of execution, this knot is a little reminiscent of a salmon knot, but only there the loops moved onto the hook, and here, on the contrary, they move away from it. The knot turns out to be located entirely above the eyelet. In general, in sea fishing, fishermen for some reason prefer knots that are located above the hook.
Shark knot
Very similar to the Uni knot, but differs from it in that the line is not passed inside the loop several times, but is wrapped around it. It is believed that this method allows you to knit hooks as tightly as possible. The fishing line forms a movable connection, the knot is located above the hook. Good for monofilament.
Execution order:
- The line is passed through the eye.
- The tip is brought up and a loop is made, which is fixed with the finger of the left hand.
- The tip is wrapped around the resulting loop 5-6 times, going down to the ear. The loops are held with the finger of the other hand holding the hook.
- The tip is threaded through the loop that was held by the left hand.
- The knot is moistened and tightened.
- The tip is cut off.
The result is a neat and durable knot that is located above the hook. The tip of the fishing line goes up, which makes it easier to attach the bait.
We recommend reading
How to tie a float to a fishing line for different fishing conditions The float is the most important part of a float rod.
It holds the bait at the desired depth and signals a bite....
Knots for hooks with a ring
Hooks with a ring are the most common, so we will start with them. By the way, novice fishermen should use only such hooks, since tying them to the fishing line is much easier.
Knot "Palomar"
First of all, we will look at the common Palomar knot. Its knitting pattern can be found on almost all packages with hooks. With “Palomar” you can easily attach a second hook to the fishing line without removing the main one, and this is the beauty of this knot.
Knitting technique:
- Fold the fishing line in half and thread it through the ring of the hook
- Now, on the folded fishing line we knit a simple knot
- Next, we put the resulting loop on the hook tip
- And tighten the knot
As a result, we have a simple and very compact knot; all that remains is to cut off the excess end of the fishing line. This knot can be strengthened if you thread the double fishing line into the ring of the hook not once, but two or three times.
Reinforced “Palomar” is used on spinners or swivels.
Characteristics
Here we will understand the various characteristics of the nodes, in general, now you will see everything for yourself.
- Application: hooks, spoons, swivels, carabiners.
- Reduction in fishing line strength: 20% (if the fishing line can withstand a kilogram, then at the knot it will withstand 800 grams).
- Line thickness: From 0.1 to 0.2mm.
- Lines used: Monofilament, braided.
"Gripper knot"
This is my favorite knot, it is so versatile that it allows you to tie not only a hook, but also tie two fishing lines, or tie a leash.
Knitting technique:
- First, we thread the fishing line into a ring, and wrap the short end of the fishing line around the long one 6-7 times
- Thread the short end of the fishing line into the resulting loop
- Now tighten the knot but not all the way
- Next, you need to grab the hook with one hand and the main line with the other, and finally tighten the knot
At this point the node is ready. For the convenience of final tightening of the knot, you can hook the hook onto any surface, for example, you can insert a nail into the bend of the hook.
Characteristics
- Application: hooks, spoons, swivels, carabiners.
- Reduced line strength: 30%.
- Line thickness: From 0.14 to 0.3mm.
- Lines used: Monofilament, braided.
Knot “Eugene” (Eugene)
Not a very popular knot, as it has a large volume. On the other hand, if you look at the characteristics, you can close your eyes to this little detail.
Knitting technique:
- We thread the fishing line into a ring 7-10 centimeters and fold it in half
- With double fishing line we make 3-5 turns around the main line
- We thread the short end through the loop of the double fishing line
- Tighten the knot
The knot is quite voluminous, but its strength is off the charts, since the fishing line holds itself.
Characteristics
- Application: hooks, spoons, swivels, carabiners.
- Reduced line strength: 3%.
- Line thickness: From 0.1 to 0.6mm.
- Lines used: Monofilament.
Shark knot
A very strong knot, it’s not for nothing that they called it that. We'll talk about this in the specifications, but now let's get down to business.
Knitting technique:
- We thread the fishing line into the ring of the hook 5-7 centimeters and apply it to the main
- We pinch both fishing lines between our fingers, and with a short piece we make 4-6 turns towards the hook
- We thread a short piece into a loop near the fingers
- We tighten the entire structure
This knot is self-tightening, so you can achieve a high-quality connection by pulling the hook and the main line in different directions.
Characteristics
- Application: hooks, spoons, swivels, carabiners.
- Reduced line strength: 5-7%.
- Line thickness: From 0.1 to 0.6mm.
- Lines used: Monofilament.
Clinch
This type of gripping unit was invented for thin fishing lines. Since the gripping knot is self-tightening, it is difficult to tighten it on a thin fishing line without breaking it. In principle, the differences are small.
Knitting technique:
- We thread the fishing line through the ring of the hook 2 times, leaving a loop.
- We make 4-6 turns around the main line in a short section
- We thread the fishing line into the loop
- We tighten
Thanks to the double loop, we double the strength of the fishing line, and this in turn allows us to efficiently tighten the knot.
Characteristics
- Application: hooks, spoons, swivels, carabiners.
- Reduced line strength: 5-7%.
- Line thickness: From 0.08 to 0.2mm.
- Lines used: Monofilament.
Figure Eight Knot
This knot is quite common among fishermen. This popularity is due to its simplicity and at the same time strength.
Knitting technique:
- First you need to thread the fishing line into the eye of the hook, and tie a regular knot on the fishing line, threading the fishing line twice
- Now from the resulting loop we form a figure eight
- After this, we need to insert the hook into the resulting figure eight. Please note that there is an arrow in the photo; it is from this loop that you need to start inserting the hook
- Next you need to tighten the knot and move it towards the ring
At this point our eight is ready, as you can see, there is nothing complicated in this knot.
Characteristics
- Application: hooks.
- Reduced line strength: 10%.
- Line thickness: From 0.1 to 0.2mm.
- Lines used: Monofilament.
How to tie a hook without an eye
For some reason, hooks without an eye are not very popular. And completely in vain. It is easy to hold it when inserting a worm or bloodworm, if you press the spatula with your fingernail. For example, when fishing with semolina porridge, the author prefers to use only them, since the hand holding the hook remains clean and does not get dirty with porridge. Fishermen believe that this type itself scares off fish less, since it does not have a massive metal eye extending beyond the nozzle.
You can tie hooks without an eye only by the shank. In this case, the fishing line must be brought out from the other side of the blade so that it does not rub against it and does not interfere with pressing the blade during installation. A hook tied to the fore-end behaves better when hooking a fish - the force will always be transmitted parallel to the tip, and even with a little force it will immediately stick into the fish’s lip. While the one that is tied freely can first turn around to the working position if it has been displaced, and only then stick it in. During this time, the fish may spit out the bait.
All previously discussed methods in which the hook is tied to the shank can also be used for hooks with an eye. For example, the “spindle” knot, which is most often used, is also suitable here. Unless the salmon knot cannot be performed: it is made using a ring that fixes the fishing line while the hook moves. At the same time, there are several special knots that are used purely for such hooks. In addition, all knots for hooks with a spatula can also be used for hooks with an eye - if, for example, an angler for some reason wants to do this. The eye in this case acts as a stopper, a spatula, which does not allow the hook to slip out of the knot.
Step unit
It is difficult to perform, but has an important feature - the line is, as it were, shifted towards the tip, which increases the chance of successfully hooking a fish, since the jerk during hooking will be transferred to the hook tip shorter, without an extra shoulder. For a thin hook that will spring when hooked, for a small hook whose bend is comparable to the thickness of the fishing line, this is a very important feature - the fish will not have time to spit it out.
The order of execution of the step unit:
- The hook is clamped between the fingers of the left hand and held by the bend, forward with a spatula.
- Parallel to the forend, the fishing line is clamped with your fingers so that the free tip extends towards the shoulder blade and is about 10 cm long.
- The tip of the line is bent and wrapped around the forend once near the shoulder blade. The fold must be tight enough, otherwise the loop will slip out.
- The tip is wrapped twice around the fore-end with a step towards the bend.
- A loop is made near the bend, the tip should then look up towards the shoulder blade, and is placed in the fingers of the left hand along with the hook.
- Perform three to four turns of the tip around the loop.
- The tip is inserted into the bottom loop.
- The knot is slightly tightened by pulling the tip of the fishing line.
- The line is oriented so that it comes out from the inside of the hook, without catching the blade.
- The knot is wetted and tightened completely.
- The tip is cut at a distance of 1 mm from the node.
This unit also has disadvantages. The tip points towards the sting, and it can affect its grip, blocking the space inside it, and can also interfere with the nozzle. At the same time, for catching bleak, roach and other carp fish with a thin lip, the correct direction of the hooking force is more important than the wide free mouth of the hook, so this knot will perform well here.
Spiral dumhof knot
A modified spindle knot. The difference is that for this method the fishing line does not pass along its outer surface to get into the loop, but smoothly moves towards it while performing the spiral.
Execution order;
- The hook is taken between the fingers and held by the area near the shoulder blade.
- The fishing line is also clamped with your fingers, the free tip goes to the bend, its length is about 7 cm.
- A loop is made that runs along the forend, the tip is clamped near the shoulder blade and held.
- The tip wraps around the loop and shank 5-6 times, going down to the bend of the hook.
- The tip is threaded through the loop.
- The knot is slightly tightened and oriented so that the fishing line does not cling to the shoulder blade.
- The knot is moistened and tightened completely.
- The tip is cut at a distance of 1 mm from the node.
It is believed that such a knot is much stronger than the “spindle” knot. But it’s also not easy to do, and many fishermen use a familiar knot.
Knots for hooks with a spatula
Spade hooks are used to catch wary fish. The beauty of these hooks is that you can use bait to completely camouflage the hook. It should be remembered that when fishing for large fish, the knot may slip off such a hook.
"Step Knot"
Let's start with the best knot for spatula hooks, the step knot. This knot does little to weaken the line, so it's definitely something you need to learn how to tie.
Knitting technique:
- First, fold the fishing line in half and attach it to the hook.
- Now we grab the loop and hook with one hand, and with the other we make 3-4 turns with the short end of the fishing line around the main fishing line and hook
- Next, you need to fold the main line and make another 3-4 turns, wrapping the main line as well.
- Now insert the short end of the fishing line into the resulting loop, and you can tighten the knot. Pull both ends of the line first, and then just the main line, and the knot will tighten
Don’t be afraid that everything seems difficult, you just need to sit down in front of the knot knitting pattern and try it. You'll soon be tying this knot with your eyes closed; it's actually very simple.
Characteristics
- Application: hooks.
- Reduced line strength: 5%.
- Line thickness: From 0.1 to 0.3mm.
- Lines used: Monofilament.
Spindle knot
A very simple knot for tying a hook with a spatula. It is very similar to a gripping unit.
Knitting technique:
- First, fold the fishing line in half and apply it to the hook.
- We need to wrap the short end of the fishing line around the fishing line and hook 5-6 times
- We insert the short end of the fishing line into the formed loop.
- Tighten the knot
At this point, the knot is ready, all that remains is to move it to the blade of the hook, and you can fish. Remember that this knot is weaker than the previous one, so it is not recommended to catch large fish with this knot.
Characteristics
- Application: hooks.
- Reduced line strength: 15%.
- Line thickness: From 0.1 to 0.2mm.
- Lines used: Monofilament, braided.
Loop knot
The most common method of tying a hook with a spatula. This is a simplified version of knitting a step knot. This knot is often used in competitions due to the speed of knitting.
Knitting technique:
- Fold the fishing line in half and attach it in a loop to the fore-end
- With the short end of the fishing line we make 6-8 turns towards the forend, wrapping the hook and loop
- Thread the short end of the fishing line into the loop
- Pinch the short end of the line and the hook with your fingers, then pull the main line and the knot is complete.
The undoubted advantage of this knot is the ease of knitting, but there are also disadvantages. When biting a large fish, there is a risk of the knot slipping off the hook.
Characteristics
- Application: hooks.
- Reduction in fishing line strength: 5-10% (depending on the number of turns, the more, the more reliable and noticeable).
- Line thickness: From 0.1 to 0.3mm.
- Lines used: Monofilament.
Leash knot
Another simple option for hooks without a ring. Although it is harder to knit than the previous one, it deserves your attention.
Knitting technique:
- Fold the fishing line in half and attach it in a loop to the fore-end
- With the short end we make 8-12 turns inside the loop
- We tighten the main line so that the loop tightens
- Now we take the short end of the fishing line and the main fishing line and finally tighten the knot
This is where I will end this article, the main thing is not to forget to wet all the nodes, then you will achieve their maximum strength. See you again, dear readers!
Universal knots for fishing hooks
Universal fishing knots are designed not only for attaching hooks, but also other fishing gear. For example, with their help you can tie an anchor to a line, a feeder, an unhitch, a boat, a lure to a tree branch, or perform other operations.
Rapala knot
A non-tightening loop, which is used when installing spinning baits. Nevertheless, in many types of fishing, for example, in sea fishing for pelengas, for some reason the hook is attached to the saddle tackle precisely on a non-tightening loop, and quite large, and moves freely along it. Perhaps this hook mount is worth trying for freshwater fishing.
Execution order:
- Tying the hook to the fishing line begins by forming a simple knot 6–8 cm from the tip, but not tightening it.
- The free tip is passed through the eye.
- After this, it is passed through a simple knot, you should get a loop limited by the knot, and a free tip behind it.
- The tip is wrapped around the section of fishing line above the simple knot five to six times.
- The tip is passed into a simple knot.
- The knot is tightened.
The mount itself is quite convenient, especially for active baits. They are virtually free in the water, which allows them to play more intensely even in the absence of a swivel.
Orvis knot
An interesting and fairly simple knot that is best performed on thick fishing line. It is performed on a hook with an eye, located entirely on a fishing line. A distinctive feature is that the tip of the fishing line extends slightly to the side and does not interfere with either bait placement or fish bite. Its peculiarity is that the knot itself is quite massive, and the small hook is easy to hold in your hand by this knot when removing the fish. Tying hooks to the fishing line in this way will be useful when fishing at a tempo pace.
Execution order:
- The line is passed through the eye of the hook and pulled back, creating a loop in the eye.
- A second loop is made above the hook, the tip is pushed back into the first and returned to the second.
- The tip is threaded two or three times into the second loop.
- The knot is tightened.
- The tip is trimmed at a distance of 3–4 mm.
Canoe man
A rather specific knot, as a result of which the hook on the fishing line hangs very freely, but still more limited than in a non-tightening loop.
Execution order:
- The fishing line is threaded through the eye.
- The tip and hook are clamped in the fingers of the left hand.
- On the free side of the fishing line, make two loops, one next to the other, at a short distance from the hook.
- The more distant loop is passed into the near one.
- The tip is threaded into the near loop.
- The knot is wetted and tightened by pulling the line above the hook.
- The tip is cut 2–3 mm from the node.
This knot is good when you need to tie fish hooks, ruining a minimum of fishing line. Essentially, all you need here is a couple of centimeters of free tip, which will be cut off.
Snell
The knot is not easy to make, but it is very durable and compact, allowing the tip to be trimmed close to the knot. More suitable for a hook with an eye, but if you wish, you can try tying a hook with a spatula this way.
Instructions to follow:
- The line is threaded through the eye and a loop is formed that looks perpendicular to the fore-end, while holding the tip.
- The hook and tip are passed through the loop.
- The operation is repeated five to six times, gradually moving the resulting turns towards the ear.
- The knot is tightened, the tip is cut 1 mm from the knot or close to it.
It is convenient to knit this knot using a feeder looper, if you grab a loop with it and throw it over the hook with the looper.
Elements of a fishing hook
Let's get acquainted with the main elements that are present in any model:
- Head . In this case, we are talking about the place of attachment to the fishing line. The head can be made either in the form of a loop or in the form of a flat spatula. The first option can be recommended to novice fishermen, since tying a model with a loop is objectively easier. However, experienced fishermen usually prefer options with spatulas - it is believed that the loop frays the line somewhat faster, and the risk of the ring bending should not be discounted. There are models where there is no pronounced head at all - the fishing line is attached along a groove marked on the fore-end.
- The forend is a long straight section running down from the head. For animal baits, options with a long fore-end are usually used. This is especially noticeable with live bait hooks.
- Prying . Curved section after the fore-end. It can have a round, semi-round or angular shape. In doubles and tees (“anchors”), with a common forend, there are two or three hooks, respectively. A distinction is made between the “back of the head” and the “forehead” of the hook - the “forehead” smoothly turns into a sting.
- Sting . The sting consists of a point itself, designed to pierce the lip of a fish, as well as a barb that holds the bait and prevents the prey from leaving. There are models without barbs, but it is rational to use them only for catching the smallest and weakest specimens. Naturally, hooking should follow immediately after the bite. The sting can be bent to the side, towards the fore-end or outwards.
Attaching multiple hooks
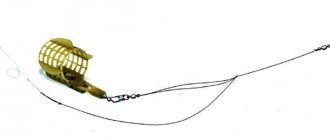
The best way to attach several hooks, as fishing practice shows, is to tie the hooks to leashes, and then attach the leashes to the fishing line. This way they will cling less, it’s easier to replant them, and it’s easier to remove fish from them. Therefore, in all cases where you need to fish with two or more hooks, you should first consider the option with leashes. In this case, it is advisable to fasten the leashes so that they can be easily removed and replaced with another, that is, not using knots, but, for example, using loops made with loop knitting or fasteners.
However, sometimes situations arise when several fishing hooks need to be tied to the main fishing line, one higher than the other. For example, when using a large crawling worm as a bait, it is placed on a rig of two or three hooks. Or when they catch devils on a garland during winter fishing. These two cases will be considered separately.
We recommend reading
How to properly tie two hooks to a fishing rod and when to do it When to tie two hooks to a fishing rod and how to do it, and when they will get in the way.
Crawling rig - bloody knot
The previously discussed bloody knot can be used to tie several hooks one after another, but provided that the distance between the hooks is not too large - no more than half a meter. It is also desirable that they have an eye bent back - without this, the sting will rub the line and this can lead to breakage. Or you can not thread the fishing line through the eye - this type of knitting of fish hooks is also allowed.
Linking order:
- Tying begins from the very top hook, gradually going down to the end of the fishing line.
- It is put on the fishing line with the eyelet and moved far enough up to the working position.
- A loop is made on the fishing line near the hook.
- The tip is threaded through the loop 5–6 times.
- The hook is threaded through the loop and the knot is tightened.
- They begin to tie the next one in the same way, going down a little to the working position.
- The last hook is tied to the end of the fishing line at random, the tip is cut according to the type of knot.
This fastening is very reliable and simple. The hooks will never be able to come undone spontaneously and will remain on the fishing line in the same place all the time; the strength of the knot itself is quite sufficient for catching large fish. One of the disadvantages is that it will be inconvenient to make a knot if the length of the working tackle is long, and the distance from the top to the very bottom hook is more than half a meter, since you will have to constantly thread a large piece of fishing line through the loop.
Garland of devils or hooks
Using a simple special knot, you can easily tie several hooks one after another to the fishing line, regardless of their number and the total length of the equipment.
In this case, all these rigs will look away from the main fishing line. This is important when fishing - this way the game of baits in a garland will be more interesting and there will be less chance that they will rub against the fishing line with the stings of the hooks. It is imperative that all hooks in the garland have an eye.
Execution order:
- The hook is put on the fishing line and moved to the working position - it’s convenient to put them all on at once.
- A loop is made near the hook so that it hangs on the eye approximately at its base. The size of the loop is such that the hook fits freely across it.
- The loop is held with the fingers of both hands, while the hook is turned 6-8 times, threaded through the loop, twisting the line at the edges of the loop.
- The hook is held with your fingers so that it stands in place, while they begin to tighten the loop, pulling both free ends of the fishing line to the sides.
- The knot is moistened and tightened.
In this way, you can even tie a drop-shot bait if for some reason the angler does not have special hooks for a drop-shot, but has ordinary ones. One of the disadvantages is that this knot will fray the fishing line too much, especially thick and hard ones like fluorocarbon, and at the knot it will lose strength.
Materials and colors
An important point when choosing is the material from which the hook is made. The following options are available:
- "Stainless steel" . Stainless steel in alliance with nickel and chromium is the best material in this segment. It is not subject to corrosion, demonstrates the highest strength with reasonable flexibility. Equipment elements made from it are used mainly in sea fishing or for catching trophy specimens in fresh water.
- High carbon steel . The most common and fairly democratic material. Its main disadvantage is its poor resistance to corrosion, therefore products made from it require a protective coating.
- An alloy of steel with vanadium . Adding vanadium to steel increases the strength of the product by about a quarter. A protective coating is also necessary - although durable, these hooks will rust. Such options are chosen mainly by carp anglers and large predator hunters.
The most common and inexpensive options for applying a protective coating are bronzing and tin plating. The best results are demonstrated by nickel coating applied by galvanization; gilding and silvering demonstrate good results. However, such products are much more expensive than bronzed ones, so not every angler can afford such luxury.
In addition to metallized protective layers, a layer of protective polymer can be applied to the hook, which also provides the corresponding color scheme. A shiny element of equipment is beautiful and pleasing to the angler’s eye, but cautious fish may not appreciate such aesthetics.
Modern manufacturers produce hooks in a variety of colors (red, blue, black, and so on). It is rational to select them according to the color of the environment or bait: for example, red elements are in harmony with earthworms and bloodworms, blue ones blend in with clean water, and black ones are good for silted reservoirs.