Ski bindings: main types
The fastening is carried out on the skis themselves or on a separate platform. Some manufacturers can install and make holes on it themselves. Then you will have to purchase fasteners from a specific manufacturer. Any mounting installations can be installed on a flat, recess-free platform.
Attention! Among the variety of winter equipment, ordinary cross-country skis are considered the most popular.
Cross-country ski bindings
There are three fastening systems:
- Nordic (welt) is an obsolete variety that is gradually going out of use. It is characterized by low cost;
- NNN (with rails) have one fastening line;
- SNS (with groove) has two connection strips.
The last two systems are divided into the following types:
- automatic device latches on its own;
- mechanical ones must be fastened by hand;
- classic - have a soft elastic band;
- Skate elastic is made of hard material, or there is another point of fixation of the shoe.
Alpine ski bindings
There are such options:
- installations that are fastened manually. They are distinguished by a fairly high price;
- machine;
- semi-automatic
The last two types can jam after water enters and subsequently freezes in them. Sometimes difficulties arise with opening them if the equipment does not have solid support (in deep snow).
Touring ski bindings
There are such varieties:
- soft - not suitable for tourism;
- tough, special boots;
- semi-rigid - reliable and comfortable.
Children's skis have the simplest fasteners, which consist of several thick fabric strips that secure the foot, and they can be ridden even in felt boots.
Drilling holes
At the beginning of drilling recesses, it is advisable to compare the gap between the holes located on the fasteners with the interval between the marks made during the marking process. As a rule, the instructions tell you how deep to screw the screws and what length of drill you need to use.
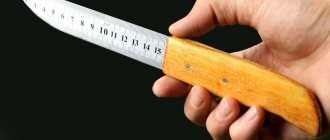
If a tool of suitable length is not available, then you can use any drill, having previously wrapped it at the top with electrical tape, leaving the required millimeters protruding. Then, using a drill operating at low speed, holes should be drilled in the marking areas.
What does the mount consist of?
Ski fasteners are located in two separate parts and a plate in the toe area, which reduces friction of the ski shoe. The front span ensures side release, while the rear span ensures top release. The dimensions of both links are equal in all varieties. Modern fasteners are made from very durable materials (titanium, steel, plastic). The main elements are:
- platform;
- heel and head of fastening;
- skistop.
Running varieties consist of the following elements:
- NNN is distinguished by a plate attached to the sports equipment, which has two longitudinal guides that secure the boot from lateral displacement. On the sole of the shoe there is a pair of longitudinal recesses for fastening guides. There is a cross snap bar built into the front of the boot.
- SNS provides for fixing shoes using one longitudinal guide. The front part of the low shoe is secured with a rubber stop.
Touring ski bindings contain pins and a shackle that clamps onto the shoe welt.
How to place the mount correctly?
For cross-country skiing today there are several most popular systems for attaching boots to cross-country skis:
- SNS – produced by Salomon;
- NNN – produced by Rottefella;
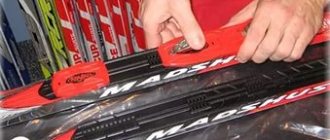
- NIS - they are produced by Madshus and other companies.
The methods for installing different mounting systems on skis may be different, but there are certain requirements that are always the same:
- ski boots must be securely attached to the skis;
- the system should provide high maneuverability and ease of control when moving;
- the fastening should increase the strength of the ski at the place of its installation.
Use a ruler to measure the center of the ski and mark it with a pencil. To mark the holes for screwing in the mounting bolts, use a template or a special jig - this is very convenient and quick.
Install a conductor that matches the type of fastening you have chosen - SNS or NNN. The carefully measured and marked center of gravity must coincide with a special mark on the conductor.
If you don’t have a conductor, make a template from cardboard or thick paper (sometimes fasteners are sold with a ready-made template). If it is missing, attach the mount to the ski so that the center of gravity mark on the ski aligns with the mark on the template.
The same applies to the axis of attachment of the boot bracket. The holes present on the template must be marked with a pencil or pressed with an awl.
This marking option is not the most accurate, so it is better not to use it.
Modern mounts may have shifting elements, so the holes for the screws that hold the platform should be marked when the mount is assembled and closed. Otherwise, the holes will shift by about a centimeter.
Once the holes for the ski bindings are marked, we begin drilling them. You can make holes with a drill with adjustable speed and special drills of a suitable diameter and with a depth limiter. A special drill has an extension that centers it in the hole of the jig and stops when it reaches a certain depth.
How not to make a mistake when choosing
Correctly chosen fasteners fit the ski boots well, but can instantly come loose at a critical moment. For example, during a period of sudden fall during a sharp turn. Under enormous loads, the installation should hold the leg in one position, and not immediately unfasten.
Choosing the right mounting system should start with choosing your boots. Having purchased shoes of the right size that meet all the necessary characteristics, you should choose bindings specifically for this pair of shoes and existing skis.
What bindings and skis?
In this article, we will not consider all the options for skis and bindings that can be used on ski trips. Nowadays there are many more such options than 2-3 decades ago. Large manufacturers such as Fisher produce special touring skis, bindings and boots. According to reviews, this is very good equipment (a set of “skis + bindings + boots” costs about 40-50 thousand). We will consider the simplest and inexpensive option - almost the same as what our fathers and grandfathers went on ski trips with, but which at the same time meets all the requirements of a ski trip, is reliable and convenient. We will need wood-plastic tourist skis (with notches) 70-100 mm wide and a little shorter than your height, like these. And the simplest cable fastenings with fixed cheeks, like these. The cost of the entire set (new skis + bindings) will be 4,000 rubles.
Installation procedure
To figure out how to properly install the selected mount on your skis, you should start immediately after purchasing them by studying the instructions. It is necessary to strictly adhere to the prescribed points, which provide for the specifics of assembling ski fasteners, taking into account its variety.
Determining the center of gravity
Determining this parameter will be needed for normal movement, so that the ski does not have an “overweight” on one side or the other. Finding the center of gravity is quite simple. Here the equipment needs to be installed on the edge of a perpendicularly located ruler and moved along its surface until the ski is balanced like a scale and stops horizontally on the floor. In this case, the stationery will indicate the correct position, and this coordinate must be marked with a marker. In modern types of sports equipment, the axis of the center of gravity corresponds to the fastening line of the boot bracket. Therefore, the front attachment area should be attached to the ski and its correct location highlighted in a different color.
Marking
The next step is to mark the holes. A good option would be to use a jig, with which you can find the exact location of the fastening components. If this item is not found, then use a template made of paper. It can be found on the Internet, but mostly it is included in the mounting kit. If there is no paper pattern, the ski is marked using an awl, applying the mounted fasteners so that the coordinate of the center of gravity converges with the shoe fixation line. Place marks with a marker through the holes in the fasteners.
Drilling holes
At the beginning of drilling recesses, it is advisable to compare the gap between the holes located on the fasteners with the interval between the marks made during the marking process. As a rule, the instructions tell you how deep to screw the screws and what length of drill you need to use. If a tool of suitable length is not available, then you can use any drill, having previously wrapped it at the top with electrical tape, leaving the required millimeters protruding. Then, using a drill operating at low speed, holes should be drilled in the marking areas.
Assembly
The final stage is as follows:
- To ensure reliable fixation and eliminate cracks that appeared during drilling of cracks, the recesses made should be cleaned of dust and filled with adhesive (supplied or PVA).
- You need to attach fasteners to the resulting holes and securely secure the screws. You should tighten them slightly first to make sure they are level, and then all the way to make sure they are secure.
- Leave the skis to dry (10-12 hours).
You can store finished skis at home on a balcony or wall by installing a special stand using brackets.
Marking
Expert opinion
Smirnov Alexander Stanislavovich
Wilderness survival instructor. More than 15 years of teaching experience
The next step is to mark the holes. A good option would be to use a jig, with which you can find the exact location of the fastening components.
If this item is not found, then use a template made of paper. It can be found on the Internet, but mostly it is included in the mounting kit.
If there is no paper pattern, the ski is marked using an awl, applying the mounted fasteners so that the coordinate of the center of gravity converges with the shoe fixation line. Place marks with a marker through the holes in the fasteners.
This is interesting: The procedure for performing cardiopulmonary resuscitation in adults and children
How to remove bindings from skis
You need to start removing fasteners (using the example of SNS) from the rear of the installation. Using a screwdriver, carefully unscrew the plug, use a screwdriver to remove the screws, and then remove the strips. To remove the screw under the front cover, use a large screwdriver to press down on the latch and lift it up. After removing the cover, remove the last bolts and the fasteners can be easily removed.
Installing bindings on skis yourself is a doable process. To do this, you will need to study the included instructions, have the necessary tools available and, most importantly, be sure that everything will work out.
How to install a mount on skis of mountain modifications?
Installing bindings on such skis is practically no different from installing them on cross-country skis. This work is performed in several simple steps.
First, the center of gravity is found as described above. Then you need to lay the fastener so that its leading edge exactly matches the balance line, place the boot in the clamp and align it. After this, you should carefully mark the holes with a pencil or awl and drill them. Then attach the front part with screws. The back part is installed in the middle position and the holes are marked. Holes are drilled and the back is secured with screws. The installation ends with configuration.
Recently, some models have been produced with pre-installed platforms, on which it is easy to install latches without fixing them with self-tapping screws. This makes it possible to reinstall it for a different shoe size, as well as the possibility of displacement along the longitudinal axis.
Types of ski bindings
Ski bindings are divided into types according to their characteristics. Sports equipment is selected individually. The main types are alpine and cross-country skiing.
Alpine ski bindings
Fastener options for mining equipment are divided into two parts: front head, rear heel. Both of them are equipped with a scale. Thanks to them, the process of adjusting the forces is easier to complete.
The bindings have brakes, which are called ski stops. They are designed to brake the runners after they are detached. Most options have a platform equipped with a “rails” type. All parts of the fastenings move along them, which allows them to be adjusted to fit shoes of any size.
The principle of operation of the front part is to press the toe of the boot against the ski. In case of excessive load, the system automatically activates, unfastening the shoes. This helps reduce the number of injuries. The back secures the heel of the shoe and works in the same way.
Cross-country ski bindings
For cross-country skiing, the following types of ski boot fastenings are used: SNS and NNN.
The fasteners on the gutter have multi-colored rubber stops. The color of flexors for ski bindings helps to distinguish the degree of their rigidity and choose the option for a specific skiing technique. The meanings of the colors have the following interpretation:
- white for hard riding;
- green means the ski bindings are semi-rigid;
- black for standard style;
- Reds are very soft skating.
In SNS system models, the bracket with an elastic band is attached directly to the toe. Here we also sort the rubber stops by color. They are marked with rigidity, which divides them into:
- classic type with indicators of 85 and yellow color;
- red models with a hardness of 115 are suitable for skating equipment;
- universal types are designated by the number 95 and have a pink-lilac tint.
Types of bindings for alpine skis
The following types of mechanisms are distinguished:
- Classic. A popular fastener that consists of two separate components: the head and the heel. These skis are popular among amateur skiers. The leg is securely held, the protection works clearly.
- Ski tour. Connoisseurs of untouched mountains prefer a frame or plate mechanism. The freeride device has a distinctive feature. There is a horizontal rigid fixation of the heel. The heel moves vertically within the acceptable limit. This property makes climbing the slope much easier. The binding is heavy, but it is easy to combine with different boots.
- TLT. A technically advanced type of fastening. The main difference is the technique of holding the boot in the heads. Fixation is performed with four pins, located two each on the toe and heel of the shoe. The pins fit into special holes located on the head and back. The fastening parts are aligned using guides.
- Telemark. Connoisseurs of extreme sports love to use a special type of fasteners. This mechanism is held exclusively by the shoe toe. The heel can be moved vertically or horizontally. A small part of the heel of the boot is made in the shape of an accordion. Thanks to the elasticity of the shoes, it is easier for the athlete to climb a steep mountain.
Many bindings are made on platforms that make it easier to adjust the mechanism to fit your shoe size.
What bindings and skis?
In this article, we will not consider all the options for skis and bindings that can be used on ski trips. Nowadays there are many more such options than 2-3 decades ago. Large manufacturers such as Fisher produce special touring skis, bindings and boots. According to reviews, this is very good equipment (a set of “skis + bindings + boots” costs about 40-50 thousand). We will consider the simplest and inexpensive option - almost the same as what our fathers and grandfathers went on ski trips with, but which at the same time meets all the requirements of a ski trip, is reliable and convenient. We will need wood-plastic tourist skis (with notches) 70-100 mm wide and a little shorter than your height, like these. And the simplest cable fastenings with fixed cheeks, like these. The cost of the entire set (new skis + bindings) will be 4,000 rubles.
Installation of fasteners
After choosing and purchasing a binding, you need to install it on your skis. This must be done in the following order:
- The center of gravity of the skis is determined. This is done like this: the ski is placed flat on the edge of the ruler and shifted until it is balanced, like a scale (parallel to the floor). If the mount is heavy, then you need to find the center of gravity by attaching the mount to the skis and move it until the balance line coincides with the locking groove of the boot.
- The locations for drilling holes are marked. For this purpose, there are paper templates included with the mount. If you don’t have a template at hand, you can apply markings with an awl, attaching the mounts to the skis, according to the center of gravity.
- Holes are drilled to a depth of 10 mm. The drill is pre-selected: for NNN - diameter 3.4 mm; for SNS - 3.6 mm. Drilling is done carefully, pressing lightly on the drill so as not to go through the ski. It is advisable to place a stop on the drill. Then the sawdust is blown out and the holes are filled with glue for a more secure fixation.
- The structure is being assembled. To do this, the fasteners are applied according to the holes and tightened with screws. After this, you need to dry the skis for 10 hours before using them.
Everything is ready, now you can go for a ride. Apparently, there is nothing complicated in choosing and installing fasteners.
Choosing ski bindings is becoming more difficult as brands struggle to retain customers. If before 2015 there was only a screwless NIS platform, which everyone could drill without any problems and install any fastenings, then since 2021 everything has become more complicated. The IFP system has appeared with a new platform, on which it is not so easy to install screw mounts without an adapter. Now the choice of mounts is a headache for the user uninitiated in these marketing wars.
In the article we briefly and clearly talk about the types of ski bindings, platforms, their compatibility and which one is better to choose.
Types of ski bindings
Fasteners are made for installation on a platform or skis. In most cases, they are produced together with a mount and a hole for its fixation. It is recommended to purchase all components from one manufacturer, otherwise the elements will have to be adjusted to each other.
The part is divided into a plate and 2 parts:
- the front area is designed to separate the boot laterally;
- using the rear part, disconnect upwards;
- A plate over the front area of the boot ensures low friction.
Coverage is carried out according to standard sizes, which makes it possible to use shoes of any brand.
Fasteners can be:
- with semi-automatic or automatic clasp;
- with manual element.
Each type of fastening has a disadvantage. Automatic fasteners often break when water enters and freezes. Manual ones are expensive.
Installation instructions
For installation you will need the following tools and materials: marker, screwdriver, drills, ruler, glue, awl.
Center of gravity
Installation of all structures begins with determining the balance line. The leading edge of the shoe should be on it. Sometimes the center of gravity is already marked by the manufacturer, but it is better to determine it yourself. To find it, you need to place the ski on a narrow object and move it until it reaches an equilibrium position. The balance line should be noted. This line will be the axis of the bracket for NNN and SNS type devices. For NN 75 it will determine where to install the screws.
https://youtube.com/watch?v=T6mQosirnfY%3F
Marking
Marking can be done using a special conductor, or, if it is not available, using a paper template.
Be sure to check the correctness of the markings by measuring the distances between the marks. In NNN systems, the fastener is located closer to the front end relative to the balance line, and in SNS systems directly on the line.
Drilling holes
It is recommended that you follow the instructions included with the kit to determine the required hole diameter and depth. For SNS and NNN systems, holes are usually drilled to 10 mm. You need to remove dust from the finished holes, then fill them with glue. This will ensure a more secure fixation of the screws.
Assembly
After this, the device should be applied to the marked holes and begin to tighten the screws evenly. Care must be taken not to displace it relative to the longitudinal axis. For NN 75, it is recommended to check the alignment accuracy before screwing. You can go out on the track after 12 hours, when the glue has dried.
General information about skis and bindings
For bindings, this transformation is the most impressive. The banal tying of the leg with a belt passed through four holes cut into the ski has been replaced by modern fastening systems made of plastic and metal.
Due to the wide range of ski equipment on the market and the literal translation of most foreign names into Russian, choosing fasteners for a beginner is not an easy task. The concept of “cross-country skiing” is especially broad. They can be “professional”, “racing”, “recreational”, “universal” and so on.
It is best to choose equipment based on the speed of movement
.
- Sports equipment will be required for those skiing at speeds of 15 to 30 km/h on a good track.
- Amateur equipment is ideal for those reaching speeds of 9-15 km/h.
- Driving on the ski track no faster than 4-8 km/h will require travel equipment.
Skate mounts
For a skate, bindings that will hold the boot in a lateral tilt are vital. NN75 and any semi-rigid mounts cannot cope with this task. Requires mounts with SNS or NNN bracket.
Weight factor - 50 g. in favor of NNN NIS
I did a little research with weighing and came to the conclusion that skis on the NNN NIS bindings (NIS is a special plastic platform on the ski for mounting the binding) are lighter than the SNS Pilot! SNS mounts are not made for the NIS platform! Metal bolts weigh more than a piece of plastic. If 50 grams is a factor for you, choose NNN! If not a factor, but you participate in cross-country skiing, compare the weight and price of the skis. My findings can be found in the table.
| NNN Rottofella Xelerator NIS bindings on Rossignol X-ium ski 186 cm - 637 g. = pair 1274 g. You can read about weighing here |
Installation instructions
For installation you will need the following tools and materials: marker, screwdriver, drills, ruler, glue, awl.
Center of gravity
Installation of all structures begins with determining the balance line. The leading edge of the shoe should be on it. Sometimes the center of gravity is already marked by the manufacturer, but it is better to determine it yourself. To find it, you need to place the ski on a narrow object and move it until it reaches an equilibrium position. The balance line should be noted. This line will be the axis of the bracket for NNN and SNS type devices. For NN 75 it will determine where to install the screws.
https://youtube.com/watch?v=T6mQosirnfY%3F
Marking
Marking can be done using a special conductor, or, if it is not available, using a paper template.
Be sure to check the correctness of the markings by measuring the distances between the marks. In NNN systems, the fastener is located closer to the front end relative to the balance line, and in SNS systems directly on the line.
Drilling holes
It is recommended that you follow the instructions included with the kit to determine the required hole diameter and depth. For SNS and NNN systems, holes are usually drilled to 10 mm. You need to remove dust from the finished holes, then fill them with glue. This will ensure a more secure fixation of the screws.
Assembly
After this, the device should be applied to the marked holes and begin to tighten the screws evenly. Care must be taken not to displace it relative to the longitudinal axis. For NN 75, it is recommended to check the alignment accuracy before screwing. You can go out on the track after 12 hours, when the glue has dried.
Types of ski bindings
NN 75
Each series of boots has its own fastening method. For example, model NN 75 is suitable for Tornau boots. They are intended for lovers of ski holidays. These are mechanical universal fasteners made in Russia. Their advantage is that they are divided into right and left shoes. They compare favorably with a price below the market average. However, this model is outdated, as it does not hold the foot well. In addition, with their help it is impossible to move on skates.
NNN
Cross-country skiing corresponds to the NNN model. A large number of types are suitable for both classic and skating. They are fully compatible with many types of boots, as their soles are cross-threaded. Buyers will be pleased with the wide selection of different manufacturers.
NIS
The NIS model is suitable for classical movement. These are mechanical fastenings that create better gliding when moving, firmly fixing the foot. A couple of clicks - and the foot is firmly fixed in the block without moving when moving. When skating, their stability becomes less due to the displacement of the foot backwards. NIS is the latest development of the NNN version. They are located on the surface, so they are compatible with any NNN boots.
N.S.
It is an obsolete type that has not been used for a long time. However, some skiers choose it because it is cheaper than other models. Among other types of low-quality category, this option is well suited for beginners and children, as it is made of numerous alloys.
Which bindings to choose for skis
Fans of winter sports carefully choose future fasteners. Every skier wants to have guaranteed comfort, ease of movement and avoid injury, so it is better to opt for systems with mechanical fastenings. Well, if you are new to this sport, then give preference to an automatic block. While moving slowly and calmly performing tricks, nothing threatens you, but an experienced skier, accustomed to moving quickly along mountain slopes, will opt for mechanical models. Consult with specialists in sports stores. Consultants will help you choose pads taking into account all the requirements and features.
Self-installation of fasteners
Having decided on the mechanism, it is necessary to install the fastenings. They can be installed in the cabin where the skis were selected, or independently. Use a hydraulic level to determine where the center of gravity is on the board. To do this, place the ski on its edge and move the level over its entire surface. Once the center of gravity is located, mark it with a dash.
Using the template that comes with the skis, you can determine where to install the base. As soon as the points of the template and the intended line coincide, drill a hole and screw in the fasteners. You can check whether the attachment is installed correctly by performing a simple test - if, when lifted, the front part outweighs the back, then the job was done correctly.
Which brand of fasteners should I choose?
Considering the huge selection on the market and the difference in price and quality, it is quite difficult to choose a company to choose ski bindings. The NNN models remain the best sellers. Buy bindings complete with boots so that you don’t have problems choosing them later. For example, NNN boots can be used on different types of attachments, regardless of whether they are components or not. If you are a fan of skiing or, on the contrary, are just starting to ski, then opt for NNN boots and bindings.
Installation Tips
Installation of ridge fastenings occurs in several stages. To carry it out, you need certain tools: a screwdriver or drill with accessories (bit, drill), pencil, ruler, jig, glue.
Installation process:
- The first thing to do is determine the center of gravity. To do this, place the ski on any object to create a kind of “swing”. The point at which the ski will be in equal proportions on both sides is the center of gravity.
- The mounting dimensions are noted and the center is selected. To do this, you need to draw a longitudinal line, dividing the ski into two equal parts.
- When all the marks are made, you need to start fixing. To do this, you need to drill holes and secure the product with screws. You can additionally coat the surface of the structure with glue.
After all the steps are done, you need to leave the skis to dry. This process takes at least 12 hours. It is advisable to leave them for a day.
When choosing a mount, it is necessary to take into account the individual parameters of the person. To make them comfortable, it is necessary to take into account the human anatomy and the shoes used for riding.
Types of ski bindings: differences between SNS, NNN and Turnamic, compatibility
More than one generation of skiers has grown up on the competition between the SNS and NNN systems, everyone is already accustomed to this - the difference between SNS and NNN is in the number of guides. In 2005, NNN switched to the NIS screwless platform and gradually phased out screw mountings. In 2016, the IFP system with Turnamic bindings was released - only Fischer and Rossignol skis are available with it. Salomon and Atomic release their Prolink system - an analogue of NNN, only with screws. Now let's look into this leapfrog so that everything becomes clear.
Ski bindings NN75
Nordic Norm 75 fastening system
. Has no advantages other than price. Rarely found on sale and even in ski rentals.
Fastenings standard NN 75
Ski bindings SNS (Salomon Nordic System)
The system of the French brand Salomon, over time it began to be copied by unknown manufacturers, including Chinese. SNS mounts are distinguished by one wide guide. They are divided into Pilot (2 boot fastening brackets) and the rest with one fastening point (without the word Pilot in the name). All fastenings of this system are placed on screws in drilled skis.
SNS boots are compatible with the following bindings:
- Salomon Profil and SNS Access
- Salomon Pilot
(Pilot bindings only fit Pilot boots, Pilot boots fit any SNS bindings)
Ski-binding compatibility:
- SNS mounts can be screwed onto any ski
SNS Pilot boot sole
Ski bindings NNN (New Nordic Norm)
System from the Norwegian brand Rottefella. NNN mounts are available on screw and screwless platforms. In 2021, the Turnamic fastening system and boots with Turnamic soles (Fischer, Rossignol) were released - similar to the NNN sole, the boots are fully compatible. Salomon and Atomic did not stand aside, but released their Prolink fasteners - the same NNN, but with screws.
NNN and Turnamic boots are compatible with:
- Rottefella NNN, NIS
, Move - Fischer Turnamic
and Rossignol Turnamic - Salomon Prolink
and Atomic Prolink
Ski binding compatibility:
- Rottefella NIS mounts only on NIS platforms
- Turnamic mounts only on IFP platforms
- Prolink fastenings are only with screws (you can drill any platform, but more on that below)
NNN and Prolink boot soles. Turnamic is compatible, but does not come with a tread in the middle.
Systems from Salomon and Rotofella
These fastening systems have a different number of longitudinal components, functionality and boot stabilization indicators, and are also available in various modifications. They are great for cross-country skis, the most common type in skiing.
- The Rotofella NNN system appeared somewhat later than the NN 75mm. The boots are fastened and stabilized here thanks to two longitudinal guides. The functionality of these mounts is not inferior to NN.
- Salomon's SNS system uses just one articulated mount. Due to the peculiarities of the sole of the boots designed for such bindings, the athlete can control the ski while performing any move. This is the most modern version of ski bindings.
There are no significant disadvantages or advantages between these systems. They are more convenient, more practical and more modern than their predecessors, so they cost a little more.
The instructions for Salomon and Rotofella recommend that you seek professional help, but in reality it shouldn't be too difficult to install them yourself. We'll tell you how to do this.
Fastening design
The complexity of the design depends on the power of the mechanism. Fasteners for freeride and freestyle have their own differences in structure. For example, additional adjustment, which is suitable for all types of professional-level fastenings: independent determination of the parameters of the wings that hold the shoes. Other design parameters differ significantly.
For example, race mechanisms may have:
- adjusting the exact position of shoes along the ski;
- adjusting the position of the toe in the transverse position;
- option to deactivate the vertical operation of the head.
Amateur skiers do not need such “bells and whistles”.
Complex fastening mechanisms for freeskiing are equipped with:
- walking-skating switch;
- rigid rods for connecting elements;
- head lift regulator, ensuring connection of the mechanism with various shoes;
- shock absorbing systems.
Mounting installation.
Before installing the fastener, it is necessary to fill all the holes with special glue, which will cover all the cracks left after screwing in the screw. Thus, it will provide additional waterproofing and durability (otherwise the moisture that gets in there will begin to cause rotting processes from the inside).
In professional centers, craftsmen use specialized glue from Salomon and Rottefella. But in principle, it is even possible to use ordinary PVA - it can also ensure the tightness of the structure. But epoxy resins cannot be used. They can damage important structural elements of the ski. The fastening is completely fixed - no play should be left. After installation, the glue should dry for about 9-12 hours.