The purpose of using any firearm since its invention was to quickly and accurately hit the target with a bullet. All developments and improvements in weaponry over several centuries are aimed at increasing the speed of aiming at the target and the accuracy of the shot. So, at one time, an ordinary front sight appeared, with the development of a science called “optics” - optical sights, and with the development of electronic technologies - collimators.
Features of the red dot sight
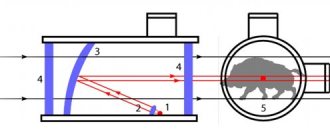
The fundamental technical difference between this model and other types of sighting devices is that it does not have a permanent front sight or reticle. Aiming is based on directing a beam of light into the shooter's eye using a lens, which is compared with the target and gives very accurate guidance to the target.
With a slight deviation of the weapon along the horizontal or vertical axis, the mark also moves, still indicating the direction of flight of the bullet. Such qualities are unimaginable for other types of sighting devices.
Principle of operation
The design of a collimator sight involves the use of simple electronics and optical effects. The light source is directed into a reflector lens, which generates a stream of light in the direction of the shooter. A person holding a weapon in a firing position sees this flow in the form of a point, which moves along the lens depending on the displacement of the weapon’s axis relative to the shooter’s axis of view and makes it possible to quickly and accurately point the weapon at the target to fire a shot.
The collimator takes advantage of human binocular vision, giving the shooter the ability to aim without covering the other eye.
Difference from other types of sights
When using a standard open front sight, the shooter must align his gaze, the front sight on the nose of the barrel and the rear sight on its near edge on one axis before firing. Only when these conditions are met can the person firing the shot be sure that the bullet from the barrel will fly in the right direction. This method reduces mobility during shooting and visibility, since the shooter needs to close the second eye so that binocular vision does not interfere with accurate targeting.
When using an optical sight, shooting while moving is almost impossible due to strong vibrations of the mark. High shooting accuracy in this case is achieved by a stable position of the weapon, in which it is possible to point the crosshairs at the target. For such measured shooting, only conditions of large distances between the shooter and the target are permissible - the conditions of sniper shooting.
This device allows for accurate shooting at close and medium distances. All that is required is to combine the direction of view and the light flow, after which the shooter sees where the bullet will hit. Compared to a conventional open sight, a red dot sight, whose operating principle allows you to spend a shorter period of time on aiming, gives more space for accurate shooting while moving.
In conditions of long-distance shooting, the collimator does not allow accurate shooting, since the marker can cover almost the entire target, so it does not compete with sniper optical devices.
An important difference between a collimator and other devices is the use of electricity for operation. Without power, the light source will stop working, making accurate aiming impossible. Therefore, when using a device of this type, you should remember that it works until the battery runs out.
Application
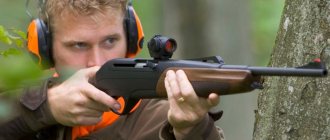
Since their appearance, red dot sights have spread to many areas of human activity related to weapons. Besides military and police units around the world, they are most common among hunters and airsoft players. In some cases, the collimator is even placed on the bow.
This device is suitable for almost any type of small arms intended for close and medium ranges, including heavy shotguns and even machine guns. So what is a red dot sight for? Shooting in combat conditions or regular hunting with a collimator sight will definitely become easier and more convenient after you get used to it.
Types of collimators
Collimators are divided into open and closed. Initially, these classes meant two types of collimator sights, significantly different in their structure.
Closed devices in the classical sense were those that did not have a transparent lens. Through it, the shooter did not see the space behind the sight with the eye that sees the front sight.
Aiming was achieved by the need to use two eyes at once, one of which sees the space ahead, and a mark is projected onto the second by a collimator. Thanks to binocular vision, the human brain in this case compares different images from two eyes and the shooter sees the front sight in front of the target and can take aim.
Open was a model with a transparent lens and an open front wall. Through such a sight the target is visible. Therefore, shooting with a collimator sight using only one eye is possible only with an open type.
With the development of collimators, the need for closed sights in the classical sense has disappeared. There is a new understanding of the difference between closed and open devices. Nowadays, an open sight is a sight in which the lens is fixed in a small frame and does not have an auxiliary protective structure around it.
A closed device is a device in which the focusing lens is located in a sealed structure consisting of a massive frame and an additional front lens. This design protects the focusing lens from raindrops, dirt and other foreign objects that can spoil the quality of aiming. It is precisely this understanding of the concepts of closedness and openness that is widespread at the present time.
Operation, care, storage rules
To ensure that a high-quality collimator does not fail during shooting, you need to install it only on weapons with the appropriate caliber. The device, intended for pistols and light semi-automatic weapons, cannot be installed on weapons with high recoil, as this can quickly disable it.
It is quite easy to damage this device. The lenses do not withstand any physical impact well; they are easily scratched, which reduces the quality of aiming. It is better to wipe them from dust using special napkins and without using improvised means, as some fabrics can leave scratches.
Batteries are inserted into the device only before shooting and removed after shooting. When storing weapons, batteries must be kept separate to protect the electronic parts of the device from possible damage if the batteries fail.
It is also advisable to remove the device while transporting the weapon, or use special cases that protect it from possible physical impact.
How to choose?
When choosing, first of all you should know what caliber weapon it will be installed on.
When choosing from models designed for weapons of a suitable caliber, you need to understand that cheap options are not complete and reliable, and will go astray during shooting and sudden shaking. A stable and reliable design can only be expected from well-known and time-tested manufacturers, so you cannot save money here. A cheap device will quickly break down during active use and you will still have to purchase a new one, therefore, it is better to immediately buy a more expensive but reliable one.
The choice between an open and closed device is based on the conditions in which it will be used. For mobile shooting at close distances, where there may be an unexpected physical impact on the device, impacts, or pieces of earth falling into it, it is better to purchase a device of a strong, closed design.
For installation on rifles intended for long-range shooting, you can choose an open collimator suitable for such weapons, but a closed one is also suitable, since the viewing angle in this case does not play an important role.
Sniping is not possible with a standard device, but there are options with lenses that provide some proximity for more convenient long-range shooting.
Parallax of the red dot sight. Zeroing in a collimator sight.
Parallax, a concept in optical sights, is not uncommon; in some places it is relevant and requires studying this issue more carefully, but in others it can be neglected. For example, parallax, or the parallax effect, or parallax error, is observed in optical sights where the internal focusing is either fixed or adjusted incorrectly. In simple words parallax is the divergence of the plane of the aiming crosshair (mark) from the plane of the target (target), i.e.
. If the target and reticle are in focus, then there is no or minimal parallax. It’s easy to see parallax; if it exists, you need to look through the scope and shake your head from side to side while aiming (or nod your head up and down). If the parallax effect is present, then the reticle (mark) of the sight will shift relative to the aiming point. In optical sights, this issue is more relevant than in collimator sights, due to the difference in firing distances, since collimator sights are initially designed for shooting at short and medium distances, and optical sights, from medium to ultra-long. Basically, collimator sights differ in type ( open and closed type), operating principle (collimator and holographic), purpose (civilian and tactical), and appearance (small for pistols and civilian weapons, and large for machine guns and military weapons).
If military red dot sights must have strict requirements, such as reliability, durability, long operating time, night vision, and the absence of parallax, then such requirements need not be set for civilian sights. Collimator sights for the civilian sector are mainly installed on hunting weapons, most of all on smooth-bore weapons, and mainly for hunting waterfowl and upland game, this is understandable, it helps to aim faster and shoot more accurately. A collimator sight will also be an excellent assistant to a hunter with poor eyesight, wearing glasses or due to age; just point the weapon (sight brand) at the target and shoot, regardless of how you hold the gun, where the point is, there will be your charge, be it a bullet or shot sheaf You shouldn’t expect high accuracy from a civilian collimator, especially from middle- and economy-class brands; the error for a shotgun shot is acceptable, unlike a bullet shot.
In collimator sights of the small and medium price category, the parallax is fixed, and shooting with it is implied at a certain distance; as a rule, the parallax is set at a distance of 40-50 meters.
For example, collimator sights HAKKO, Sightmark, Docter, which are so popular in our country, not to mention their replicas and sights of this type bought from the Middle Kingdom for pennies, have a fixed parallax of 50 meters ( HAKKO ), 20 -50 meters ( Sightmark depends on the model), and 40 meters ( Docter ). What to do about this and how will this affect shooting? Yes, very simple. If you shoot with a shot, then everything is in order and no questions arise, but if you shoot with a bullet, then there are nuances. Let’s say you’re on a driven hunt, with a smooth-bore gun and a collimator on it, and an animal comes at you... and not an elk, but a wild boar, a confident hit of the target when aiming will be at a distance of about 40-60 meters, but what if it jumps out close or far? Then you already need to know how your sight behaves, how much the deviation will be, what the radius of bullet spread is, etc. With a fixed weapon, at a distance beyond 60-70 meters and at a distance up to 30 meters, the aiming point will shift a certain distance from the aiming point. And with a quick jump? Yes, by the boar that jumped out from under your feet? The probability of an accurate hit is not 100%! It’s another matter when you have a red dot sight with no parallax effect; such brands include EOTech and Aimpoint , but they cost an order of magnitude higher. It is not for nothing that military models from these manufacturers are in service in many countries around the world, and civilian versions of sights are successfully used for hunting with rifled weapons. In these collimators, in any model, there is no parallax, at any distance the bullet will be in the place where the aiming point is located. Aimpoint has been positioning its hunting series scopes (H) as scopes for driven hunting for several years now, and is a leader in this. All promotional videos , promotions and company events are replete with shooting at a running boar. European driven hunting is mainly for wild boar and roe deer, and these are not large and fast animals, and the hunting takes place in forest areas, and not in fields, where “drivers” do an excellent job.
Zeroing in a collimator sight. Collimator sights are smaller in size, do not have a magnification, are able to withstand large recoils, aim with two eyes, which does not limit the field of view, and are worth the price. Zeroing a collimator sight with the absence of parallax is not so difficult, if you take any model from Aimpoint , then zeroing will only be a pleasure, and it will not be difficult to do it in any conditions, no screwdrivers or wrenches are needed, everything is familiar and couldn’t be simpler, installed, fired , made adjustments, fired to check, and you're done! If you take a brand like Redring , then this sight does not require zeroing at all, it needs to be installed correctly and it is ready for use. A separate conversation about zeroing collimator sights with fixed parallax, and on smooth-bore weapons, here you need to count and think, and not just buy a weaver base, attach it to the gun, install the collimator and shoot. If you do not have a cold-zero cartridge, then the process will not be as simple as it seems at first glance. Let's look at a pair of collimators and their zeroing.
Zeroing in the HAKKO BED-35 red dot sight First, you need to resolve the issue with the installation base; you need a weaver base to install the sight on. Where and how, and most importantly what base, you decide for yourself, to your taste, especially since there is a choice. The main factors that need to be taken into account are the height of the base (it should be comfortable and as low as possible to the aiming bar), and reliability (so that it stands dead in place). Let's say the base is installed on a weapon, a collimator is attached to it, let's start.
1) Zeroing with a cold zeroing cartridge (laser cartridge). a) Unscrew the adjustment locking screw with a thin hexagon on the right side of the sight body (in the direction of shooting). Unfortunately, this screw is not marked on the sight (on this model). b) Place the batteries in the cartridge and insert it into the chamber of the semi-automatic machine, into the upper barrel of the “over-and-under”, or into any barrel of the “horizontal”. c) Find a vertical plane, preferably dark in color, so that the laser is visible on it. Then mark the aiming point on it, draw or scratch the point at which you will aim (the wall of any building will do). d) Count 50 meters from your target (from the wall), at this distance you will shoot. Why 50, not 30, not 60? Of course, you can shoot at 35, 40, and 60 meters, but firstly, it will be difficult to count the clicks for entering corrections, and secondly, the BED-35 has a fixed parallax at 50 meters, i.e. the point does not “run” across the target when nodding and shaking the head from side to side, and is stationary at the aiming point. At this distance, the internal focusing of the scope will be optimal. e) Fix the gun in the zeroing machine so that it is motionless, and aim the collimator point at a point on the target. If you do not have a machine, then you will need an assistant who will hold the weapon and aim, but it is possible that the gun can be secured with improvised means so that it is motionless. f) In the collimator, you need to select an aiming mark from 4 possible (point), and aim it at a point on the target. The fixed gun is aimed at a point using a collimator, now you need to approach your target (the wall), and mark the point where the laser point is located, you will get 2 points on the target. To enter corrections, you need to take the LASER point as a basis as the center of the target, and from it count how much higher-lower, left-right the collimator point has shifted. One click of correction for the BED-35 is equal to 1 MOA (minute of arc) or 30 mm at 100 meters, therefore at 50 meters it will be 1/2 MOA or 15 mm. You need to enter sight corrections based on the position of the points relative to each other. For example, the laser points 10 cm lower and 15 cm to the left, from your aiming point with the collimator, therefore we take the LASER point as a basis, and it turns out that the sight mark moves away from the bore axis point 10 cm higher and 15 cm to the right. Now we consider 10 cm (100 mm) / 15 mm (1/2 MOA) = 6.66 clicks vertically, and 15 cm (150 mm) / 15 mm = 10 clicks horizontally, i.e. the aiming point moved away from the desired point of impact, 7 (6.7) clicks up, and 10 clicks to the right. You need to combine the dots, make 7 clicks down and 10 clicks to the left. Now the dots are aligned and the scope is perfectly sighted at 50 meters. The bullet will hit a spot at a distance of 35 to 70 meters from you. Accordingly, the shotgun shot will be in the right place when shooting at a distance of 30-40 meters. ! There is, of course, one caveat when zeroing DOUBLE-BARREL guns, the zeroing given above is relevant for single-barreled weapons, and for double-barreled guns, if you shoot a bullet from this particular barrel in which the laser cartridge was located, and at this particular distance (50 m). The peculiarity of a double-barreled weapon is that the barrels are not soldered in perfect parallel, they are brought together at one point, since the optimal shot is at 30-35 meters, with a bullet at 50 meters. In the book by Izmetinsky and Mikhailov “Izhevsk Guns” it is said that for guns of the Izh-58 type, the angle between the axes of the bores is 36 minutes of arc. For shotguns of the Izh-27 type, the angle between the aiming line and the axis of the upper barrel is 13 arc minutes, and between the aiming line and the axis of the lower barrel is 39 arc minutes. It is also necessary to take into account the narrowing of the barrel bore (choke, choke, cylinder, choke with pressure, etc.), in each case the bullet is selected individually for its weapon, taking into account the weight of the bullet, brand and mass of gunpowder. Selecting a bullet for your weapon is a labor-intensive process and requires maximum precision. All these calculations must be completed before zeroing the collimator sight.
If you insert 2 laser cartridges into the barrels at the same time and aim them at a plane, you will see how the dots will be at different distances from each other as the distance between the shooter and the target increases or decreases. This must be taken into account when zeroing, and when shooting in general (without optical instruments).
2) Zeroing the collimator on a smooth-bore weapon in the standard way, shooting with a bullet and shot. a) Place your weapon in a sighting machine or find a fulcrum so that you can shoot from a fixed position. Place the target at a distance of 50 meters from you, in the center of the target you need a point at which you will aim. b) For zeroing you will need at least 4 bullet cartridges, preferably more. The bullet should be the model that you usually use for hunting, or one that suits you ballistically. Each bullet has its own ballistic characteristics, so 3 bullet cartridges are needed to obtain the MTP (average point of impact) of this particular bullet model. Check that the correction locking screw (on the right side of the case, under the thin hexagon) is tightened; if not, then it must be tightened carefully, without fanaticism. Aiming at the center of the target using a collimator, you need to shoot at the target 3 times from a well-fixed position. There is no need to rush, you need to aim carefully. It is better to let the barrel cool down after each shot, then you will ideally calculate the STP of a given bullet from the cold barrel of your weapon. In a barrel heated by shooting, the bullet behaves a little differently, and the ballistic characteristics may be different (cold or hot barrel). c) We count the STP, connect the holes from the first (1) and second (2) shots with a straight segment (pencil), and put a point on the segment exactly in the middle. Then we connect the resulting point and the hole from the third (3) shot with a segment. We divide this segment into three equal parts and separate them with dots. So the POINT closest to the segment between (1) and (2) will be the STP. d) Unscrew the correction locking screw and enter the required corrections. You need to combine the target point (where you were aiming) and the STP point. The calculation of the number of clicks can be seen above in point (e) of shooting with a laser cartridge. e) After entering the corrections, do not forget to tighten the correction locking screw and shoot at the target. If all conditions are met exactly, then the bullet should land at or near the aiming point. Ideally, you need to shoot three times and calculate the STP again, it should be as close as possible to the center of the target.
At this point, the zeroing is completed, and you can use the sight for its intended purpose. It is not recommended to remove the red dot sight from the base, since with frequent removal and installation back, an error is possible and you cannot expect perfect accuracy. It’s another matter if your collimator is on a quick-release bracket, and all installation manipulations are provided for in the design.
Zeroing in the HAKKO BED-40 collimator sight By default, the weapon is equipped with a weaver base, and the collimator is already on it. Zeroing this particular collimator sight differs from the previous one in that the sight does not have clear clicks of the adjustment screws.
1) Zeroing with a laser cartridge (cold zeroing). a) Count 50 meters from the target to the zeroing point. There should be a dot on the target (the center of the target), the smaller the better, but so that you can see it at a distance of 50 meters and aim. The scope has a fixed parallax of 50 meters, so the focus will be perfect and the dot will not move when nodding your head. Zeroing at this distance will be optimal for bullet shooting at 40-70 m, and shot shooting at 30-40 m. The weapon should be fixed and motionless, it is better to use a zeroing machine (cradle), or find an assistant who will aim with your weapon or mark the laser point. b) Insert the batteries into the cartridge and install it into the chamber. Turn on the sight and aim at the center of the target (at the point) as accurately as possible. If you are using a machine, leave the gun in this position so that the collimator point is in the center of the target, and you need to mark with a pencil the point on the target where the laser is pointing. c) Use a ruler to calculate the distance at which the points are located. The reference point should be the laser point, and the displacement point should be the center of the target where you were aiming. For an example of calculating click corrections, see above in paragraph (e) of zeroing the HAKKO BED-35. The correction step for the HAKKO BED-40 is 1 MOA (minute of arc) or 30 mm per 100 meters vertically, and 23 mm horizontally ( BE CAREFUL with this!). At 50 meters, the pitch will be 15 mm vertically and 12 mm horizontally. d) A special feature of the collimator is the absence of screw clicks, so the steps are as follows. To begin with, unscrew the correction locking screw, then on the small hexagon to enter corrections, you need to put on the sighting disk, which is included in the kit. Insert the key with the disk into the screw so that the division (0) is perpendicular to the side of the sight. Relative to this, the plane of the side, it is necessary to count the clicks of amendments (steps). Since there are no clicks themselves, you need to rotate the key by as many divisions as you calculated when the points of the collimator and laser diverge. After making adjustments, tighten the locking screw. e) Insert the laser cartridge into the chamber, and again aim at the center of the target, the dots should be maximally aligned at 50 meters. After zeroing, it is not recommended to remove the red dot sight from the weapon.
2) Traditional zeroing, shooting with bullet cartridges. a) Set up a target 50 meters from your location. The target must have a marked center, an aiming point. Shooting should be from a fixed position for greater accuracy. b) Before shooting, check whether the adjustment locking screw in the sight is tightened. Shoot three times, aiming for the center of the target. Allow the barrel to cool after each shot for smooth ballistic performance from a cold barrel. c) We count the STP, connect the holes from the first (1) and second (2) shots with a straight segment (pencil), and put a point on the segment exactly in the middle. Then we connect the resulting point and the hole from the third (3) shot with a segment. We divide this segment into three equal parts and separate them with dots. So the POINT closest to the segment between (1) and (2) will be the STP. d) Unscrew the correction locking screw from the end of the collimator. Install the sighting disc onto a thin hex wrench and insert the adjustment screw into the adjustment screw. Set the sighting disk notch perpendicular to the side plane of the sight and make adjustments. After entering the corrections, tighten the locking screw and fire control 1-3 shots. The hits must fall on the aiming site, and the STP must coincide with the center of the target. The shooting is over. After alignment, it is not recommended to remove the collimator from the weapon. To check shot talus, you can shoot at a target from a distance of 30-40 meters.
Basically, all red dot sights have a clear click to enter corrections, but there are exceptions, which include the HAKKO BED-40 and DOCTER Sight, which come with a sighting disk, and it is not advisable to lose it. Zeroing the DOCTER collimator looks the same, but at a distance of 40 meters, since it has a fixed parallax at 40 meters, and the correction input is 1 MOA or 30 mm vertically and horizontally. These are the zeroing data for smooth-bore weapons chambered for bullet and shot cartridges. If you plan to shoot only shot, then you can zero at the required distance specifically for shot, about 30-40 meters, which is optimal for “hunting by feather.”
Shooting Features
After purchasing the device, you need to shoot it. First, you need to study the theoretical part, understand how the collimator sight works and how to correct its aiming at the target, and then zeroing the collimator will not cause any problems.
Installation and configuration
High-quality branded devices are provided complete with mounts for two mechanisms - dovetail and Picatinny rail. Small arms are also manufactured with appropriate mounts on the body, therefore, installing the device on the barrel consists only of firmly fixing it in the right place by tightly tightening the clamping screws. They need to be tightened tightly, but moderately, so as not to break the thread.
Before shooting a red dot sight, you need to carry out its initial setup. Setting up is not particularly difficult; any hunter can figure out how to set up a red dot sight. In expensive models, you can adjust not only the brightness, but also the shape of the front sight. Most often, the choice is between a dot, a cross, a circle with a dot, and a cross with a dot. Brightness is adjusted depending on the lighting.
In the dark, you should lower the brightness level of the light flux so as not to illuminate the target.
At the same time, there is no need to be afraid that the point in the sight will be seen by the enemy located on the other side of the weapon, because the visible beam of light is very weak and is reflected in the direction of the shooter’s eye. Thanks to this device, the front sight is visible only to the person looking through the sight, and to no one else.
Zeroing the collimator on a smoothbore video. How to sight a red dot sight
The appearance of sights of this type is due to the requirement for fast and accurate targeting. Collimators make it possible to obtain a contrasting aiming mark that remains on the target even when the position of the shooter’s body relative to the weapon changes.
Content
Features of the red dot sight
A feature of many red dot sights are open optical parts - lenses and mirrors. In the case of closed structures with a durable tubular body, the risk of damage is minimal. The difference between open sights containing a lens in a small frame is the high probability of damage to the sight due to external mechanical influence.
Collimators must be used carefully, despite manufacturers' assurances about the high strength of their products. Although quality scopes can withstand significant abuse, you should avoid knocking them or dropping them on the ground. To use the collimator as efficiently as possible, you will have to spend time fixing it correctly and zeroing it.
Installation
Mounted collimator sight on a rifle
Most red dot sights are mounted on one of two systems - a dovetail or a Picatinny rail (or a Weaver mount, which is almost the same thing). Most rifles come with one of these options out of the box, allowing you to mount the collimator without any problems.
To install it on a pistol, you will have to stock up on special adapters that are fixed in the area of the trigger guard.
Some models of air pistols and revolvers already have a built-in mount for mounted sights.
To correctly install the collimator on a weapon, you must adhere to the following sequence:
- ensure that suitable fasteners are available;
- attach an adapter, if necessary;
- install the sight on the weapon mounting mechanism and secure it with a screwdriver or a special key that comes with the collimator. The fit of the sight should be as tight as possible, but not too tight. If you overtighten the mounting screws, you can strip the threads or bend the guide rails, which will damage the design and make warranty service impossible;
- check the functionality of the collimator by testing it in all modes provided by the manufacturer.
You can watch the process of installing a scope on an air rifle in the video:
Despite the fact that the installation is not carried out on pneumatics, the video clearly demonstrates the use of special adapter strips. After the sight is securely secured, you can proceed to preparing and zeroing the weapon.
Selecting a position and distance
Unlike ordinary amateur shooting, the zeroing procedure should take place in the most convenient conditions. This will help eliminate the influence of extraneous factors on the results of the shot. In the shooting area the following should be kept to a minimum:
- gusts of wind;
- local changes in humidity (for example, the passage of a bullet’s trajectory over a pond, swampy area, puddles);
- close traffic of vehicles and trains (including metro).
An experienced shooter can accurately zero a weapon while in a “standing” position and holding it suspended. If you don’t have the required experience, then it’s best to shoot from a rest position. For a pistol, a “sitting” position is suitable, and with a rifle you can shoot while sitting or lying down.
Ideally, the weapon is secured motionless in a vice. This is useful when you need to find out the accuracy of the shot, but it is difficult to implement without special clamping equipment (it is better not to use a regular vice).
Please note that for spring-piston pneumatics, the “lying down” position is extremely inconvenient in terms of reloading. You should also pay attention to the ground coating so that dust raised by the wind does not get inside the mechanism.
Another significant nuance is the safety of others - there should be no people or animals in the direction of the shooting. It is best to shoot at a range or in front of a hillside. In the latter case, the bullets will hit the ground and will not harm objects located behind the hill.
When shooting an air gun, it is preferable to start at ten meters. Firstly, this is a standard distance for pneumatics, and secondly, when subsequently shooting at other distances, it is most convenient to make adjustments for every 10 meters of distance to the target.
Target selection
Target with concentric circles and the central one painted black
There are special paper targets for pneumatic weapons, the holes in which are easy to navigate. You just need to know the width of the dimensions - concentric rings that give the shooter points from 1 to 10 for a hit. Standard rifle targets may be too small for a novice shooter, so it is better to choose a larger diameter for the first time.
When choosing the shape of a target for shooting, you should pay attention to the standard concentric rings, the middle of which is painted black (from “seven” to “ten”). By measuring their width, it will be easier to make adjustments when zeroing and transferring fire to other distances.
The target is attached to the bullet receiver. In the simplest case, it is a wide wooden board that should not be penetrated by a bullet. You can also purchase a special bullet receiver with a remote control for changing targets, like in shooting galleries.
Selecting a position and distance
To shoot a weapon with any scope, you need to ensure a calm atmosphere in the place where the shooting will take place. Ideally, there should be no wind or precipitation, and there should be no places with changes in humidity, such as flowing rivers, near the bullet’s flight path. Zeroing a collimator sight begins with shooting at targets located at close range. With each adjustment step, the distance to the target can be increased.
Target selection
For zeroing weapons with a collimator, targets are selected depending on the type of weapon. For the first stages of zeroing, it is preferable to choose large targets, since the error before zeroing can be very high. When using firearms, dense targets for shooting live ammunition are suitable, and when shooting from pneumatic weapons, thin targets for pneumatics are sufficient.
What is cold shooting?
How to zero a collimator without firing a single shot? Such a procedure is quite possible. In addition to the usual method of zeroing a weapon, there is also cold zeroing. To do this, you need to insert a special laser with a tube into the barrel, which can be purchased at a specialized hunting or weapons store.
As a result of using such a device, a corresponding laser marker will appear on the target, which indicates the point of impact of the ballistic projectile with millimeter accuracy, without taking into account the decrease in trajectory during flight. However, a bullet fired from a smooth-bore weapon has enormous speed, so the decrease in trajectory due to gravity at low distances can be neglected.
After installing the guide laser, it is necessary to adjust the position of the aiming marker on the red dot sight. After this, the device is considered zeroed, however, for reliability, it is recommended to check the accuracy of the settings using hot zeroing, firing several live cartridges from the weapon. Even if the cold method does not give accurate results, it will still allow you to save the amount of ammunition when zeroing a red dot sight on a smoothbore weapon.
The shooting process step by step
Zeroing occurs in several simple sequential stages.
- Before zeroing the collimator, you need to place the weapon in a stable position so that the swinging of the shooter’s hands has as little effect as possible on the shooting accuracy. You can use a stop in a stand, or fix the weapon very tightly in a vice with soft linings.
- The weapon is aimed at a target located 10 meters from the shooter.
- Fire 3 shots.
- Based on the shooting results, a deviation of the bullet trajectory from the aiming point is observed. Using the appropriate screws, the collimator sight is adjusted and the position of the marker is adjusted.
- Fire 3 more shots.
- If the shooting results are acceptable, then the target is moved to a distance of 30 meters.
- Shooting is repeated and adjustments are made in accordance with the shooting results.
- When the accuracy of shooting at a target at a distance of 30 meters becomes satisfactory, then the target can be moved to a distance of 100 meters.
- The process of sighting and adjustment is repeated again until satisfactory accuracy is obtained.
When shooting at close and long distances becomes sufficiently accurate, zeroing the red dot sight is completed.
Step-by-step zeroing process
Aiming a red dot sight on a smoothbore weapon may not be so easy. After all, even the slightest error in calculations can lead to a ballistic projectile being deflected several centimeters to the side. When hunting, when a wild boar or elk is running towards you, such errors will be unacceptable, so we recommend following the algorithm below:
- Before zeroing the collimator, you should place the weapon in a stable position so that swinging your hands has the least impact on shooting accuracy. It is best to use a special fixing machine or bipod. In a pinch, any horizontal flat object or sandbag will do.
- We position the barrel in the direction of the target, which is located 10-15 meters from the shooter’s position.
- We fire three precise shots while exhaling.
- Based on the shooting results, you can easily determine the deviation of the bullet's trajectory from the place at which the shooter was aiming. The collimator sight is adjusted using special screws, the movement of which corrects the position of the marker.
- We fire three more shots with the adjusted sight.
- If the results of repeated shooting are acceptable, then the target is moved to a distance of 30 meters.
- We repeat shooting and adjusting the sighting device in accordance with the results of the hit.
- When the accuracy of shooting at a target at a distance of 30 meters is satisfactory, it should be transferred to a distance of 50 meters and repeat the procedure.
This algorithm of actions is repeated until the zeroing of the collimator sight is completed. The last “frontier” may be the hundred-meter dash. A target located at a distance of more than 100 meters must be hit using optical sights.
Cold shooting
In addition to the usual shooting method, there is also the so-called cold shooting. It happens without a single shot being fired. To do this, a special tube with a laser is inserted into the barrel of the weapon, which is directed exactly along its axis.
As a result of using such a device, a laser marker appears that points exactly to the point at which the barrel of the weapon is pointing. This is the point of impact of the bullet without taking into account the decrease in its trajectory during flight.
After installing the guide laser, the position of the marker is adjusted to the laser marker, taking into account the lower trajectory of the bullet. After this, the device can be considered zeroed, but for reliability, you should still check the accuracy of the weapon with live ammunition after it has been cold zeroed.
Cold zeroing of the collimator
We recommend cold shooting first. It can be carried out at home at a distance of 3-5 meters. We will do this so that in real conditions it will be easier for us to hit the target and make further adjustments.
For cold zeroing, use a cartridge with a laser specially designed for this purpose. It is inserted into the barrel of a gun. The laser marker immediately indicates where the bullet will hit when fired. Now, with the help of handwheels, we combine the point of the collimator beam with the laser marker, while taking into account the slight decrease in the trajectory of the bullet, because in reality the shooting will be carried out at a long distance.
Brief overview of models
There are several well-known manufacturers producing collimators. Each brand has its own characteristics, advantages and disadvantages.
Cobra
A Russian manufacturer that specializes primarily in open-type models with the ability to adjust the brightness and type of marker. The differences between the models are mainly in the method of fastening.
- EKP-8-02 is fixed on the barrel using a side mounting system with movable levers located in hidden places to minimize the possibility of accidental pressing.
- EKP 8-18 has a different mounting method - a Picatinny rail.
- EKP-1S-03 is a device with a side sighting bar, the arrangement of the locking levers of which ensures maximum ease of installation and removal.
Eotech
American manufacturer with a good reputation. Devices of this brand are common among the military and tested in combat conditions. The high quality of these products corresponds to their high price. The manufacturer specializes in open sights of compact size and are mounted on a Picatinny rail as standard.
- Eotech 552.A65 is a standard model with good moisture protection and customization options.
- Eotech EOLAD-1V - has a laser designator built into the design, making it easier to fire from the hip.
- The Eotech XPS3 is a very compact model and is completely waterproof.
Aimpoint
Manufacturer from Sweden. The range of this brand includes many models for various purposes, both sights for military special forces and for hunters. Available with various mounting systems, allowing installation on almost any weapon. The quality and price are very high.
- The Aimpoint 9000L is an enclosed long sight for hunters. One of the most common models due to its versatility with multiple brightness levels, water resistance and resistance to mechanical damage.
- Aimpoint CompC3 is a closed model with a more compact size, more suitable for medium and close ranges.
- The Aimpoint Micro T-1 is a compact device used primarily on short-range shooting weapons.
Sightmark
Chinese manufacturer with moderately priced devices. Satisfactory product quality and affordable price have contributed to the wide distribution of this brand among amateur shooting and hunting. They use dovetail mounts and a Picatinny rail, and also have good resistance to recoil of weapons up to 12 gauge. Sightmark devices typically have 4-6 brightness levels.
- Sightmark SM13003B is a compact and lightweight device that is widely used among airsoft players.
- Sightmark SM13005 is a compact model with a short body.
- Sightmark SM13001 is the most compact and lightweight model with 2 brightness levels and no choice of marker type.