History of PSO
The history of the sight's creation goes back to 1963. The task of developing the most efficient device was entrusted to designers Anatoly Ovchinnikov and Lolliy Glyzov, who worked at the Novosibirsk Instrument-Making Plant (Refinery). Initially, the name “PSO” stood for “Ovchinnikov sniper sight,” but later, by decision of the refinery management, the abbreviation in the documents was deciphered “optical sniper sight.” This is the name used by the device to this day.
Important: PSO was developed exclusively for military purposes - for the Dragunov 7.62x54 (SVD) sniper rifle.
Partly continuing the success of the legendary Mosin rifle and PU sight, the main requirements for the technical specifications were:
- ability to work at a distance of up to 1300 m;
- the presence of a height rangefinder scale (1.7 m);
- trouble-free operation of up to 9000 shots (guaranteed resource for 3000 shots plus 6000 according to reliability tests);
- no need to zero after removing/reinstalling the sight.
High aiming accuracy and ease of adjustment of the sighting reticle (the shooter could make horizontal adjustments during shooting without turning the handwheels) fully met all the points of the USSR technical specifications, so the sight was almost immediately put into mass production at the Novosibirsk plant.
Moreover, the last point of the requirements, regarding the quick-release bracket, combined with the low cost of the sight (if we compare the options bracket + rings + sight), is decisive when choosing a sight for many owners of weapons with a side-mounted sight.
Important: both the PSO and its civilian counterparts have the sight shifted to the left relative to the axis of the weapon: this is done to preserve the ability to aim using an open sight.
Over time, the PSO became the main standard optical sight of the USSR (later Russian) army, and subsequently began to be actively used in other countries: both in the army and in the “civilian” versions.
In the mid-1970s, PSO production was transferred to the Izhevsk Mechanical Plant. Ten years later, around the mid-80s, the sight began to be produced at BELOMO, Vileika (Belarusian SSR). And a decade later (the second half of the 90s), the production of PSO-1 at the refinery was resumed.
During this time, the sight has undergone certain modifications: it lost its luminescent screen, received different batteries, and the latest models have the ability to be installed on other types of mounts.
Important: after the collapse of the USSR and the return of PSO production to the refinery in the mid-90s, the sight was modernized and the eyepiece mounting structure was strengthened.
Earlier military models are inferior to modern ones, including civilian software analogues produced at the same plant.
Characteristics of the PSO-1 sight
Tests carried out during the development process showed that the sight can be successfully operated at temperatures from +50 to -50 °C, in severe weather conditions, in mud and snow. It is suitable for working at dusk and in low light conditions.
This is achieved due to a durable housing made of aluminum alloy and nitrogen inside the sight itself - it makes the device sealed, moisture-resistant and eliminates fogging of the glass during sudden temperature changes.
TTX PSO-1 and its equipment
| Weight, gram | 580 |
| Dimensions, mm | 337 x 136 x 72 |
| Multiplicity | 4 |
| Lens diameter, mm | 24 |
| Exit pupil diameter, mm | 6 |
| Angular field of view, degrees | 6 |
| Resolution limit, arcseconds | 12 |
| Hood | Yes, retractable |
| Reticle illumination | Eat |
| Batteries | One, battery RC-63, 1.5 V |
| Additional equipment |
|
Note. Also included in the kit: carrying bag, case, oil can and spare parts.
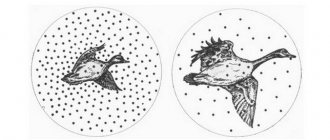
PSO-1 sighting reticle
Let's look at the purposes of the grid elements:
- lateral correction scale allows you to make corrections using the corresponding handwheel located on the side;
- squares to aim at the target, choosing the right one depending on the distance to the target;
- the rangefinder scale allows you to determine the distance to the target (in this case, the average height of the target is determined as 170 centimeters).
Important! The PSO-1 sight reticle was developed for the 7.62x54 caliber and the SVD rifle. If you have a different weapon or cartridge caliber (for example, Lancaster), the rangefinder reticle will not help when making adjustments.
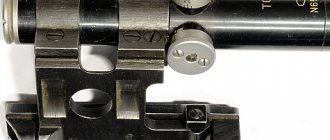
Bracket for PSO-1
The PSO mount (monolithic, integral with the body of the sight itself) is perhaps one of the main advantages of this optics. The ability to remove and install the sight without the need for re-zeroing (for example, to clean the weapon) saves the shooter time and ammunition. In addition, the opportunity to re-shoot in combat conditions is often simply not available, which is why the ability to remove/attach the sight becomes a key advantage.
The design of the bracket is made in such a way that when mounted on the SVD, neither it nor the sight body overlaps the standard mechanical sighting devices, which allows the shooter to fire at short distances or in the event of failure of the optics itself.
Note. The ability to aim with an open sight without removing the optics is convenient when suddenly approaching a target, for example, during a driven hunt.
Comparison of PSO-1, PSO-2, PSO-3
| Characteristic | PSO-1 | PSO-2 | PSO-3 |
| Multiplicity | 4 | 6 | 8 |
| Field of view, degrees | 6 | 4 | 3 |
| Lens diameter, mm | 24 | 36 | 42 |
| Exit pupil diameter, mm | 6 | 6 | 6 |
| Dimensions, mm | 337x136x72 | 340x167x78 | 406x138x76 |
| Resolution limit, arcseconds | 12 | 8 | 6 |
Note. All three modifications have different mesh parameters.
Separately, it is worth mentioning the modification of the PSO-1M2-01 sight, which was created for use on the VSS Vintorez and AS VAL.
The PSO-1M2-01 sighting scale is designed for shooting at a distance of 100-400 meters (steps are 50 meters). The sight itself has an updated battery compartment for a standard AA power source, which allows the use of reticle illumination.
Using the scope
Mounting the sight
To install the sight on a weapon, you need to install the sight on the seat and move the clamping screw handle
.
On SVD-type rifles, after installing the PSO-1 optical sight, it remains possible to use a mechanical sight
, since the sight, when installed on the mount, is shifted to the left and does not overlap the mechanical sight.
Removing the sight
The PSO-1 sight can be removed from the rifle and attached to it without reducing the quality of shooting. the handle of the clamping screw towards you.
and remove the sight from the dovetail towards the butt.
Determining the range to the target
The PSO-1 optical sniper sight has a distance determination scale tied to the average human height of 170 cm.
According to the rangefinder scale
The distance to an object can be determined using a rangefinder scale. The rangefinder scale shows marks from 10 to 2. By aiming the sight so that the object is placed between the upper line of the mark and the lower horizontal line, you can determine the range to the target. In the picture on the right, for example, the range to target D
=400 meters.
On the scale of lateral corrections and angular values using the thousandth formula
Example
: We observe the chest target.
Target size B
= 0.5 m, angle
Y
= 0-01 = 1. To calculate range
D
, target size
B
is multiplied by 1000 and divided by the angle in thousandths
Y
:
D=(0.5×1000)/1=500
Disadvantages of PSO sights and analogues
There is ongoing debate on the Internet about the quality, accuracy and compliance with the declared performance characteristics of the sight. Speaking about the purpose of the sight, it is worth noting that the requirements for the weapon (SVD) and the sight (PSO-1) were based on the weapon tactics of an ordinary sniper (Marksman), who, as part of his unit, is nothing more than a marksman at medium and short distances, which are usually do not exceed 600 meters. That is, the task is being solved to massively arm soldiers (conscripts) with a low level of training to work on priority targets as directed by the commander. Such targets could be a pillbox, a machine gun nest, a mortar crew, or light equipment. And the weapon and sight do an excellent job with the task.
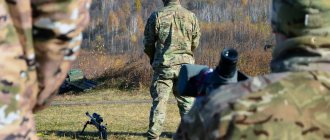
Soldier in Chechnya 1999. Photo by Vladimir Vyatkin.
You must understand that sniper officers work alone, with different weapons, with different sights and at much greater distances.
One of the main disadvantages of the PSO for civilian shooters is the too large distance from the mounting point to the axis of the optics itself, which is why Tiger owners have to resort to various tricks to improve shooting comfort (mount “cheeks”, order an elongated stock). But even greater difficulties are experienced by the owners of civilian modifications of the AK - “Saiga” and “Vepr”. The wide variety of receiver heights and stock lengths, coupled with the inability to adjust the monolithic bracket, sometimes calls into question the use of a scope together. That is why we strongly recommend that owners of these weapons carefully study the drawings of civilian analogues of PSO (PO and POSP) and the installation height of the rail on the receiver. Using the corresponding lower part of the bracket, you can select the desired mounting height for the sight. The same applies to SCS owners. If you doubt the correct choice of a sight, take a photo of your weapon, the mounting height of the rail and send it to our consultants, we will help you figure it out.
The second drawback of the original PSO is its low magnification, which does not allow clear target identification at distances exceeding 3-4 hundred meters. Civilian analogues of the software have modifications of variable magnification up to 9x, and POSP - up to 12x, which is in demand when hunting from slope to slope of a mountain or hill for a large animal - bear, deer, goat. However, for longer distances (about 1000 meters), other sights and weapons may be better suited.
Additionally, in the armed forces, soldiers who have 100% vision are selected to become snipers. Pay attention to this parameter: some civilian analogues of the software and POSP have diopter adjustment.
Important: PSO sights do not have diopter adjustment.
Thus, the characteristics of the scope perfectly suit almost any type of hunting, where a shot at a large animal is rarely made at distances of more than 300 meters, and the most common case is 150 meters. For these purposes, sights with a magnification of 4..6x and a “cross” or “half-cross” reticle would be optimal, since the bullet drop at such distances is insignificant.
Taking into account the completely different needs of our clients, mainly hunters, we previously considered options for other sights (including night and collimator sights), as well as brackets for the SVD/Tiger: a detailed article was written about this.
New in blogs
As real practice shows, accurate shooting of sniper weapons is a stumbling block not only in deployed units, but also in specialized sniper courses. Practical instructions on this topic have not been received by the troops for a long time. The instructions left over from the times of the USSR are written in an academic style and therefore are poorly understood not only by soldiers, but also by junior officers. Experts in their field, long-time snipers, who once could explain all this quickly, intelligibly and clearly, for the most part have long since left for another world. In their place were shooters who had neither practical experience nor theoretical training. In the absence of the necessary information, they are forced to zero the weapon according to their own judgment, spending a lot of nervous energy, ammunition and service time.
Meanwhile, the technique for zeroing a weapon with an optical sight is quite simple. Moreover, it is the same for sniper rifles of various systems and calibers.
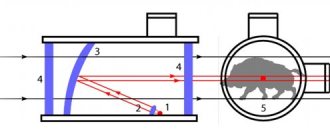
Inexperienced shooters try to shoot a sniper weapon directly using the optical sight, and this immediately drives the sighting process into a deep dead end. The fact is that an absolutely unshooted sniper rifle must first be “tied” to the target. To do this, the weapon is secured in a sighting machine or on something massive. Then the bolt is removed and pointed along the barrel bore at a regular chest or sports pistol target No. 4, located at a distance of 100 meters from the shooter’s position. This is difficult to do on an SVD rifle, so the barrel bore is viewed using a fragment of a mirror placed at an angle in the receiver.
Photo 1. This target should be visible strictly in the middle of the barrel bore (1).
With this orientation of the barrel relative to the target at a distance of 100 m, the bullet will definitely hit the center of the target or somewhere close to this center. But the shooter will not aim the rifle down the barrel all the time - this is practically impossible. Therefore, it is necessary that such aiming of the weapon along the barrel corresponds to the position of the sighting devices of the open sight - the front sight and rear sight. Therefore, the shooter needs to set the rear sight to division “1”, and, maintaining the orientation of the barrel bore to the target, move the front sight with horizontal and vertical movements somewhere to the center of the target (2 in photo 1).
Don't try to do this particularly accurately - at this stage of zeroing it is not necessary. It is important that using this “cold zeroing” method you aim the weapon both along the barrel bore and through the open sight at the same point. On domestically produced sniper rifles, the horizontal movement of the front sight is done by moving it along the dovetail groove in which the front sight is seated. To facilitate the sighting process, a scale is applied to the base of the front sight of the SVD rifle, the angular value of which from mark to mark is one thousandth of the distance to the target (deployed along the front). Therefore, moving the target mark by one such division shifts the average point of impact at the sighting distance of 100 m by 10 cm to the right or left. The displacement of the average point of impact is similar when shooting from a three-line rifle. Moving the front sight along the dovetail groove both on a three-line rifle and on an SVD is done either with the help of a special device - a front sight guide, or by carefully striking a small hammer through a copper pin at the base of the front sight guard (front sight guard).
Vertical movements of the front sight on the SVD rifle and other modern weapons are made by screwing it in and out. One rotation of the front sight on the SVD shifts the average point of impact at the sighting distance by 16 cm up or down. The front sight is rotated using the base of a screwdriver available in the cleaning tool case. In a three-line rifle mod. 1891–1930 this process is more complicated - you need to knock out the front sight with the fly-tip from the dovetail, then remove the fly from the fly-tip, select it according to the height numbers, or adjust the height with a file.
The process of moving the front sight must be constantly checked against the visual position of the target in the middle of the round opening of the barrel bore. To do this, you will have to bend down and look into the trunk several times, straightening its position each time. And as soon as you achieve that the middle of the round field of the barrel bore and the even front sight in the rear sight are directed at the same point on the target, you can consider that cold zeroing is completed. With such a relationship between the axis of the bore and the line of sight, the bullet will definitely hit somewhere near the center of the target. It is important for you to “catch” the target with the very first shot: this way you will avoid unnecessary waste of ammunition.
But in practice, the bullet does not always fly strictly along the axis of the bore. Therefore, you will need to more accurately zero the rifle with open sights. This will have to be done for the reason that the optical sight has a nasty habit of “straying” to the side from impacts and shocks. In a combat situation with “downed” optics, all hope is only for a carefully sighted and verified open sight. More accurately, an open sight is sighted at a black sighting target or a black sighting square, the horizontal size of which is 25 cm. Why was this particular size chosen?
Photo 2. Because the width of the rifle front sight has the same projection width as the sighting square and aiming when sighting at a distance of 100 m is carried out under the bottom of this square, or, as they say, under the bleed, with a small (by a hair) white gap .
Clearance is necessary so that the black front sight does not merge with the black square. Without white clearance, the front sight will “crawl” into the black square. This type of aiming is the easiest and gives the most accurate shooting results.
The final “fine” zeroing of an open sight with aiming “under the bleed” at a distance of 100 m is carried out with the aiming division set to “3”, and under this condition, the average point of impact should be located 14 cm above the clearance between the front sight and the lower edge of the sighting target. Why is this so?
Photo 3. Because with the “3” sight installed, at a distance of 100 m the excess of the trajectory is 14 cm, at a distance of 200 m – 18 cm, and at a distance of 300 m the trajectory drops and the bullet hits the center of the target.
Why is a rifle zeroed at a distance of 100 m with aiming data for shooting at 300 meters? For convenience and speed. At a distance of 100 m, bullet holes will be clearly visible through a telescope, but at 300 m they will no longer be visible at all. Walk to targets 100 m closer and faster than 300 m, and the practical results of zeroing will be the same. Having sighted the SVD rifle at a distance of 100 m with an excess of 14 cm above the average point of impact with the same sight “3” at a distance of 300 m you will hit the aiming point, “in the center”. If you want to hit the center of the target at a distance of 100 m, set the sight to “1”, the bullets will go lower and you will get where you want. At a distance of 200 m, set the sight to “2” and you will again get the desired result.
When shooting with a carefully calibrated open sight, chest targets can be confidently hit at distances of up to 300 m, and tall ones - up to 600 m. In addition, with a correctly adjusted open sight, you can easily and quickly “set” the optical sight.
The optical sight is installed by checking the direction of its optical axis with the aiming line of the open sight. This occurs in accordance with the previously described principle of installing an open sight by aligning the direction of its aiming line with the axis of the barrel bore. Only this time, the rifle, clamped in the sighting machine, is aimed at the target using an open sight placed on the “3” mark, under the edge of the sighting square, as described earlier. And the aiming element of the optical sight (3 in photo 1) is aimed at the same point (sharp “stump” for PU, PE, PB sights or the tip of the aiming square for the PSO-1 sight). But at the same time, a mandatory condition must be observed: the tip of the aiming element must be in the middle of the visual field of the sight. For what? In order to have room to “twist” amendments. The bottom line is that the desired point of impact in a properly sighted scope should be on its optical axis. When introducing targeting corrections for range, side wind and target movement, the sniper shifts the aiming element somewhere away from the optical axis and thereby selects the aiming point for the necessary leads or correction of the trajectory height.
Photo 4. Look at the photo. The sniper, while aiming the weapon, neglected the mandatory rule of locating the tip of the aiming element on the optical axis in the middle of the visual field and “positioned” the sight “as necessary,” with the main aiming position of the aiming element on the side and to the left. As combat events progress, he needs to be given a “two to the right” correction, that is, move the sights two spaces to the left. But since the sights are already there, there is nowhere to move them to the left. In addition, the clarity of vision of the target in the middle of the visual field is much higher than at its edges.
For all these reasons, before aligning the tip of the aiming element with the aiming point of an open sight during zeroing, this aiming element (the tip of the aiming stump or the tip of the aiming square) is brought out by rotating the adjustment flywheels to the center of the visual field of the combat optics. After that, the alignment of the aiming point of the open sight and the sighting element of the optical sight is done by aiming the entire tube - the body of the optical sight. There are special devices for this on various types of optical sights. On the PU sight (photo 6–7), the optical tube is aimed vertically by rotating the upper (1 in photo 6) and lower (2 in photo 7) adjusting screws of the bracket base.
Photo 5. Horizontal adjustments on this sight are made either by placing a thin strip (or several strips) of tin between the bracket shank and its base, or, conversely, by carefully filing off the supporting surfaces of the bracket shank with a needle file in the place where they contact its base.
Photo 6. After adjustment, the PU sight bracket is tightly clamped with a clamping screw (3, see Photo 7).
Photo 7. The PU optical sight is installed on a three-line rifle once and for all. It cannot be removed.
Photo 8. Optical sights PE
Photo 9. and PB are installed on massive side brackets, which are “seated” on the receiver using a wedge-shaped “dovetail” (photo 10) with great precision and secured in this position with a clamping screw (2 in photos 9, 10, 12).
This design of the bracket allows you to remove the sight from the weapon during transportation and, without losing combat accuracy, place it on the rifle when shooting is necessary. The bracket for the PE and PB sights allows you to aim the sight tube with the center of the visual field (the optical axis with the sighting element located on it) horizontally. To do this, slightly release the screw-axis (1 in photo 9), and then the sight is shifted in the desired direction horizontally by transversely rotating (clamping or releasing) the right and left adjustment screws (3 in photo 9 and 4 in photo 10). Once the adjustment is complete, all screws are tightened tightly. The bracket for PE and PB sights is not vertically adjustable, since its base (seat) is fixed to the receiver of the weapon with great vertical precision. Minor sighting adjustments (fine-tuning) in the vertical direction are made by rotating the vertical remote flywheel.
Photo 10. In the same way, with great technological precision horizontally, the PSO-1 sight is installed on the SVD rifle.
However, there are cases when, due to mechanical failure of its bracket, it becomes necessary to coordinate the center of the visual field in the required direction. To do this, the tightening screws (1 and 2 in photo 10) in the bracket joints are released and thin strips of sheet metal are laid between the joints, after which the screws are tightened tightly.
Once again, we emphasize that sighting alignment of the sighting element of an optical sight with the aiming point of an open sight on a sighting target at a distance of exactly 100 m should only be done by pointing the optical sight tube. In this case, the sighting element must be installed in the center of the visual field of the optics on the optical axis. Actually, this will be the aiming point of the optical sight.
Photo 11. At the end of this process of “cold” sighting of the optics, the aiming point will be selected strictly under the edge of the black sighting square.
Afterwards, shoot with live ammunition for a bit. The point of impact of the SVD should be 14 cm above the aiming point (remember - the rifle was sighted with an open sight “3”, and you aimed at the same point using an optical sight). If the point of impact turned out to be higher or lower than these 14 cm, or went slightly to the right or left, this is not scary. Such an error is usually attributed to aiming with an open sight. Targeted shooting with optics will always give greater accuracy and accuracy. And therefore, with such a discrepancy between the average points of impact, the result that was obtained when shooting with an optical sight should be accepted as the truth.
But if the resulting STP does not coincide with the desired impact location, they must still be combined. If the gap is small - 5–10 cm, then it is no longer necessary to aim the sight tube, and sighting adjustments can be performed by rotating the adjustment flywheels. In order for the sniper to know which way to “turn” the side flywheels, they are marked with symbols: on PU, PB and PE sights, “+” is to the right, to “–” is to the left, and on PSO sights the direction of movement of the STP is indicated on the flywheels with arrows (STP - to the right, STP - to the left). The lateral horizontal flywheels are graduated in thousandths - from marks to marks one thousandth. On vertical remote flywheels, firing distances are indicated in hundreds of meters. But even experienced snipers often forget where to turn the flywheels.
Photo 12. In addition, due to the peculiarities of loading three-line magazine rifles on their “native” sights PU, PE and PB, the windage adjustment flywheels are located on the left (photos 12–13), and on the PSO-1 sight of the SVD automatic rifle, where it is not necessary “turn” the bolt, the horizontal flywheel is located on the right.
Therefore, you need to turn the flywheels on different sights in different directions. From the old-timers came a simple, practical and understandable way to turn flywheels in the right direction.
Photo 13. Its essence is as follows: you rotate any flywheel on any sight, unscrewing it - and the bullets (the average point of impact, abbreviated as STP here and below) “leave” from your palm.
Photo 14. You “twist” the flywheel - the bullets go into your palm.
Photo 15. Vertical distance corrections are made according to the same principle.
The method is so simple that it is impossible to forget it.
Don’t forget - the dials (scales) of horizontal flywheels are graduated in thousandths. This means that when you turn the flywheel by one division, the bullet at a distance of 100 m will move to the side by 10 cm. Therefore, let’s say, if the STP is to the left of the desired location 5 cm, you turn the right flywheel of the PSO-1 sight “away from you”, tightening the screw" half a notch. The bullet will go to the right (into your palm), and on the target - 5 cm to the right. In the same case, on PU, PE, PB sights, you turn the left handwheel “from yourself”, unscrewing the screw, the bullet comes out of your palm to the right, and you get the same result.
The distance values on the dials of the upper flywheels from 3 to 6 approximately correspond to one thousandth at a distance of 100 m. This can be used as a guide when zeroing. If, for example, the STP lies 5 cm below the calculated location, turn the vertical flywheel (it is the same on all types of sights) “tightening the screw” by half a division (about 0.5 mm of the linear value of the dial) – the bullet will go “into your palm” , and on the target the STP will “increase” by 5 cm.
After you set the STP at the desired height above the aiming point, set the scale value to “3” on the upper handwheel, because when you shot at 100 m, you actually shot at 300. How to do this?
Photo 16. On the flywheels of all types of sights there are two (sometimes 3) clamping screws on top. (1–2).
Carefully, so as not to disturb the alignment of the flywheel (it is better to hold the flywheel rim in pliers or grab it with a wrench - there are special slots on the flywheel rim of the PSO-1 sight, and this rim itself is therefore called a nut), loosen these clamping screws with a screwdriver. In this case, the dial scale is released and can be easily turned in any direction. Turn the dial and set it to number “3” against the control line. Then carefully tighten the clamp screws. Do the same operation with the horizontal flywheel. It must be set against the control risk to zero. Consider your rifle now sighted. The flywheel dials of the PSO-1 sight are closed to a ratchet, so turning the dial will be accompanied by clicks. You shouldn't be afraid of this. Now, if you need to shoot at 100 m, set the distance handwheel to 1, if at 400 m - to 4. The bullet will “fall” in the center, on the tip of the aiming element.
Attention! When using PU sights, developed at one time for SVT rifles with an initial bullet speed of 840 m/sec, when firing from three-line rifles with an initial speed of 865 m/sec. At a distance of over 400 m, the STP does not coincide with the aiming point - the bullets go higher. For different batches and types of cartridges (with light - 9.6 g, heavy - 11.4 g and very heavy sports bullets weighing 13.4 g and more), the weapon is aimed at specific distances. Before shooting the optical sight, test the weapon for accuracy - according to the instructions, a sniper rifle should have an accuracy of 8x7 cm at 100 m firing distance. But a real sniper weapon with a select barrel should fit into the dimensions of a matchbox in terms of accuracy of combat. If a weapon does not have accuracy, it is pointless to install an optical sight on it. Three-line sniper rifles, the reserves of which are still very large, were mostly manufactured in 1944–1945. At the same time, the best guns were selected from among them for combat work at the front. Due to constant use in units, these weapons became worn out long ago, and in the 60s and 70s they were replaced by SVD rifles. Rejected three-line sniper rifles that did not reach the front were subsequently used in DOSAAF or were stored for decades in warehouses. During this time, many of them developed “metal fatigue” and their stocks became warped. And therefore one should not expect anything supernatural from such a weapon.
PSO-1 sights have a weak point. Internal leather gaskets are sometimes used incorrectly and “pull” the adjustment system. Such a sight causes an unstable battle with long gaps: two shots to the right - three to the left. This sight requires repair in a special workshop.
On PU, PB, PE sights, the dial scale rotates freely when the locking screws are released. On PSO-1 sights, the dials are closed with a ratchet at the rate of 1 division per 2 clicks. The remote handwheel has one click from division “0” to division 3, and then 2 clicks per division. When zeroing, it is better to loosen the locking clamp screws of the dials in advance. Then they can be easily tightened without unnecessary risk of moving the flywheels.
The rifle is sighted from a rest, but there must be a soft pad (mitten or cap) between the rest and the weapon. Otherwise, the rifle will be thrown up uncontrollably by the shock of the shot.
For shooting at distances up to 600 m, such zeroing is quite sufficient. Shooters who practice shooting at distances of 800 m and beyond, at a distance of 100 m, install the aiming element slightly above the center of the visual field, so that there is room to move it down for shooting at longer distances.
The difference in trajectory elevations when shooting with an open sight (aiming under the image of a sighting square with clearance) and when shooting with an optical sight with aiming strictly under the bleed is usually 1–2 cm and at shooting distances up to 800 m has no practical significance. At longer distances, the rifle will in any case have to be zeroed at specific distances separately for each shooting distance.
According to the old instructions, sniper rifles are only zeroed by a specific sniper (different people have different weight, height, arm length and perception) when received from a warehouse, when received from another sniper and after each shooting of 150 shots. The question of the need for another shooting is decided by a specific sniper. After the sniper’s report about the need to zero in, his immediate commander is obliged to release this shooter to the shooting range, but be sure to assign a machine gunner to his security to ensure safety.
Encyclopedia "Training of a Special Forces Soldier" SPC "People's Health", LLC "VIPv"
Operation of PSO today
The entire power of the Soviet defense industry, which was behind the development of the PSO sight, has now entered the largest defense holding company "Shvabe", including the Novosibirsk Instrument-Making Plant. The refinery still produces this sight both for the needs of the Ministry of Defense and for export. Civilian analogues - software sights - are produced on the same machines, and production control is carried out on the same lines. More information about the refinery’s production culture can be seen in the video dedicated to the 105th anniversary of the enterprise at the link.
Various models of PSO are actively used in army and police units of the Russian Federation and a number of other countries (China, Ukraine, Romania, Belarus, Serbia). In addition, there is a segment of civilians who like to “touch history” or “just like in the army” - they buy such sights for a collection or install them on their “Tigers”, try to hunt and... understand that the device is of little use for effective hunting due to behind its specific grid.
But it can be used at shooting ranges for tactical training and when shooting at short distances at relatively large targets. Civilian versions of this sight are actively used in hunting, especially models with
- variable frequency,
- “cross” or “half-cross” grids,
- diopter adjustment.
But, in any case, despite the fact that the PSO looks morally and technically outdated compared to other, more modern sights, it has firmly taken its place in the world and history of optics and will be used for many more years. And thanks to the unique quick-release bracket, which, after removal and reinstallation, does not lose the STP, the PSO sight (or its civilian analogues) is the most optimal choice for hunting with Tiger, Saiga, Vepr, SKS rifles and their analogues .