Preparation
Proper preparation for the zeroing procedure is the key to successful adjustment of the sighting device. If the shooter acquires all the necessary equipment, and also prepares the sighting position and targets in advance, this will save a huge amount of precious ammunition and time.
Necessary equipment
The first thing you need to do before zeroing is to make sure that you have all the necessary equipment to carry out the procedure according to all the rules. Here is a list of what you should get first:
- A sighting machine is a special support that allows you to fix a rifle or shotgun in a stationary position. Typically, such devices have the ability to adjust the height of the support for the bed, as well as the level of its tilt.
- Wooden table and chair. The first one will be needed in order to place the sighting machine there. The shooter needs a chair so that he can take a comfortable position (it is desirable that it be height adjustable).
- Biathlon targets. You can purchase them in sporting goods and gun stores or print them yourself by finding a picture on the Internet and using a printer (A4 paper is enough for rifled weapons and pneumatics).
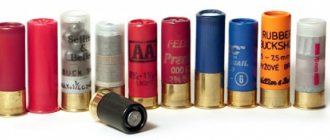
- Ammo. It is worth giving preference to those ammunition that you plan to use in the future when shooting from custom weapons. The exception is cartridges with an expansive tip, which leave a ragged mark on the paper.
- Binoculars. A useful thing for those who do not want to constantly go into the line of fire to determine exactly where the bullet hit. As an alternative, any optical sight with adjustable magnification will do.
It is advisable to take safety glasses and headphones with you to minimize the risk of visual and auditory injuries (especially when shooting at short distances). A felt-tip pen and ruler can also be useful to more accurately identify the midpoint of impact.
Don’t be upset if you couldn’t get the sighting machine. In this case, we remove the first two points, replacing the equipment with sandbags, and the table and chair with a small rug.
Position preparation
Shooting of weapons is permitted either in specially designated places (shooting ranges, training grounds), where you will have to pay to be in them, or in hunting grounds. Practice shows that the second option is more popular among hunters, so let's look at what requirements the shooting position must meet:
- Remoteness from the city. It is recommended to choose a deserted place where there will definitely not be onlookers who have come to see “who is shooting there.”
- Landscape. Should be level enough to support a table or rug. It is best to choose a place in an open field or a clearing in the forest.
- Vegetation. The shooter's view should not be blocked by trees or grass. Also, the area behind the targets should be clearly visible.
Closed natural spaces, such as quarries or ravines, will work very well as places for shooting. The sound emanating from such places travels a short distance, so the shooter will not disturb people or local wildlife.
Shooting range or grounds
Most hunters will answer this question quite simply: “Of course, a shooting range, because in a specially equipped room the bullet is not affected by high air humidity, wind force and other atmospheric phenomena.” However, do not forget that the shooting gallery has its disadvantages:
- Lack of fresh air. Due to the poor ventilation system in the shooting range, the chance of getting lead poisoning in such a room is extremely high. A characteristic symptom is a sweetish taste in the mouth (and the stronger it is, the worse).
- Large load on the hearing organ. Of course, you can use special protective headphones, but not all modern shooting ranges are equipped with such accessories. In open space such problems should not arise.
- Limited shooting distance. Most shooting ranges have a line of fire of 50 to 100 meters, which should be enough to zero in on an open sight. However, if a hunter wants to calibrate the optics, he may be faced with a lack of space.
- Inability to conduct skeet shooting. Again, due to the confined space, it is almost impossible to implement this idea. In nature, you can shoot at clay pigeons as much as you like.
- Having to pay money to use the shooting range. Although there are many amenities during the shooting process in a specially equipped room, the prices for visiting shooting ranges are often inflated.
However, not everything with shooting galleries is as bad as it might seem at first glance. Yes, compared to a natural shooting range it has many disadvantages. However, the shooting gallery also has enough positive qualities:
- Comfortable weather conditions for shooting. The owners of the shooting ranges maintain optimal air temperature and humidity in the premises, and there is no wind at all. It is logical that such conditions are much better suited for shooting than in nature.
- Convenient location. Typically, shooting ranges are built within the city, so getting to them will not be difficult. The same cannot be said about shooting on hunting grounds, which, firstly, need to be found, and secondly, to arrive there.
- Availability of a room for storing weapons and equipment. In a natural environment one cannot even think of such luxury. However, a shooting range visitor does not have to worry about his ammunition being stolen during shooting.
- Availability of all necessary equipment. If you don’t have a sighting machine or suitable targets for sighting, you don’t have to worry about this, because everything you need will definitely be found at the shooting range.
- You don't have to be afraid to disturb someone. The shooting gallery has simply phenomenal sound insulation due to thick concrete walls. Even if a person walks past the building, he most likely will not hear the shots.
So what is better to use for shooting an open sight - hunting grounds or a shooting range? Let’s answer this: if the issue of finances is not so important for you, it’s definitely a shooting gallery. At the same time, you can save money on a trip to a place specially equipped for shooting if there are hunting grounds near the city and the weather is good outside.
Target requirements
The last thing to consider during the preparation stage is the type and size of targets. Everything is quite simple here: if we are talking about zeroing a smooth-bore weapon using shot, you need to acquire a standard shooting range target (75x75 cm). But for rifled weapons and pneumatics, the usual biathlon (sports) markings will be sufficient, which you can simply download from the Internet and then print on a piece of paper.
Shotgun sighting
Zeroing a smooth-bore weapon differs from the procedure that is performed when adjusting the sighting device on a carbine or rifle. In this case, it is important to use exactly those cartridges that you plan to use for hunting (with the same amount of gunpowder and shot). In no case should you remove the buttstock or the magazine with cartridges from the gun, since reducing the weight of the gun can affect its ballistic characteristics.
Combat accuracy
Combat accuracy usually refers to the distance by which a ballistic projectile deviates from its aiming point. The easiest way to calculate this parameter is to fire 3-5 bullet shots. In this case, it is necessary to aim at the same place. If the bullets land in the wrong place, but are quite dense, this means that the accuracy is within normal limits, and the gun only needs a slight adjustment to the sighting device. If the distance between the impact points is too large, then there is a clear loss of accuracy.
To be fair, it is worth noting that any weapon shoots with minor flaws. The permissible deviation of a bullet from a given course for a rifled weapon is 3-4 cm when shooting from a distance of 100 meters. The parameters of smoothbore shotguns largely depend on the caliber of cartridges used. If, after firing, the distance between the impact points is greater than what is regulated by the manufacturer’s instructions, this means that the weapon needs cleaning or modification of the barrel channel.
Combat accuracy
Combat accuracy is a parameter that beginners often confuse with accuracy, although in fact it is present only in smooth-bore weapons that fire shotguns. This characteristic can vary greatly not only from the caliber, but also from the shot number, powder weight, number of balls in the cartridge, distance to the target, and so on.
The further the distance to the target, the less accuracy of the battle
With high accuracy of combat, at least 75% of the pellets hit the target at a distance of 35 meters. The higher the distance to the target, the less accurate the shot will be. For example, if you increase the distance to 40 meters, the accuracy will decrease to approximately 60%. This parameter is considered average, since in this case the damaging cloud will certainly hit the game, but will not turn it into a colander.
Thickening of shot scree towards the center
When zeroing a smooth-bore weapon using pellets, it is important to pay attention not only to the accuracy of the fire, but also to the center of impact of most pellets - the closer the distance to ten, the denser they are. If the open sight is not adjusted correctly, the “epicenter” will be deflected to the side. In this case, it is necessary to adjust the position of the front sight so that as many pellets as possible are located exactly at the center of the target.
Combat consistency
Another important parameter that should be taken into account when zeroing not only smoothbore, but also rifled weapons. The consistency of the battle indicates how much the accuracy and accuracy of the weapon differs from shot to shot. The higher this indicator, the more stable the shooter will show results. To determine the consistency of the battle when shooting from a gun, you will have to use several targets.
First, you need to make sure that the sighting device is adjusted correctly (to do this, look at the thickening of the scree towards the center). After this, we carry out several sighting shots at different targets using the same cartridge. Then you need to look at the result by counting the number of pellets that hit the circle. If the difference between hitting different targets is no more than 10%, then this indicates good consistency in the battle.
Sharpness of combat
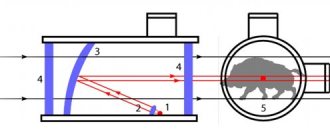
We hear about combat sharpness quite often, but what does this parameter mean and how to check it during zeroing? It's quite simple. Sharpness is the penetration force of a ballistic projectile - its penetrating ability. This parameter is one of the most important for hunting weapons, since the shooter needs not only to hit the prey, but also to hit its vital organs, so as not to leave wounded animals behind. You can determine the sharpness of the battle during zeroing in the following way:
- We place several thin pine boards at a distance of 35 meters from the barrel of the gun.
- We load the weapon with ammunition that will be used during fishing.
- We fire a shot and see how many boards the shot was able to hit.
Let's assume that you used 5 boards, the thickness of which is 10 millimeters. Of these, only 3 boards were hit, and the 4th was barely touched. This means that the sharpness of the battle is 30-32 millimeters. To understand whether this is a good indicator, you need to multiply the diameter of the caliber by two - this is the optimal indicator. For example, for 12 gauge it will be 37 mm (18.5 * 2). However, our sharpness is only 32 mm, which means that either the gun has some kind of malfunction, or there is insufficient powder in the cartridge.
As the charge of gunpowder in the cartridge increases, the accuracy of the fire drops - the pellets begin to scatter to the side due to the high power. The situation can be corrected by using an additional choke constriction or using a heavier ballistic projectile, for example, steel shot instead of lead. However, sharpness will still differ when shooting from different distances. That is why professional hunters shoot their guns from different distances, determining the optimal cartridge for it.
Checking the firing of a shotgun with shot
Test shots are fired at the target to determine accuracy and compliance of the main parameters of the shot with the passport data. They also find out the degree of coincidence of the shot scree with the aiming point. The test is carried out with a series of 4 or 5 shots from a standard distance of 35 meters at identical targets. According to GOST 18406-79, the deviation of the center of the shot talus at the aiming point should not exceed: up - 150 mm; down - 50 mm; right - 75 mm; to the left - 75 mm.
The magnitude of the muzzle constriction (DC), which is more often called the choke, has a great influence on the accuracy of the shotguns. For the most part, hunting weapons have a muzzle constriction of a given size, manufactured at the manufacturer's factory. There are also a large number of shotguns with interchangeable muzzle devices that are screwed into the muzzle of the barrel. Thus, the shooter can change the parameters of his weapon in a matter of minutes depending on the task or when changing hunting objects.
For greater clarity, we present the influence of the magnitude of the muzzle constriction on the average accuracy of the shot and the indicators of the condensation of the shot shower towards the center, when shooting from a 12-gauge shotgun at a distance of 35 m.
Shooting rifled weapons with open sights
Most rifles and carbines are equipped with a front sight and rear sight with height presets. However, you should not rely on the factory settings, since they are only relevant for shooting at short distances (pneumatic rifles are zeroed at 10 meters, rifled carbines - up to 50). At the same time, there are often specimens in which the horizontal is strongly knocked down, which is why the ballistic projectile deviates from the aiming point to the left or right. Therefore, re-shooting a rifle after purchase is strictly necessary, especially if you plan to use the weapon at long distances (100 meters and above).
Shooting “on the spot” or “under the bleed”
You can often hear the phrase from professional hunters: “My rifle is zeroed in” or “Be careful, the carbine shoots under bleed.” It is not difficult to guess that these are two shooting methods that are relevant only for rifled weapons. Each of them has both positive and negative sides. Therefore, let's first take a closer look at the essence of each of them, and only then you will determine what suits you best.
Shooting “in place” is carried out at distances of 100, 200, 300 meters (and so on). In this case, the shooter tries to align the midpoint of impact with the position of the rear sight - and we all know that the bullet begins to gradually fall as the distance increases. That is why when shooting at a distance of 100 meters, position “1” is lined up. Then the distance increases to 200 meters, the rear sight bar is lowered and takes the position under the number “2”. And so on as long as the effective firing range and sighting range allow.
Bleed-off sighting is the most common type of sighting among hunting enthusiasts. The method does not take into account the fact that the bullet begins to gradually lose its trajectory, so the rear sight in all cases is in the “P” position (“fixed sight”). However, you will still have to zero the weapon at distances of 100, 200 and 300 meters in order to know how much the ballistic projectile deviates from a given point depending on the distance to the target. In the future, this knowledge will also be useful when hunting - at long distances you will need to aim a little higher.
Which of the two existing methods should a beginner choose? We recommend bleed zeroing because it is the most versatile. The fact is that in real conditions, not everyone decides to shoot at a long distance using an open sight (it’s difficult to hit because of the shaking front sight). In addition, modern cartridges and rifles can boast very high speed, so that the bullet begins to lose its height at a distance of half a kilometer and above. If you want to feel like a real sniper, spot shooting is better for this.
Target "Sighting-1"
If you still decide to shoot your rifle, then a target called “Sighting-1” will help you with this. It is designed for shooting at distances of 100, 200 and 300 meters. Before we talk about the procedure, let's understand a few abbreviations that will be used in the explanation:
- STP - the average point of impact (that is, the center of dispersion of holes);
- TP - point of impact (the place where the bullet hit);
- KT-1, KT-2, KT-3 - control points located on the target (from bottom to top).
The "Sighting-1" target is used for zeroing in.
To zero in a rifle, you must first place the target at a distance of 100 meters from the shooting position. After this, you should clamp the weapon into the locking machine and fire several shots at the KT-1. If the STP is located at a distance of 2-3 cm from the outer hole, this means that the zeroing was carried out correctly and the weapon is fully operational.
Then you need to switch to KT-2 (higher point) and repeat the procedure. If the TP is located above or below the aiming point, then you will have to slightly raise or lower the front sight (leave a gap on it). Much depends on the characteristics of the weapon and the caliber used for shooting. However, the Pristrelka-1 target can be produced in three versions:
- for intermediate cartridge - 7.62×39 mm;
- for a rifle cartridge - 7.62x54 mm;
- chambered for automatic cartridge - 5.45x39 mm.
The Pristrelka-1 target is equipped with visual reference information, which will be of great benefit when adjusting the sighting device. For example, it contains instructions on how to determine the STP and in which direction to move the front sight if the bullet deviates from the aiming point.
Amendments
For a novice shooter, making adjustments to the position of the rear sight may not be as simple a task as many people think. However, if you follow the guide described just below, the adjustments will be correct:
- The TP is located below the aiming point - unscrew the front sight, lifting the bar up;
- The TP is located above the aiming point - screw the front sight down, lowering the bar;
- The TP is located to the left of the aiming point - move the rear sight bar to the right;
- The TP is located to the right of the aiming point - we shift the rear sight bar to the left.
That is, if we are talking about adjusting the height, then the bullet will always fly in the direction where the front sight is adjusted. Place the front sight higher and the bullet will fly up; lower, the bullet will fly down. But with horizontal and vertical the opposite is true. But don’t rush to get upset if you are a novice shooter, because such an understanding will come with practice - there is nothing difficult about it.
Many readers may have a reasonable question: “How to determine the STP if the bullets are scattered around the target?” In fact, it is not difficult, and even somewhat interesting. You just need to connect the holes with lines using a felt-tip pen and a ruler. Then you need to determine at what point the lines intersect - this will be the STP.
Bullet sighting technique
Photo by Anton Zhuravkov
First, we determine the accuracy of the battle - the degree of coincidence of the average point of impact (MIP) with the aiming point (an apple with a diameter of 10 cm). The average point of impact for a given series of shots is determined as follows. We connect the centers of the two nearest holes with a straight line and divide it in half. This will be the STP of two holes.
We connect it with the adjacent 3rd hole and divide this distance into 3 parts. The closest division to the first two holes will be the STP of three shots. We connect the found STP of three shots to the 4th hole, divide the line into 4 parts, and the nearest division on this line to the first three holes will be STP of four shots. Then we connect this STP with a straight line to the 5th hole, divide the distance into 5 parts, the nearest division on the line will be the STP of five shots. And then we connect the STP of five shots to the 6th hole, divide it into 6 parts, and the STP of six shots will be located at 5/6 of the distance to the 6th hole.
In practice, it may not always turn out that the STP will coincide with the aiming point - the apple on the sheet.
We determine the magnitude of the horizontal and vertical deviation of the STP from the aiming point for a given series. We draw perpendicular lines through the center of the target (apple) and from them, using a ruler, measure the distances to the STP vertically and horizontally. We make such measurements in each series of cartridges (it is advisable to shoot 3 series of 6 cartridges with different ammunition or different types of bullets).
We select a series of cartridges from which the horizontal and vertical deviations of the STP are the smallest. We shoot a similar series of cartridges again, but with adjustments made to the aiming horizontally and vertically. Let's say the STP was located 10 cm above the apple. This means that now our aiming point will be 10 cm lower (with clearance). Previously, we aimed under the sawn-off shotgun, but after this adjustment, the STP of this series will align with the center of the target - the apple. This means that we have achieved shooting accuracy—combat accuracy.
Now we determine the accuracy. We draw a circle with a radius from the middle point of impact to the most distant hole in our series (the wild hole is not taken into account). We measure its diameter. We compare the results with the standard. If the bullet dispersion diameter is up to 10 cm, then the accuracy is considered excellent, if up to 15 cm, the accuracy is very good, up to 20 cm - good, from 20 to 30 cm - satisfactory.
Determine the penetrating ability of bullets. Naturally, under the target sheet we had a package of dry pine boards. On average, high penetration ability at a distance of 50 meters (for 12 gauge) is considered to be a depth of penetration of bullets into a package of dry pine boards of 20 cm. Considering that when hunting you have to shoot at different distances, a similar check and zeroing must be carried out at distances of 18, 35, 50 and 75 meters.
When zeroing, it is necessary to determine the deviations of the STP from the aiming point for each distance in order to take the correction when shooting at an animal at a specific distance. After all, if you shoot a gun, for example, at 50 meters, and do not make adjustments to aiming at a target at 20 meters, you can shoot too high. It would be a shame if, due to negligence and an error in aiming, you miss a rare and valuable trophy.
In practice, you may encounter 3 options for shooting results.
1. Shooting is accurate, but not accurate. STP lies outside the target. The probability of a hit is negligible, so you will have to make large adjustments when aiming. 2. The STP coincides with the center of the target, but the accuracy of the holes is poor. The probability of hitting the target is bad, but still better than in the first option. 3. STP coincides with the center of the target (aiming point). The accuracy is excellent (good). The probability of hitting the target (with accurate shooting) is high.
It is advisable to have a quick-release sight for a smooth-bore gun with height and windage adjustment and tinker with its zeroing.
Anatoly Azarov February 6, 2015 at 10:58 am
Quality of ammo for sighting
Given that different types of ammunition are used to hunt different game, zeroing a weapon can lead to mixed results when using different cartridges. In this case, you can make the weapon universal, showing good performance at both medium and long distances, or narrowly targeted - tailored for shooting at a certain distance. And such a division is quite logical, because none of the hunters will go after a hare with the same cartridges with which he shoots ducks (a large number of pellets spoil the trophy value of fur).
The quality of the ammunition used when zeroing a weapon is also of great importance. After all, if you use a cheap cartridge in a shooting range, and an expensive one when hunting, then zeroing will not give a good result, because the quality of combat in products from branded companies is usually higher. In addition, cheap ammunition often misfires, increasing the likelihood of injury when reloading the weapon. At the same time, you shouldn’t think that “roll-your-own” guns are not suitable for shooting and hunting. After all, if the cartridge is made of high-quality material in compliance with all technologies and recommended attachments, then it will also perform well in battle.
Also, during zeroing, you will have an excellent opportunity to study the features of your weapon in order to make adjustments in the future to improve its technical characteristics. For example, some guns are designed to fire magnum cartridges, while others prefer ammunition with a reduced amount of gunpowder. So, only through trial and error can you choose the highest quality ammunition that will suit your weapon.
High-quality zeroing of a weapon without optics is a rather complex task that requires taking into account many nuances. However, if you properly understand the theory and also acquire all the necessary equipment, then the hunter will be able to easily customize his carbine or gun for a specific purpose. The most important thing is to remember the safety rules and carry out shooting only in those places that are regulated by law.