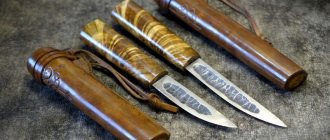
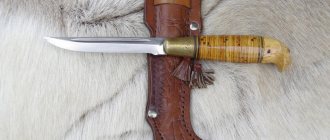
The Finnish puukko knife is a traditional weapon of Suomi hunters with a 10-15 cm blade, a 12.5-13 cm rounded wooden handle and a leather sheath. It exists in several types depending on the area of application: Yleispuukko, Vuolupuukko, Eräpuukko, Vaarinpuukko, etc.
Puukkos also differ depending on where they came from: Vöyri, Jalasjärvi, Kalajokilaakso, Kauhava, etc. But they are all so convenient and reliable that they have been used for decades in everyday life, hunting and as combat knives. Puukko helped the Finns win more than one war and were taken as a model by the Red Army in the manufacture of scout knives. Now they are produced by Roselli, Marttiini, Hackman, Ahti, Lappi, Polar, and cost from 5 thousand rubles. up to 60 thousand rubles
Finnish puukko knife: description
The traditional Finnish puukko knife has the following characteristics:
- universal blade 10-15 cm with a straight spine, without fullers;
- a wooden barrel-shaped handle with a smooth surface, which is smaller in size than the cutting part;
- forged bolster separating the blade from the handle;
- a small back, which can be in the shape of a mushroom, in the shape of a dog’s head, slightly lowered or rounded.
Initially, it was a household and hunting knife, made from steel that was at hand at the blacksmith. But the Finns had to use the weapon in the struggle for independence, first from Sweden, then from Russia, in the war with the USSR. In the Union, other versions of the puukko were created - the bandit finka and the Finnish army knife.
We recommend reading the article about a knife for cutting elk. From it you will learn about the pros and cons of short and long knives for cutting elk and wild boar, how much hunting knives for cutting elk cost and whether it is possible to use a Swedish knife for this. And here is more information about the signs and characteristic features of a scout knife.
Dimensions of a real knife
Traditional dimensions of a real puukko knife:
- blade 10-15 cm long, the most common size is 12-13 cm;
- its width is 2-2.5 cm;
- handle 11.5-13 cm long;
- its width in the most voluminous place is 3-3.2 cm;
- handle top – 1 cm.
The blade has a straight spine; the slopes to the blade should be of the Scandinavian type. For its manufacture, powder, Damascus, and carbon steel are used.
Puukko knife drawing
The barrel-shaped handle is made of wood, usually birch, and impregnated with oil. It is separated from the blade by a forged bolster. The pommel of the handle can be in several versions:
- slightly bent down;
- blunt with metal frame;
- with a convex “ridge”;
- with the outline of a mushroom cap;
- with the image of a dog's head.
The puukko also has a sheath made of leather or birch bark. In the first option, there is a wooden cover that protects the main material from damage.
The best Puukko models
The sheath is quite long, so that a significant part of the handle is hidden in it. They are also dense, narrow, and the knife is held in them due to this quality. The scabbard has a suspension that allows you to attach the weapon to your belt.
Origin and history of the old hunting knife
The oldest puukko hunting knives were made of stone or bronze, that is, they existed from a time when man had no idea about iron. But not all historians agree with this version; some believe that the guns appeared only in the 18th century. More precisely, they stood out from the general mass of household knives. For the first time this happened in the province of South Pohjanmaa. And back in the 10th-12th centuries, tools much like the puukko were used throughout northern Europe.
The name puukko can have two origins - from the word “tree” (puu), or the name of the German knife – pook. The latter were sold in Sweden and Finland by German merchants.
Puukko gained popularity during the years of the beginning of the national liberation movement in the country. Knives had the status of household knives, being excellent hunting and edged weapons. Therefore, the authorities of Sweden and then Russia could not prohibit the Finns from wearing them. During this period, puukkos begin to be made from high-quality steel, with a stacked handle.
Thanks to their versatility, the guns become popular as hunting tools outside of Finland, eventually becoming one of its brands. They were even made for the Russian imperial court. The supplier was master Lisakki Järvenpää.
Shape and materials
At the very beginning, we need to decide what shape the knife will have and what characteristics it will have. An excellent choice in this situation would be to choose the shape of a classic Finnish knife, which has the following characteristics:
- The shape of the handle is oval, smoothly transitioning to the pommel and blade. This seemingly primitive, but centuries-old form of the handle is extremely convenient.
- The blade is narrow, about 20 mm wide, butt thickness is 3-4 mm. The blade drops are close to a full wedge, which greatly simplifies sharpening.
- Knife length – 200 mm, blade length from 70 mm to 100 mm. A classic Finnish knife, as a rule, has exactly this blade length.
So, we have decided on the shape of our future knife. Now let's decide on the necessary materials. We will need birch burls or any other piece of wood, birch bark since part of the handle will be inlaid, a brass sheet and a Puronvarsi blade. If you don’t have a sheet, take any other brass object from which you can cut a square fragment. With the blade, things are more difficult; here a previously purchased ready-made blade from Puronvarsi is used. It is clear that not everyone has it. This or a similar blade can be purchased without much difficulty in an online store, but if this is not possible, then, as a last resort, you can go to the market and buy a metal saw blade, from which you can later cut your blade.
How the puukko was modified into a finca
In fact, the finka is one of the variants of the puukko, but not the Finnish hunting or combat knife itself. It appeared shortly after the revolution in Russia, when the new government banned the carrying of weapons by law-abiding citizens. But the difficult financial situation of the majority of the population led to an increase in crime. And the bandits used finks, which were easy to convert from kitchen and hunting knives. They have longer blades and a small guard. And yet this is not a puukko.
Finnish knife dimensions
What is needed to make a Finnish knife
The most important thing in a knife is good steel. Anyone can choose it: there is plenty of this goodness in stores and markets.
For a Finnish knife, it is better to use P6M5 material. To do this, you need to buy a metal saw in the store. For the handle, it is better to use the following types of wood: birch, maple or beech; it will not be difficult to find them right under your feet.
After selecting the materials, the dimensions of the future knife are determined: the length of the knife is 100 mm, the thickness is two millimeters, and the width is 23 mm. Handle length - 100 mm, width 24 mm, thickness 11 mm.
After determining the dimensions, you need to draw a sketch of the future Finnish knife. It will serve as a template for the blanks. All drawings will need to be cut out and attached to the appropriate materials: the handle to wood, the blade to metal and outlined with a pencil.
How the puukko became the fighting knife of Finnish warriors
Puukko gained new fame after Finland successfully repelled the Soviet attack. The armament of the army of the small state played no small role in this.
Mobile units of Finns attacked the Red Army at night, silently massacred entire enemy combat units, and took away food. With the help of puukko, they could act quickly and quietly, which gave a tactical advantage and instilled fear in the aggressor. Moreover, each Finn had this weapon as his personal weapon, and not as an official army weapon. After all, the majority of warriors were also hunters, accustomed to handling puukkos from adolescence.
Watch the video about how the puukko became the combat knife of Finnish warriors:
Puukko in the Red Army
Some Finnish combat knives became trophies of Soviet soldiers. Scouts began to use them. But without the habit, using traditional enemy weapons was inconvenient and led to injury to the new owner, as the hand slipped onto the blade. Russian soldiers did not know how to hold this knife correctly.
Then the USSR began to develop its own version of the weapon:
- with an S-shaped guard;
- with a longer blade that has a bevel at the tip;
- with an anatomically shaped handle with finger rests.
This is how the HP-40 knife appeared in service with the Red Army.
Knife assembly
Well, now all that remains is to assemble our product. Let's get started.
- We insert the blade with the bolster on it into the handle. We check whether the length of the product matches the intended length. Remove the blade from the handle.
- We place the handle in the teeth and saw off the excess parts of the material, as shown in Fig. 3, giving the handle the shape we need.
Rice. 3. Finish handle preparation
- We put the birch bark rings on the shank, insert the blade with the bolster into the handle and secure it.
- We create a bend on the back of the handle under the pommel. This can be done by eye, but it is better to mark everything out and do it strictly according to the markings.
- We assemble our product and make sure that everything is done smoothly, and the workpiece is ready for gluing. Glue with epoxy glue. After drying, we grind, grind and polish it, that is, we do everything to give the product a finished look.
Rice. 4. Handle pommel
The end result of this work should be something like this:
Rice. 5. Finnish knife puukko by Bwildered
Finnish puukko knife: drawing, how to make it yourself
Before starting the process of making a Finnish puukko knife, make a drawing of a universal blade on paper. If a steel part is made with a length of 95 mm plus 5 mm for the base, then its width is 23 mm.
The descents of the blade begin from the middle of this distance. The shank is made slightly larger than the handle, that is, from 120 mm. It should have notches and a sharp pin at the threaded end. It is also necessary to machine a stop sleeve 3-4 mm thick and a butt plate from brass.
Puukko knife drawing
They make puukkos with their own hands like this:
- The paper blank is attached to a sheet of steel and a blade with a shank is cut out with a grinder.
- On the cutting part, a caliper is used to mark and descents are made, using a grinder or a grindstone for the last step.
- The blade is ground and polished.
- At the next stage, it should be hardened in a forge, the metal should be tempered, the workpiece should be washed from oil, and polished with fine-grained sandpaper.
- A round sleeve is machined from brass, the width of which is equal to the thickness of the handle at the junction.
- A hole is made in the resulting limiter corresponding to the size of the widest part of the shank.
- The back plate is formed from brass.
- A hole is drilled in it according to the thickness of the tip of the shank, which has a thread.
- A block is cut out of wood; its length should be the same as the handle.
- A hole is made in the center for the shank, corresponding to its width.
- A brass stopper sleeve is placed on the shank.
- Glue is poured into the hole of the handle blank, and it is connected to the blade.
- Then the backplate is attached using, among other things, an adhesive composition.
- The structure must be clamped with clamps to dry for 1-2 days.
- The shank pin protruding from the handle blank is covered with a cap nut.
- The wood is turned on a machine to give the handle the desired shape and thickness.
- The wooden part is sanded and polished until smooth.
- Finally, the handle is impregnated with linseed oil or beeswax.
Example of how to make a puukko with your own hands
1 of 5
KnifeHelp / Sheath for Finnish 2
Scabbard by Risto Mikkonen
Report from Sergei Kerogen. Taken from knife.ee
So, let's begin! I heard from a friend that an international meeting of blacksmiths and an exhibition of Finnish knives will be held at Narva Castle, in the Northern Courtyard. After calling Andrei, Ruan received the following link: https://www.narvamuuseum.ee/?lang=rus&next=pressiteated&id=231&menu=menu_kula Forging a metal fence in the Baroque style did not interest us much, but the “training workshop for adults on making finials” for knives under the guidance of the Finnish master Risto Mikkonen” sounded much more interesting. Already on the spot it turned out that “making tips for knives” was sewing sheaths, and not, as we naively believed, forging blades. Well, sheath, so sheath!
Risto Mikkonen Before starting to cut out the future sheath, the craftsman made a wooden insert (the material is presumably alder), the knife went in and out of the insert quite freely.
Next, we place the knife blade into the liner and glue a strip of masking tape from the back to the tip of the liner. We make markings every 1.5-2 cm on the tape. We take a strip of leather of the same thickness as the leather of the sheath and take the size from each mark, transferring it to a sheet of paper. Depending on the thickness of the skin, add 3-4 mm to the resulting size.
We cut out the resulting pattern without any seam allowances. We glue the pattern to the skin with masking tape to prevent it from crawling and outline it.
We cut the workpiece along the contour at an angle of 40 degrees (the photo shows that 40 degrees were not always successful).
We trim the leather at the place where the pendant is attached and at the tip of the sheath.
Stepping back 2 mm from the edge, mark the seam line with a pencil.
Starting from the seam under the suspension, we mark with a wheel.
We carefully watch the actions of the master and try to remember everything. The markings are completed, we proceed to drilling holes. Risto does not use an awl because he believes it may tear the skin at the hole. A cordless Drimmel drill is used. We drill holes at an angle.
Sewing thread - braided fishing line.
We measure 7 times the length of the sheath, cut the thread and wax it carefully.
Next comes a clever trick that helps keep the thread in the needle. 5-6 cm before the end of the thread, pierce the thread in the middle, lift it to the eye and insert the tip of the thread into the eye, you get a mini fishing rod
Dip the skin into water and soak until the bubbles stop.
The skin is quite wet. Let's start sewing. Risto starts sewing from the bottom seam to attach the hanger. Each stitch with a knot, i.e. we pass one needle into the hole and, without tightening the thread, leave a free “loop”, thread the second needle into this hole and insert it into the loop, and the first needle into the loop from the second thread. Tighten the stitch. Next, we make our work easier with the help of a simple device. A blank is clamped in a vice, a sheath secured with an elastic band is put on the blank, and the sheath is sewn stitch by stitch.
We remove the sheath from the blank and finish the seam with the canopy.
We sewed the scabbard. We return to the wooden liner. Rub the outside of the insert with a candle to make it easier to fit into the sheath.
We take a knife, lubricate the blade with gun oil, wrap the knife in cling film, insert it into the insert and place the entire structure in the sheath. When the insert with the knife is completely inserted into the sheath, we begin to form the seam and general contours. The master used a smooth toothbrush handle for molding. The sheath leather is molded and you can start making the suspension loop. The pendant is made of a piece of leather about 11 cm long. We make cuts for attaching to the belt and 3 cuts 31-33 mm long at the bottom to install the ring.
Next, we manipulate the lower part of the suspension, where 3 cuts were made. We bend the workpiece at the place of the cuts in the middle and, using a hook, turn loops No. 1 and 2 clockwise, and No. 3 and 4 counterclockwise. I'll try to draw a diagram (I apologize for my art). Here's a crappy photo of wrapped loops
We leave the loops in the hook, remove the punch and make a hole in the sheath for attaching the ring with the pendant. We open the brass ring in a vice using pliers, insert it into the sheath, thread the pendant into the ring, clamp the ring back and admire the result!
Thus, in 2 hours of work, the master showed one of the ways to sew a Finnish sheath. Typically, Risto spends 1 hour on this type of sheath, and the total time for making the puukko and sheath is about 13 hours.
Comment from Ruan:
completion of the event participant In short, the most important work in sewing a sheath was called preparation, with which I agree. The more thoroughly the preparation is done, the better the result. However, as in many other things. So, additions: “We take a strip of leather of the same thickness as the leather of the sheath and take the size from each mark, transferring it to a sheet of paper. Depending on the thickness of the skin, add 3-4 mm to the resulting size.” In general, as the master himself admitted, the amount of skin shrinkage must be determined for specific skin separately. I took a strip, measured it, wet it, dried it, and measured it again. Based on the difference, you give an allowance, the same 3-4 mm. “We cut out the blank along the contour” It is important, as the master himself said, that the pattern should be as symmetrical as possible. And it’s better to cut with a knife with replaceable blades. Risto suffered for a long time with his warehouseman, but did not say any bad words out loud. “Starting from the seam under the hanger, we mark with a wheel.” Wheel with marking pitch – 4 mm. Another point - if you start sewing from the bottom, it is better to count so that the number of markings coincide, if you sew from the top - it is not necessary. “We drill holes at an angle.” The exit of the hole is three-quarters of the thickness of the skin, counting from the top. I drilled with a dental bur, which has dull teeth on the tip. Yes, a low-power tool is recommended for making holes. “Let’s go back to the wooden liner” - here’s a little more detail. Inserts come in different shapes. If the insert has the shape as in the pictures, it can be sent to the finished sheath. If the middle of the liner is widened, then you need to install it in a half-finished sheath and sew further. “The sheath leather is molded” - again, it is better to carry out molding on semi-dry leather, and repeat it several times while drying the sheath. Ideally, the surface should be molded as often as possible. The drying time for the sheath is a day or a day and a half, depending on the conditions. Natural drying, without heating, was recommended. Judging by the last photo, it’s not clear why a hollow rivet was not installed in the hole, but it turned out so beautifully. By the way, a very powerful ring was used for the suspension. While Risto was trying to close it, he almost knocked over the table
The best models from well-known manufacturers and related options
Puukko knives are produced by Ahti, Lappi, Polar from Finland. These are affordable products with carbon steel blades, wooden handles, traditional appearance and good quality. They can be bought for 5-7 thousand rubles. Puukko from Roselli and Marttiini are considered to be of higher quality and more prestigious. They are not difficult to find in Russia.
The most valuable are the guns from Fiskars and Hackman. They are found on sale much less frequently and are expensive - up to 20 thousand rubles.
1 of 2
puukko from Roselli
puukko from Marttiini
Those interested in puukko usually do not ignore the leuku, a larger Scandinavian hunting knife. This type of implement can be found from Martini and Roselli.
Finnish Roselli
Finnish puukko Roselli knives are known to weapon lovers all over the world, as they differ in:
- High quality steel. For blades, use carbon Krupp W75, high carbon UHC, Roselli Wootz or Damascus. They are sharpened by hand, and the blade can not only cut paper, but also shave.
- Comfortable handles made of Karelian birch. They are well polished, impregnated with linseed oil, and heat treated. Thanks to this, the knife fits well in the hand, does not slip, and does not get cold. And the handle remains durable, despite the active use of the product in any conditions. The butt plate is usually rounded, that is, the gun can be held with a “Finnish grip” with the emphasis on the palm.
- Sheath made of durable leather. Inside there is a plastic cover that prevents the blade from damaging the base material. A convenient suspension makes carrying the gun hassle-free.
Watch the video about Finnish knives from Roselli:
The length of the puukko blade from Roselli is 85-102 mm, the handle is 110-125 mm. These knives are well balanced, which also makes them easier to use. You can buy a gun for 6-11 thousand rubles, there are copies priced at 60 thousand rubles.
Puukko and leukko
Finnish knives puukko and leukko are not exactly the same thing, although the latter is called by some a variant of puukko. And yet leuku has its own characteristics:
- Larger size. The length of its blade is 13-21 cm, width – 3.5 cm. The handle of the weapon is significantly shorter than the cutting component.
- A different blade shape. Leukko also has a straight spine and a raised blade line. But, unlike the puukko, the blade expands slightly in the area between the base and the tip, more precisely in the place where the sharp edge changes direction.
leuku puukko
Leuku are produced by the same companies as the famous puukko models, although they originate from Lapland.
Sewing a sheath is one of the main stages of creating a finca
Making Finnish knives is a labor-intensive and very complex process. Some craftsmen believe that the most important task is sewing the sheath. To make a good sheath, you need to spend a lot of time, unlike making the sheath itself. The whole secret lies in a special technology that must be followed without fail. If you do not fulfill at least one condition developed by the Finns, the case will be damaged and can be thrown away. The sheath is made exclusively from wet leather, it fits the insert well and is stitched. The Finns take a more responsible approach to making sheaths than to the knife itself.
Particularly popular are the sheaths made of dark red leather with a curved tip. Such a scabbard is called a “bishop’s hat” (in honor of one of the prelates of the Catholic Church, who was killed by a simple peasant for ruining his entire farm).