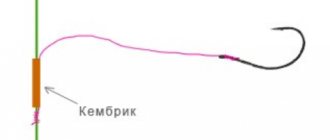
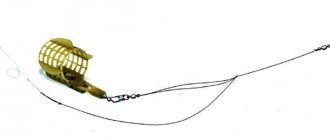
The swivel is the main element of any fishing equipment, and it plays an important role in it. Therefore, every fisherman must understand how to tie a swivel to a fishing line and with what kind of knot this can be done, so that there are no troubles later. There are a lot of ways to tie swivels, but you don’t need to know everything.
Among the many ways to tie a swivel to the main line, there are a lot of complex, weak and unreliable knots. Of course, few people are interested in such nodes, so we will not talk about them in our article. We have left only the correct, reliable and simplest options.
Basic methods
The most popular methods of how to properly tie a swivel to a fishing line are about 10 knots, but we will not consider all of them, but only the simplest part. We will only describe complex nodes a little, and then devote a separate article to them. And so, the simplest methods are considered to be the following:
- Fastening with a palomar knot
. The knot is considered one of the most common due to its simplicity and versatility - it is suitable for fishing line and braid. It is tied quite simply, quickly and securely. - Clinch knot
. A very useful and good node, to which we have already devoted an entire article. Using it to tie a swivel to a fishing line is quite simple and secure. - Fastening using a greenner knot
. A strong and secure knot that is suitable for tying fishing line to fishing line, hooks and swivels. - Figure eight knot
. Quite strong and at the same time simple knot. Allows you to use a variety of materials, from regular fishing line to braided cord. - Tying with double knots
. Knots fail very rarely; many people know this from personal practice. But, for unknown reasons, they were not widely used. - Method of fastening with a hangman's knot
. One of the oldest knots, which is easy to tie, but at the same time it is quite reliable. It was used by English fishermen as early as the 17th century for sea fishing - Jensik knot
. The knot came to us from abroad quite recently, but has become widespread among domestic fishermen. The simplicity and strength of the knot can be the envy of many.
Quite an interesting way to tie a swivel to a fishing line, isn't it? Now let's take a closer look at the best way to tie a swivel to fishing line, braid and fluorocarbon fishing line. So that everyone can choose for themselves which knot to tie the swivel to the fishing line.
How to tie a swivel to fluorocarbon line
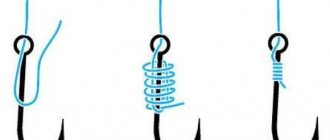
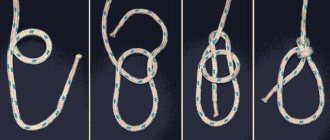
Fluorocarbon has greater rigidity than braid or monofilament. Therefore, the method of tying a swivel to a fluorocarbon fishing line differs from those described above. Many experienced fishermen use the Rapala knot. It was originally designed for attaching wobblers, but has been used successfully with flukes. It's done like this:
- We retreat about 15 cm from the free end of the fishing line and make a simple single knot, but do not tighten it completely.
- The end of the fishing line is threaded through the eye of the swivel, and then into the loop of the single knot.
- We make 5-7 turns around the fishing line and again insert its end into the loop of a single knot.
- All that remains is to insert the free end of the fluor into the resulting loop, moisten the fishing line and smoothly tighten the knot.
Cut off the excess line. That's it, the fluorocarbon line is tied to the swivel. This knot has a strength of about 98%, so it does not reduce the overall strength of the equipment, which is important especially in light spinning rods and ultralights.
To the fishing line
First of all, I want to consider installation options with regular fishing line (which is the most popular among fishermen). Fishermen identify two main units for such needs. We have already described the first node above, and it is called Grinner. They can be used to tie not only fishing line
.
Technique for tying a swivel to a fishing line using a Grinner knot
happens as follows:
- Pass the end of the line through the eye of the swivel and pull the edge about 15 centimeters;
- Now you need to lay the free end over the fishing line to make a loop;
- Now take the working end and wrap it around the fishing line about 5-7 times and insert it into the first loop;
- You will get another loop, so you need to stretch the free end of the fishing line into it;
- Wet the line with water and tighten the knot;
Do not cut off the entire line, leave a free end about 1.5 millimeters long
so that the knot does not come undone.
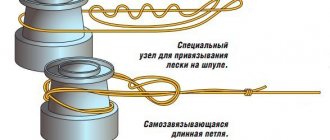
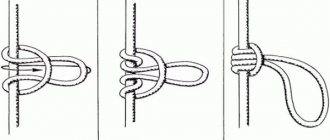
Also, domestic fishermen quite often use the Homer knot
, if a connection with a regular fishing line is required. Its load capacity and strength are not inferior to those described above. Let's look at the diagram and step-by-step installation instructions:
- We take the main fishing line and pull it through the swivel ring, leaving about 15 centimeters free;
- We wrap the remaining end around the main fishing line to form a loop (see picture);
- Now take the end of the fishing line and pull it through the resulting loop;
- Now you need to take the fishing line itself and wrap it around its axis 4-6 times;
- Thread the end of the fishing line into the resulting loop;
- Moisten and tighten the knot.
When you tighten the knot, be sure to pull on two lines at the same time. Try to move the knot as close to the eye of the swivel as possible.
These were the two most common, durable and simple mounting options for regular fishing line. Now, I think it's time to move on to something else. Namely, consider how to tie a swivel to a braided fishing line. Let's get started.
To monofilament line
Grinner knot
Grinner is most often used for monofilament fishing line. It has a good strength indicator: 85% . This fastening method is simple to implement, yet lasts a long time and has good load-carrying capacity. In addition to the swivel, this method can be used to correctly knit hooks and carp sinkers.
How to tie a Grinner
- The tip of the thread must be threaded into the ring of the swivel. In this case, the length must be at least 18 cm.
- The other tip needs to be folded in half to form a loop.
- The area where the two tips intersect must be grasped with two fingers and wrapped with at least six turns of fishing line.
- You need to thread the other end of the fishing line into the larger loop and carefully tighten the knot, after wetting the fishing line with water. When pulling, the knot should be pushed towards the swivel loop by the main loop.
- Trim the excess line at the tip by 2 mm.
Homer node
This knot is extremely popular among fishermen due to its reliability. The strength of this unit is as much as 98%.
How to tie a homer
- Measure the fishing line 15 cm long.
- Pull the tip of the fishing line into the eye of the swivel.
- Wrap the free end of the fishing line twice around the main fishing line and thread it into the resulting loop.
- Do not tighten the resulting knot, holding it with your hand, wrap the other end of the fishing line around the main fishing line 6-8 times.
- Pull the other end of the fishing line into this loose loop.
- After wetting both the main and working lines, tighten them simultaneously.
- Push the resulting knot towards the swivel ring so that it rests against the eye of the clasp.
- Trim the excess line, backing off a couple of mm.
To the braid
There are several ways to tie a swivel to braid. But the simplest and most reliable knot is called Palomar
.
It can also be used to tie a regular fishing line
, but it still shows its qualities better on a braided cord. The execution sequence of the node is as follows:
- Take the free end of the main fishing line, about 10 centimeters long, and fold it in half;
- Now pull the double loop into the eye of the carabiner (as in the diagram);
- Tie a regular knot, but do not tighten it;
- Place the swivel at the bottom of the large eyelet;
- Now put a small one on top of it (see the diagram so as not to get confused);
- Pull the swivel through the large loop;
- That's it, all that remains is to tighten the knot.
Also an excellent knot for such purposes is the reinforced Clinch knot
. But it has a significant drawback - it is not suitable for tying on thick fishing line and is used only on medium-diameter ears made of thin wire. The node execution sequence is as follows:
- The end of the fishing line must be threaded through the eye and pulled back by about 15 centimeters;
- Fold the fishing line in half;
- Wind the free end around the main line 5-10 times;
- Now pull it through the formed loop;
- And again pull the free end into the large loop obtained as a result of the action in step 4;
- Wet the knot and tighten it.
It is very important when tightening to ensure that the free end does not fall out of the main loop.
How to tie a swivel to braid
The main knot used to attach a swivel to a braided cord is the Palomar. It is performed as follows:
- The braided line folds in half. The length of the double section is about 10–15 cm.
- The double end of the cord is threaded halfway through the loop of the swivel.
- We make a simple single knot, but do not tighten it. As a result, the swivel is freely located on the cord.
- The swivel is threaded into the resulting loop.
- The knot can now be tightened.
The resulting free end of the braid is cut off. All. The Palomar node is ready. This versatile option works for cord, nylon and fluorocarbon. It is very simple, reliable, suitable for any beginner.
You can also tie the swivel to the fishing line using the Clinch knot. Some anglers consider it more reliable than the Palomar. It is somewhat more complicated, but with some skill it can be done quite quickly. Its knitting pattern looks like this:
- We thread the free end of the braided thread into the eye of the swivel.
- Take the swivel in your hand and rotate it about 6-10 times.
- We thread the free end of the cord into the loop formed near the eye of the swivel.
- All that remains is to wet the line and smoothly tighten the knot.
To increase the strength of the equipment, you can tie the fishing line to the swivel using the Double Clinch knot, initially folding the cord in half.
To fluorocarbon line
a Rapala knot is used to mount a swivel on a fluorocarbon line.
. It is considered one of the most reliable units for this type of task. If you look closely at the knitting process, you can see its similarity with the knots mentioned above. But, besides this, the Rapala knot is very often used when tying spinners and wobblers.
Knot technique:
- You need to tie an ordinary knot on the fishing line;
- Then pull the line through the eye of the swivel and thread the free end into the knot tied earlier;
- Wind the free end around the main line 4-6 times;
- Pass the free end of the line through the loop;
- Pull the fishing line through the loop obtained in step 5;
- Moisten and tighten the knot.
Best knot for attaching to fluorocarbon line
For fluorocarbon monofilament, it is quite acceptable to use the same types of knots that were used when installing a swivel on a monofilament line. However, it is better to pay attention to the fastening method that is optimally suited for this particular material.
"Rapala"
The Rapala knot was created specifically for fishing with light balsa wobblers and goes well with material such as fluorocarbon. It is knitted according to the following pattern:
- A simple knot is formed 5 cm from the end of the fishing line, which does not need to be tightened completely.
- The free end of the monofilament is inserted into the knot formed, which is then wrapped around the main line 5–7 times.
- The tip of the line is passed through a simple knot and loop formed by the previously made turns.
- Before tightening the assembly, the assembly is wetted.
- The remaining tip is cut off.
Knitting pattern for the Rapala knot.
A wobbler secured in this way to a fluorocarbon fishing line is distinguished by the most realistic play, which is due to the free connection. The same type of knot is successfully used when fishing for live bait, since it does not restrict the movement of the fish on the hook.
Without node
When spinning fishing, a knotless connection is very often used. The main purpose of which is to eliminate weak points in the equipment, because as you know, most often the fishing line breaks at the knots. Let's take a closer look at how to tie a swivel to a fishing line without a knot.
The advantages of such a connection are numerous. This includes the absence of destruction of the fiber structure and minimization of line deformation. It also makes it possible to quickly replace the bait in poor lighting or weather conditions.
The main and most important element of such gear is the clasp. A swivel or a metal leash is attached to it, or all together (depending on your personal preferences and the characteristics of catching the selected type of fish). As personal experience shows, it is not at all necessary to use a swivel, since the tackle rarely gets twisted. Only this type of installation can only be used in combination with braiding
.
If you are interested in how to tie a swivel to a fishing line using a knotless connection, then I suggest moving on to the step-by-step instructions:
- on the side of the longitudinal bend, a connecting element (spinner, wobbler, leash) is strung;
- the fishing line is folded in half, forming a loop 3 cm long;
- the tip of the loop is put on the bend;
- the fastener rod is wrapped 4-5 times in the direction of the bent transverse bend;
- by pulling both branches, the fishing line is inserted under the bend into the fastener loop.
Video
This method of tying a swivel can compete for a place among the best. Easy to remember, easy to perform - in general, everything we need. Although, the first time, this method of tying a swivel may not seem very convenient, but after a while you will adapt, and all difficulties will be forgotten. Let's take a look and practice.
https://youtu.be/_4kGbgPHVoE
Knots “Clinch”, “Diamond”, “Eight”
In this video you will see three cool ways to tie a swivel to a fishing line. Thanks to this knowledge, you will provide yourself with reliable fishing knots for all occasions. These nodes and the first method will be quite enough for you. Don't bother with too many options.
All the same, in the end you will choose for yourself one that seems most convenient to you and you will almost always use only it. And of course, these knots can be used to tie not only a swivel, but also other elements of fishing gear, such as a hook, feeder, etc.
How to tie to braided fishing line
The requirements for connecting braided lines with a swivel are much more flexible than for monofilament and connecting with fluorocarbon. The physical parameters of the braid are less rigid, therefore, the material is less susceptible to friction forces, fracture and loss of load-bearing capacity in places where it is pinched. Based on these conclusions, it is possible to tie these types of warps with swivels that are technically simple knots.
Palomar Knot
The main requirement of knitting is only to ensure high reliability of the knot being connected and a small volume of the final twist. For thicker braid diameters, a knot familiar to every angler, the well-known Palomar, . This technically simple, but reliable method of knitting tightly tightens the connected elements, reducing the movement of the cord along the swivel ring to a tiny fraction. Thus, the knitting provides the dynamics of movement only to the design of the accessory itself, adding even more sensitivity to the fence. Based on this conclusion, the described tying method is best used for spinning fishing with rotating spoons. After all, high control of the retrieve is a priority for the spinning player.
Knot Clinch Reinforced
The second fastening method, using a strong Clinch Reinforced , is recommended for tying elements with thin bases made of braided cord. This knot has a less strong tightening structure and leaves the swivel the opportunity to move relative to the braid along the arc of its ring. Such requirements are less important when installing with feeders, float schemes and rigs with live bait.
The ability to tie the swivel to the main fishing line made of braided materials with just such knots will ensure complete safety of the equipment and high functional qualities of its components.
What you need to know
- It is better not to use a swivel that has a rough eye, as it can be sharp for the fishing line and fray it;
- before tightening the fishing line, you should always wet it so that the knot lasts longer and is stronger;
- a novice fisherman who is just learning to tie knots should try making them on a textile cord;
- the more turns the knot has, the stronger it will be, so you need to try to make a lot of turns;
- when you tighten the knot, you don’t need to rush, because too fast and sharp jerks make the knot much weaker;
- It is very convenient to cut off the excess fishing line from the knot using nail clippers;
- if the fisherman has doubts about the strength of the tie, then it needs to be bandaged; a reliable knot will not have gaps or distorted areas of the line;
- It is advisable to practice a lot so that at the right moment the fisherman can easily tie the knot he needs.
These were the most popular and effective knots that will help you understand how to tie a swivel to a fishing line. By following the recommendations, the fisherman will be able to tie the tackle correctly so that it does not fail him at the most inopportune moment.
Types of binding
It would be useful for every fisherman to have in his arsenal several ways of tying a swivel for a particular gear.
When should you use this type of mating like palomar?
This method is most used for monofilament fishing line and braided line. How to tie a swivel to a fishing line in this way?
- an indentation is made 50 cm from the end of the thread and bent;
- the thread is threaded through the swivel, and it should be at a bend of 50 cm;
- then a simple knot is made, but with a double line and is not tightened to the end, forming a loop lower to the swivel, and the edge and the main part of the thread should remain above;
- the swivel passes into the loop from the side of the bent line and is tightened.
This type of unit is designed for heavy loads and is designed for catches of overall dimensions. Suitable for all types of thread.
The figure eight is one of the simplest knots
It is considered a universal knot; its great advantage is the fact that the fishing line does not break during its formation. To get an eight you need:
- fold the fishing line in half at a distance of 20 cm;
- thread the swivel;
- lay the fishing line on top of each other in the form of a figure eight;
- do not forget to moisten;
- tighten.
Recommended reading: How to choose the right line for pike fishing
Wetting is important with any knot tying, but for the figure eight it is necessary because the knot will not tighten properly.
Rapala for loops that don't require tightening
Anglers mainly use this type of knot for wobblers or spoons. It allows the tackle to move freely. To get it you need:
- tie an ordinary knot that is not fully tightened on the thread;
- pull one end of the thread into the hole of the swivel into the original non-tightening knot;
- wrap the first end around the main thread 5 times;
- for a loop to appear, you need to thread the first end of the thread into the knot;
- then unfold the same tip of the thread into a new loop that appears from above;
- moisten with water and tighten;
- cut off excess.
As a result, the swivel should run along the line in a loop, and the loop itself should be securely tightened.
Grinner for any threads and fishing lines
This type of fastening can be applied to anything, and it is designed for heavy loads, thanks to a special knitting method:
- pull the end of the thread into the hole of the swivel at a distance of no more than 15 cm;
- the rest of the thread must be placed on the main thread to form a loop;
- holding the top loop, wrap the edge of the thread 3-4 times around the main one;
- pull it through the loop at the top again;
- wet and tighten.
This type of binding is the most common because it is simple and can be used on any gear.
Homer for monofilament lines
An unusual and strong enough knot for its purpose, it holds in 90% of cases. To begin with:
- pull the thread into the swivel hole;
- then turn part of the thread, which should be about 20 cm, once around the main thread and tighten it into the loop below;
- a knot that has turned out cannot be tightened;
- wrap the edge of the thread 6 times around the main part;
- pass the edge into the top loop, which is above the knot;
- wet and tighten.
Such a knot is similar to a grinder, but here, in the end, there will be a loop between the knot and the swivel, just as an angler uses monofilament fishing line.
Clinch and its features
This fastening method is only suitable for monofilament types of fishing line with a diameter of 0.4 mm, but no more. For this node you need to do the following:
- the end is inserted through the ear at a distance of 15–20 cm;
- the thread bends after threading and is pinched with your fingers;
- 7 turns are made and the edge of the thread passes through this loop, and then through the first;
- after 2 threadings through 2 loops, a third pass occurs where winding occurred 7 times;
- The edge of the thread is passed between them (turns) and tightened, after wetting it.
We recommend reading: Detailed information on the use and independent production of amphipods for pike perch
This is a very complex type of knitting, but it is considered the most reliable application for this thread.