Fishing is the most popular type of outdoor recreation. In order not to return home without a catch, you should know many important subtleties and nuances. First of all, you need to learn how to properly tie the fishing line not only to the hook, but also to the reel. The tensile strength of the fishing line, and therefore the catch, depends on this.
Each fisherman has his own proven methods for tying fishing line. However, there are several basic methods that every angler should know.
How to attach the fishing line?
In order to secure the fishing line on the reel, first of all you need to prepare everything that is necessary for this, namely:
- A reel.
- Fishing line.
- Nippers or scissors.
Various knots are used to attach the fishing line to the reel, but the following rules are important for each of them:
- When tying a fishing line using any of the known methods, it is very important to ensure that the knot does not interfere with the free twisting and unwinding of the fishing line.
- Also, the knot must be quite strong so that during a long cast it does not come undone, because this threatens not only the loss of the catch, but also all the gear tied to the fishing line.
- The line should be attached at the very bottom of the spool. Thanks to this, the knot will not rub against moving parts of the fishing line.
- To establish a stronger connection, you can make two consecutive nodes. However, you should make sure that such a connection does not interfere with unwinding and winding the fishing line onto the reel.
How to wind fishing line or cord onto a reel
So, we have chosen one of the types of laying, configured the spool as needed, and now all that remains is to wind it correctly. And before we get down to business, I would like to note some fundamentally important points: the winding should be tight, without sagging, bumps and depressions. Otherwise, the “beard” cannot be avoided, and with it, as you know, fishing turns from relaxation into torture. And if the wicker is also expensive, then it’s no time for jokes.
Backing. What is it and what is it for?
It's time to say a few words about backing. For a longer cast, it is necessary that the cord be wound almost under the very edge of the spool. It is enough to leave a distance of 1 - 1.5 mm so that there are no discharges. As a winding, they usually use old braid or fishing line similar in diameter to the main one. If you don't have them, you can buy them in the cheapest price range. In the end, you can't fish on backing, so quality plays the most important role here.
They also say that they use electrical tape. However, I am skeptical about this alternative for one simple reason: I have seen what happens to such materials in the heat. But sewing thread, on the contrary, is a very interesting option and is recognized among many fishermen. Well, let's finally get to the point?
So, let's go in order. What we need to wind the cord onto a reel:
The reel itself and the main braid or line; Spare spool (there is one); Volume “War and Peace” (no matter which one); Backing (winding: sewing thread, fishing line, cord); A comrade or a basin, but a comrade is still better; Patience.
If all of the above is available, then you can proceed.
However, first of all, I would like to pay attention to the following point - how to tie the fishing line to the reel. It just so happens that without this fastening nothing good will definitely happen.
In expensive reels, some manufacturers have a special recess on the working surface of the spool, where you can easily hook the cord and continue winding. But this is the exception rather than the rule, because most models do not have this option, so you will have to tie it the old fashioned way. Yes, so that the braid does not slip, but holds relatively tightly. Perhaps this is the only requirement for the node.
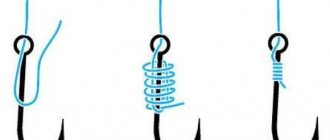
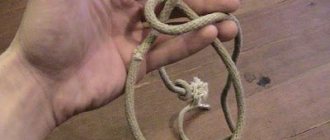
Look at the photo, there is a diagram here. Everything should be clear, and most importantly, reliable. I prefer the top knot, it just so happens.
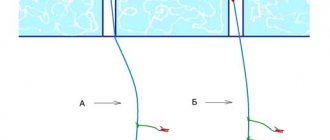
Let's assume that we have tied the main line to the spool. Next, we take out “War and Peace” (or any other thick book), open it somewhere in the middle and put fishing line between the pages. We safely close the reading and move on to the next stage. By the way, the book is needed so that the fishing line or cord is wound under uniform tension. You can also press the whip against the rod with your finger, just be sure to wet the cloth so as not to damage the skin.
If you have a friend next to you, you can ask him to hold the reel, exactly opposite the reel, in the same plane as the direction of the fishing line (mirror it). This way we can avoid excessive curling, which can later turn into a “beard”. The cord will simply twist to a critical value and a fiasco will inevitably happen, a matter of time.
But if there is no friend, some kind of container, basin or deep cup will do. Just put the bobbin there and it will not jump out, preventing you from doing normal winding. It’s not as convenient, of course, as with the help of a friend, but you can manage!
So, now everything is ready to begin the actual winding. The line (or lash) is under tension, the reel is also fixed, we begin to twist the reel. As soon as the main line runs out, you need to tie the backing to it and reel it in until there is 1 - 2 mm left to the edge of the spool. If everything turns out smoothly and you are satisfied with the type of installation, we rewind the result back to the spare spool. However, it is advisable to hide all the knots at the very edges so that they do not protrude anywhere, I mean the connection of the backing with the main winding. After all, we do it “to the finish”.
If there is no spare spool, you will have to tinker longer. And the principle itself changes a little. We also tie the main fishing line or cord to the spool, wind it to the end (until it runs out), and finish off the remaining capacity of the reel with backing. Next, we wind the backing separately onto one reel, fishing line or cord onto another. And only after this we re-attach the winding to the spool, and carefully tie the main line to it. Using this scheme, we will accurately determine the required amount of backing the first time and our winding will be to the very edge of the spool.
Read How to make a catfish snack with your own hands
How much line should you reel in?
Don't put too much line on the reel. The principle “the more the better” does not apply here.
The ideal situation is when the fishing line fills the entire spool, forming a slightly convex or concave cylinder, the diameter of which is 3 mm less than the diameter of the spool side.
Excess fishing line, when tangled, can create unnecessary obstacles during fishing (dropping rings, beards). Otherwise, when there is not enough fishing line, when unwinding, friction occurs on the side of the spool and the line wears out faster.
What types of knots and loops are the most popular?
Fishing experts identify three main units, which are sufficient to securely attach the fishing line to the reel.
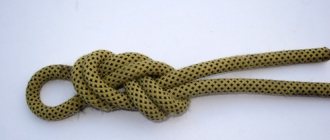
Arbor Knot
The Arbor Knot is ideal for attaching line to the reel spool. In order for the scaffold to hold tightly, the knitting sequence must be strictly followed:
- Turn the line around the reel.
- Create a knotted loop around the main end.
- Make a regular knot at the free end of the fishing line.
- Tighten the knot.
This type of connection is strong and reliable. It has many positive characteristics and advantages over other types. Unfortunately, the Arbor Knot is not suitable for all types of fishing line. When tying braid to a reel, you should abandon it and choose a different type of knot connection.
Self-tightening loop
Self-tightening knots are quite popular among fishing enthusiasts. They are easy to knit and also simply tighten when tensioned, which ensures the most durable connection between the line and the reel.
To make a fastening based on a self-tightening loop you need:
- Make a full turn of the line around the spool.
- Make a loop at the free end of the fishing line.
- Wrap the free end around the main line and the base of the loop several times.
- Insert the free end into the top of the loop.
- Moisten the knot with water and tighten.
- The resulting excess pieces of fishing line should be cut off with scissors.
This connection is suitable for any type of fishing line and is considered the most durable, since it cannot come undone on its own. The only negative is that the self-tightening loop is very difficult to untie, so usually the knot is cut off with scissors.
Silk knot
A snare knot or “self-tightening figure eight” is also suitable for attaching line to the reel spool. The technique for tying this knot is very simple:
- Wrap the line around the spool.
- Loop the free end around the main end.
- Wrap a loop around both ends.
- Pull the free end through the first loop.
- Slowly tighten the knot.
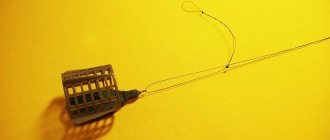
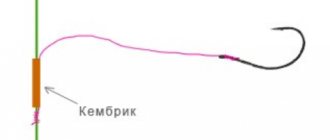
Attaching the braid to the reel spool
When connecting braided fishing line to reel spools, it is necessary to take into account the peculiarity of the braided line, namely the presence of slipping, as a result of which the cord may jump out.
An elementary type of fastening is the following option:
- The line should wrap around the spool.
- The running part of the fishing line is bent around its solid part.
- The section of fishing line going to the bending point of the spool
is superimposed with the 7th reverse layer of the fishing line limb. - It must be taken into account that most of the braid is inside the loop.
- Next, the main part of the fishing line should be threaded through a loop
, taking into account the coverage of most of the fishing line and tightened tightly.
Arbor knot method
- First, you need to wrap the line around the reel.
A section is left for tying a knot. - After this, by wrapping the line going to the reel
, you need to form a knot at the running end of the braid. This ensures that the nodal part of the line slides towards the reel. - An additional knot is made on the free part of the braid
, which will serve as a stopper. Through it, the first node will be securely attached. - When tightening the knots using wetting
, the remnants of the running and main ends must be cut off in order to prevent tangling during winding.
Read Making bottom tackle for crucian carp and mastering fishing techniques
This method provides a powerful hold and self-tightening function.
Adhesive plate in fishing
Spinning reels usually come with a special adhesive plate that can be used to provide additional strength to the connection between the line and the spool. This is necessary so that if the line is completely unwinded, the loop does not slip during winding back.
It is very easy to secure the knot with an adhesive plate. Just stick it on top of the knot. Instead of an adhesive sheet, you can use a regular patch.
Now you have discovered some secrets and subtleties of fishing skills that will help you protect yourself from returning home empty-handed.
(Visited 11 times, 1 visits today)
How to strengthen a knot
To avoid the possibility of the loop slipping during reverse winding in the event of complete unwinding of the fishing line, it is necessary to use a special device. Especially for these purposes, fishing stores sell adhesive plates, the use of which does not cause difficulties. It is enough to glue the plate on top of the manufactured unit. An analogue of the device can be a patch.
We recommend reading: The main advantages of plug rods and a review of the most popular models
In some cases there is no need to tie a fishing line. Instead, the line is secured to the stopper and reeled in. This is possible if the reel by default has a clip or stopper that serves to attach the fishing line. In addition, you can avoid attaching the fishing line to the base of the reel by winding a large amount of fishing line.