It is important to understand that whether the leash will get tangled or not is influenced by a whole range of factors: the length of the leash, the thickness of the leash line, the type of knot. It is clear that the shorter the leash, the less tangling and tangling. But less does not mean no at all. And we need to eradicate this phenomenon in our equipment.
Published Mon, 03/06/2019 — 03:00
It is important to understand that whether the leash will get tangled or not is influenced by a whole range of factors: the length of the leash, the thickness of the leash line, the type of knot. It is clear that the shorter the leash, the less tangling and tangling. But less does not mean no at all. And we need to eradicate this phenomenon in our equipment.
The thickness of the fishing line affects quite significantly. The thicker the line from which the leash is made, the stiffer it is, which means that it has much less traction to twist and wrap around the main line.
So, you don’t always have to give preference to the thinnest fishing lines. If you need a side leash, then you should look for a balance between the thickness of the line and the secrecy of the gear.
And now we come to the most interesting part. How to tie a side leash so that it does not get tangled or twisted on the main fishing line. The simplest method is to use a cambric.
The type of knot with which the leash is tied is not particularly important. It is important that the leash is passed through a piece of thin, transparent, or, on the contrary, bright cambric, placed on the main line above the knot.
This is not a panacea, but it does reduce confusion to some extent. Especially if the leash is not long and is made of not the thinnest and softest fishing line - it works fine!
Another way to make tangle-free leaders is to double tie them using main line (or insert line). This method is often used when installing winter equipment, tyrants and garlands. The thinnest winter fishing lines are used here. And, therefore, whether it is double or single does not matter much. But we can tie tangle-free leashes.
To do this, a hook is put on the fishing line. It is grabbed by the ring in the right place with a double knot. The main line is grabbed from the sides of the hook. It turns out double. And another double or triple regular knot is tied on it, a leash is formed from a double fishing line of one length or another.
Good method. But, it is only appropriate with winter gear, or very delicate gear in the summer.
When a more powerful line is used (than, for example, 0.12-0.15mm), then this method loses its relevance, the tackle becomes rough.
The most correct, in my opinion, way to tie a leash and avoid twisting is to use a special knot.
On the main line we form a regular single knot. We pass the end of the leash into it. We make a loop and wind 5-7 turns with the end of the leash around the main line, grabbing the leash as well. And we pass the end into the loop formed when the leash is bent. Tighten the knot. We cut off the excess end. It turns out to be a side leash that extends from the main line with an upward and sideways slope, which significantly prevents tangling.
Of course, the thicker and stiffer the leash line, the less likely it is to get tangled with this method. If we are talking specifically about installing a lead leash or spinning equipment for fishing with silicone, then I use one installation method that practically eliminates tangling.
A separate leash for the sinker is made. For this purpose, a piece of fairly thick fluorocarbon is taken. I usually use fluor in the range of 0.22-0.35mm for these purposes. I tie a sinker at one end and a swivel at the other.
I put the ring of this swivel on the main line of the spinning rod. Then, a small bead to secure the knot. And I tie another swivel to the end of the main line. And already I tie a leash to the second ring of this swivel. All connections are made using the Grinner node. With this method of installing the diverter leash, it is possible to completely eliminate the effect of twisting and overlapping of the leash.
Next, pass the free end into the half-loop.
An additional side leash is used to attach an additional hook or an additional jig to the main fishing line. Accordingly, there can be several hooks and jigs, and then in many regions such tackle with hooks is called a “garland”, and tackle with several jigs is called a “locomotive”.
This article discusses the question of how to tie a leash (retractable) to the main fishing line so that it does not hang, but has a certain elasticity and an additional hook with an attachment or an additional jig, it can be either reelless or not, do not hang parallel and too close to the main line and thus do not get confused with it when fishing and fishing.
For clarity, we will consider the knot for tying this leash using the example of ropes of two colors. Green color is the main line. Red – additional leash.
On the main line we make one turn of the loop.
We insert the end of the leash into the loop, which we will tie to the main fishing line.
Next, with this end we form a half-loop parallel to the main fishing line. The most important thing is that the half-loop should be at the bottom of the rig, that is, facing the lower jig or sinker.
Next, with the free end we make several turns around the half-loop and the main line. The number of turns that need to be made depends on the diameter of the fishing line used. Usually my ratio is this: line diameter 0.08 mm - 8 turns, 0.1 mm - 7 turns, 0.12 - 6 turns, then when the diameter increases less than 5 turns I don’t do it.
Next, pass the free end into the half-loop.
As you can see, in the knot the line to which the hook or jig will be attached comes out of the knot almost parallel to the main one and is directed almost upward to the fishing rod.
This position of the fishing line in the knot gives the tied leash additional elasticity and, depending on the diameter of the fishing line, with diameters from 0.12-0.14 mm, the leash with the hook is located almost perpendicular to the main one.
Of course, we are talking here about reasonable lengths. And long leashes will only worsen the performance of the tackle and will get tangled, since the weight of the nozzle or bait can be added to the weight of the hook or jig.
All that remains is to tie a hook of the size you need or a jig to the end of the leash. True, I always do the opposite, first I prepare several leashes with attached hooks or jigs, and then weave them into the main fishing line. This makes it easier to control the length of the resulting leash.
ANSWER: It is knitted as follows:
Auxiliary units for outlet and side leash
Knot for a temporary loop used to attach a diverter leash
QUESTION: how to tie a lead leash to the main line?
ANSWER: It is knitted as follows:
If the need arises to replace or completely remove the leash, carefully cut off the restrictive assembly and remove it. The temporary loop knot is untied by pulling the main line near it in different directions.
Knot forming a permanent loop for tying a side leash
QUESTION: How to tie a side leash to the main line?
ANSWER: Let's consider the scheme for tying the side leash to the main fishing line:
Unlike the previous one, such a loop can no longer be removed from the fishing line. The leash is attached to it using a “Loop to Loop” knot connection.
By the way, installation is not the only important point for successful fishing. It is also important to know the basic principles of fly fishing.
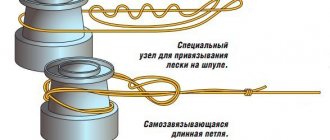
How to tie a lead leash to the main line
As practice shows, very often it is necessary to tie leashes not in continuation of the main fishing line, but directly to its body. Thus, there can be more than one hooks or jigs
In order for the additional leash to have the necessary elasticity, it is important to remember that the fishing line with the hook should not hang close to the main fishing line. This will help avoid unnecessary tangling when fishing.
The simplest technique can be considered a driving knot on a running base.
First, the end of the leash is tied into a figure eight, and the main line at the place where the leash is tied is bent into a ring. Then the end with the figure eight is inserted into the ring of the main fishing line, overlaps it and is again passed through the ring and tightened.
Installation methods
For successful fishing, it will be enough to know only a few basic ways to tie this equipment. Let's look at the basic methods for installing a diverter leash :
- fastening the outlet leash through a single swivel;
- installation with double swivel;
- retractable leash with a sliding sinker;
- installation without swivels;
- installation with triple swivel;
- option for attaching the outlet leash through a single swivel;
- A quick way to turn a classic jig into a retractable leader.
Attaching the diverter leash through a single swivel
One of the simplest options for installing a “bend”.
It only requires one swivel, which any spinning player always has in sufficient quantities in his arsenal. Installation of a diverter leash with one swivel is as follows:
- on the main line (1) a swivel (2) is attached 20 - 30 cm
- a sinker (3) is attached to the end of the main line
- Attached to the second eye of the swivel is a branch leash of the required length (usually 1 - 1.5 m ) with a hook for attaching a silicone fish or bait (such as a wobbler or spinner) at the end (4 and 5).
With double swivel
This version of the diverter leash is even more convenient to use than installation with a single swivel, since it gets tangled even less often .
The double swivel needed to make it can be difficult to find in stores, but it's worth looking for.
So, let's look at how to knit a lead leash:
- to the end of the main line (1) through the first free eye we tie a double swivel (2);
- We attach a short leash with a sinker (3 and 4) to the middle free eye of
- We attach a lead (5) with a hook at the end (6) to the third free eye of
Retractable leash with sliding sinker
This installation has two important advantages that make it perhaps the best option for a diverter leash:
Installation of a diverter leash with a sliding load consists of:
- the first swivel ) located on the main line (1) freely sliding along it ;
- a second swivel tied to the end of the main line (3);
- a short leash (4) with a weight (5) tied to the second eye of the first swivel
- tied to the second eye of the second swivel and a retractable leash with a hook (6 and 7).
Without swivels
In this version of the rig, the lead is tied directly to the main line at some distance from its end.
The advantage of this installation method is its simplicity, but the disadvantage is a higher number of overlaps and tangles in the equipment than for installations with swivels.
In addition, the sensitivity when fishing with this rig will be much lower than if the spinning angler uses a retractable leash rig with a sliding sinker.
With triple swivel
In this equipment version :
- to the end of the main line by one of the side eyes;
- a retractable leash with a hook for bait is attached to the middle side eye
- to the second side eye .
In order to keep the number of equipment overlaps to a minimum, it is important to select high-quality triple swivels from trusted manufacturers , which are not always easy to find on sale.
Through a single swivel
differs
from the above-described method of attaching a lead leash through a single swivel in that here the swivel is located on the main fishing line not 20-30 cm from its end - it is tied directly to the end of the main fishing line.
The sinker is located on a separate leash , which is tied to the same eye of the swivel.
If in the above method of installing equipment with one swivel, the load is attached to the main fishing line (which is usually braided), then in this option you can choose any material for the lead for the sinker . For example, you can use fluorocarbon , which is rigid and highly resistant to abrasion from sharp stones and shell rock lying on the bottom, or a metal leader material.
There are many ways to increase your fish catch, but the most effective ones are. Below, the site editors share with you the 3 most effective ways to increase your catch:
- Bite activator. This is a pheromone-based additive that activates receptors in fish. ATTENTION! Rybnadzor wants to ban this bait!
- Any other baits with flavorings are less effective; it is better if they contain pheromones. But the most effective way is to use the new product of 2016 – DYNAMITE EFFECT!
- Learning different fishing techniques. For example, it is written here about spinning wires.
- the first swivel ) located on the main line (1) freely sliding along it ;
- a second swivel tied to the end of the main line (3);
- a short leash (4) with a weight (5) tied to the second eye of the first swivel
- tied to the second eye of the second swivel and a retractable leash with a hook (6 and 7).
Installation methods
For successful fishing, it will be enough to know only a few basic ways to tie this equipment. Let's look at the basic methods for installing a diverter leash :
- fastening the outlet leash through a single swivel;
- installation with double swivel;
- retractable leash with a sliding sinker;
- installation without swivels;
- installation with triple swivel;
- option for attaching the outlet leash through a single swivel;
- A quick way to turn a classic jig into a retractable leader.
Attaching the diverter leash through a single swivel
One of the simplest options for installing a “bend”. It only requires one swivel, which any spinning player always has in sufficient quantities in his arsenal.
Installation of a diverter leash with one swivel is as follows:
- on the main line (1) a swivel (2) is attached 20 - 30 cm
- a sinker (3) is attached to the end of the main line
- Attached to the second eye of the swivel is a branch leash of the required length (usually 1 - 1.5 m ) with a hook for attaching a silicone fish or bait (such as a wobbler or spinner) at the end (4 and 5).
With double swivel
This version of the diverter leash is even more convenient to use than installation with a single swivel, since it gets tangled even less often .
The double swivel needed to make it can be difficult to find in stores, but it's worth looking for.
So, let's look at how to knit a lead leash:
- to the end of the main line (1) through the first free eye we tie a double swivel (2);
- We attach a short leash with a sinker (3 and 4) to the middle free eye of
- We attach a lead (5) with a hook at the end (6) to the third free eye of
Retractable leash with sliding sinker
This installation has two important advantages that make it perhaps the best option for a diverter leash:
Installation of a diverter leash with a sliding load consists of:
- the first swivel ) located on the main line (1) freely sliding along it ;
- a second swivel tied to the end of the main line (3);
- a short leash (4) with a weight (5) tied to the second eye of the first swivel
- tied to the second eye of the second swivel and a retractable leash with a hook (6 and 7).
Without swivels
In this version of the rig, the lead is tied directly to the main line at some distance from its end.
The advantage of this installation method is its simplicity, but the disadvantage is a higher number of overlaps and tangles in the equipment than for installations with swivels.
In addition, the sensitivity when fishing with this rig will be much lower than if the spinning angler uses a retractable leash rig with a sliding sinker.
With triple swivel
In this equipment version :
- to the end of the main line by one of the side eyes;
- a retractable leash with a hook for bait is attached to the middle side eye
- to the second side eye .
In order to keep the number of equipment overlaps to a minimum, it is important to select high-quality triple swivels from trusted manufacturers , which are not always easy to find on sale.
Through a single swivel
differs
from the above-described method of attaching a lead leash through a single swivel in that here the swivel is located on the main fishing line not 20-30 cm from its end - it is tied directly to the end of the main fishing line.
The sinker is located on a separate leash , which is tied to the same eye of the swivel.
If in the above method of installing equipment with one swivel, the load is attached to the main fishing line (which is usually braided), then in this option you can choose any material for the lead for the sinker . For example, you can use fluorocarbon , which is rigid and highly resistant to abrasion from sharp stones and shell rock lying on the bottom, or a metal leader material.
There are many ways to increase your fish catch, but the most effective ones are. Below, the site editors share with you the 3 most effective ways to increase your catch:
- Bite activator. This is a pheromone-based additive that activates receptors in fish. ATTENTION! Rybnadzor wants to ban this bait!
- Any other baits with flavorings are less effective; it is better if they contain pheromones. But the most effective way is to use the new product of 2016 – DYNAMITE EFFECT!
- Learning different fishing techniques. For example, it is written here about spinning wires.
Cloudflare Ray ID: 63a811f0fad72074 • Your IP: 195.64.208.251 • Performance & security by Cloudflare
I am showing the simplest knot, on the basis of which you can tie two leashes to a swivel, and such leashes will not get confused with each other either when casting or when playing fish. They will be rigidly spaced from one another in different directions, the rigid knot will set the desired directions for both leashes.
Hi all! Very often, anglers use rigs with two hooks. This increases catchability, but can also create difficulties when leashes tied nearby become tangled when casting, and the fish, finding the bait under water, is not detected when biting.
I am showing the simplest knot, on the basis of which you can tie two leashes to a swivel, and such leashes will not get confused with each other either when casting or when playing fish. They will be rigidly spaced from one another in different directions, the rigid knot will set the desired directions for both leashes.
It is most convenient to tie double leashes to a swivel. To do this, a piece of fishing line for two leashes is passed into the eye of the swivel approximately to the middle. The ends of the fishing line are bent towards each other, and in the crosshairs, you need to form a gap between the fishing lines with your fingers, which will need to be twisted 7-8 times, and then thread a swivel into it. Carefully straightening the ends of the fishing line in different directions, you need to tighten the knot so that the outgoing leads are securely rewound with turns of the fishing line.
All! The simplest knot is ready, and it elastically spreads the leashes in different directions. All that remains is to attach suitable hooks to the leashes, and it will be possible to attach such a double leash to any installation through the winding ring, or to knit any further equipment: attach a sinker, a feeder, and so on.
There are many options for knitting this rig. Here are some examples: 1-to the load 2-to the bait 3-main
For which I thank him. It's even funny. I couldn't explain it myself. Or, except for Pitertsov and Mishin, no one is catching on to this.
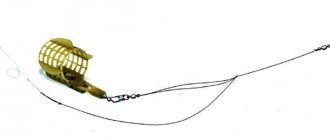
A diverting leash is understood as a spaced-apart rig, where a separate load and a separate twister (more often) are located.
Here's an example:
3 is the main fishing line (braid) 2 is a piece of fishing line (regular monk or fluorocarbon) going to the bait (its length can vary from 70cm to 1.5m). The diameter depends on many factors... (for catching perch, a diameter from 0.12 to 0.25 mm is used) 1 is a piece of fishing line that goes to the load (length ranges from 10 to 35 cm). Here the diameter should be thicker as this promotes less twisting. Plus, a thick mono line is less susceptible to damage from the sharp edges of shells and stones. Here variations range from 0.2 – 0.35mm.
There are many options for knitting this rig. Here are some examples: 1-to the load 2-to the bait 3-main
In the first variation, use large fasteners (for example, Owner No. 2), this will eliminate the problem of leashes overlapping.
From left to right lies: Tyrolean stick, filda (olive) and Cheburashka. When fishing in snags and grass, I use a field. Among the stones, pebbles, boulders - Tyrolean. In the rest - Cheburashka.
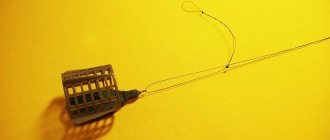
The retractable leash can be tied without any swivels or fasteners. This option is not as prone to twisting. Here's an example:
The segment (1) from the knot goes to the main line and is connected by means of a swivel. This segment should be at least 5-6 cm larger than segment (2). The segment (2) goes to the load, and you don’t have to cut it off, and attach the load without knots. Section (3) goes to primaka.
If you have any more questions, ask. We will answer everything in detail!
Hook
Rod
If we talk about specifics, I currently use two spinning rods for fishing with a retractable leash - Hearty Rise Egi Force EB-792E (241 cm, up to 21 g) and Norstream Kando KDS-862M (259 cm, 7-28 g).
Reel and cord
However, choosing a specific model is more a matter of personal preferences and financial capabilities.
Leash
And again, a little specifics. I use Sunline Siglon FC or Colmic Shade fluorocarbon lines with a diameter of 0.14-0.16 mm - this is enough for most conditions. I would not recommend using cheap FC - most often these are ordinary monofilament lines, at best having a fluorocarbon coating.
Sinker
Hook
We knit the rig
The good thing about this device is that:
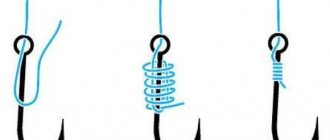
Types of fishing knots
Any fishing knot is characterized by its tensile strength. For example, if you take a monofilament with a strength of five kilograms declared by the manufacturer, then it will withstand the resistance of a fish in water of no more than two and a half kilograms. Let's look at the main ways to tie a leash to the main fishing line.
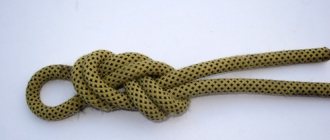
Triple knot, loop in loop and perfect loop
When float fishing, you can use such a triple knot. The ends of the leash and the main line are folded together and tied with an ordinary triple knot. You can strengthen the knot by dropping a little waterproof glue on it. In this case, the tensile strength will be sixty percent. It is not difficult to tie the leash to the main line in this way.
Loop to loop is probably the most common method. A loop must be made at the end of the fishing line, and the same loop must be made at the end of the leash. After this, a loop is threaded through the loop. With this method, the strength of the resulting knot is sixty percent. Knitting it will not be difficult even for novice fishermen.
The perfect loop. To do this, tie a simple knot, but do not tighten it. You need to thread the end of the leash into the loop and make a second turn. Now you need to pull it through the loop and tighten it. You can see more details in the photo.
Bloody Knot
It knits quite simply and retains seventy-five percent strength. To tie such a node, you need to do the following:
- The main line and the leash must be placed parallel. Wrap the leash around the main line four to six times. You need to know that the thinner it is, the more turns there should be. For a fishing line with a diameter of 0.15, the number of turns should be six. If the diameter of the fishing line is up to 0.27 - five turns. If the diameter is 0.3 and above - four turns. For braiding you need to use two to three turns.
- You need to wrap the end of the fishing line back and thread it between the two fishing lines up to the turns.
- Now we wrap the main line around the leash and make the required number of turns.
- The end of the main line must be threaded into the middle loop.
Retractable leash
Often it becomes necessary to tie the leash not to the end of the main monofilament or braid, but to its body. It's done this way. The end of the leash needs to be tied in a figure eight, and the main monofilament is bent into a ring in the required place. The end with the figure eight is placed in the ring of the main monofilament, then overlaps it and tightens. In this form, it will be positioned perpendicular to the monofilament and the likelihood of the leash being confused with the main thread will be significantly reduced. The main monofilament has a small number of weaves and will not lose its strength.
Centaurus
The fisherman's knot turns out neat and compact. Its main advantage is that it is very durable. It can be used for both monofilament and braided threads.
- Both braids need to be placed parallel. One needs to be wrapped around the other three to five times.
- The outermost coil is taken in the right hand. Next, its end is brought to the beginning of the turns, and pushed inside all the turns.
- Now you need to pull the long and short ends, the first knot will be tightened.
- The same must be done with the other end of the braid.
- Now all that remains is to pull the long ends and pull the knots together.
Nail
From the name we can conclude that to tie it you need a nail or a similar object. It could be some kind of tube or a ballpoint pen. This node can be considered universal. It turns out to be compact and does not get caught when passing through the spinning rings. It is tied this way.
- The main line and the leash are parallel. You need to attach a handset to one of them.
- The other one needs to make about eight turns around the tube with the first line in the opposite direction.
- Thread its end into the tube.
- The tube needs to be pulled out. Then pull the end and tighten the first knot.
- The same is done with the second line. The second one also needs to be tightened.
- All that remains is to pull the long ends and the two knots will be pulled together.
So, above were listed ways to tie a leash to the main fishing line or braid. These methods are quite enough to securely secure everything. If a novice angler can correctly tie the leash to the main line, then a large fish will not be able to escape by breaking the tackle. The fisherman's knot is the most convenient way to use it at home. It is also good to use when fishing with a spinning rod, or for mounting carp gear.
Examples of node bindings