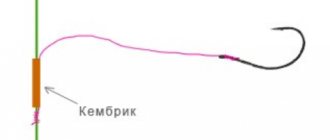
The best knot patterns for a hook with a ring
The most popular methods of tying for gear with a ring:
- spindle;
- stupid leash;
- Canadian eight;
- clinch;
- grinner;
- world fair.
Common node types:
- Californian;
- shark's;
- tuna;
- salmon.
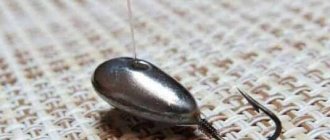
Spindle
The peculiarity of this knot is that it can be knitted on any type of synthetic thread of small diameter. Withstands traction load perfectly, it makes no difference whether a single or double hook is chosen.
Step-by-step instruction:
- The tail of the fishing line is inserted into the eye of the hook and drawn until the latter bends.
- The line is bent and wrapped 4-5 times around the loop and tackle.
- On the last turn, the tail is passed into the loop from the bend of the fishing line.
- A strong knot is tightened.
The photo shows a detailed diagram of the assembly.
Spindle
California Knot
It is suitable not only for hooks, but also for sinkers and swivels.
Tying instructions:
- The scaffold is folded in half.
- The loop is threaded into the eye and wrapped around the main line.
- The tail of the thread is passed through the resulting loop, wound behind the tackle and tightened.
California Knot
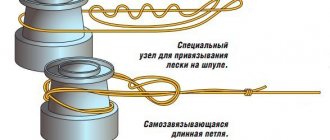
Stupid leash
The method is similar to the Spindle, but in this case the turns are made not around the hook, but around the thread. It is used on monofilament or braided fishing lines with a diameter of 0.3 mm, as well as on thin nylon.
You can tie a fishing hook to a fishing line like this:
- The tail of the thread is passed through the fastening hole of the tackle.
- 4-7 turns are made around the main thread.
- Its end is wound between the first turn and tightened.
Stupid leash
In the “stupid leash” knot, the number of turns is important: they need to be done up to 10-12. This is no longer recommended as it can add weight to the tackle and make the line less resistant to breaking.
Canadian eight
The popularity of the knot is due to the fact that it is held on a synthetic elastic fishing line, but it is easy to tie and untie by hand.
The Canadian eight is knitted as follows:
- The line is pulled through the ring of gear.
- The tail of the thread is wrapped around the base of the hook and pulled between the fishing line and the base of the tackle. A self-tightening loop is created.
- Without tightening, we push the free end through it. Then we tie a knot.
Canadian eight
Clinch
The clinch is performed like this:
- The fishing line is launched into the gear ring and stretched 10 cm from it.
- 4-10 turns are made around the thread.
- The loose tail is threaded through the first curl and threaded into the resulting loop.
- The knot is moistened with water and tightened.
- If there is a long end left, it is recommended to cut it off.
Clinch is an easy and reliable fastening method that is suitable for use on any fishing line with a thickness close to 1 mm. The downside is that when the hook catches on objects, it often comes undone. To prevent this from happening, the method cannot be used if the eye of the hook has a large diameter or is completely absent.
Clinch
Grinner
This method is also called Uni (from the word universal) and is often used on monofilament threads of different thicknesses.
Its advantages:
- simplicity;
- speed of tying;
- reliability.
Grinner is knitted like this:
- The line goes into the eye of the hook and is pulled out with a margin of 10 cm.
- The free tail is returned to the base of the tackle and a curve is made.
- The end is wrapped around the main thread and part of the loop 5-6 times.
- The tail is put into a loop and tightened.
Grinner
world fair
The knot is made on any fishing line of arbitrary thickness, but the diameter of the eye of the tackle should not be very small so that a thread folded in half can easily pass through it. The reliability level is about 70%.
Sequencing:
- Fold the line in half and insert it into the ring of the tackle.
- Place a loop over the folded thread.
- Thread the tail through two fishing lines and send it into the loop that was formed when performing step 3.
- Tighten the knot.
world fair
Shark knot
This technique can only be used on synthetic fibers.
It's done like this:
- The fishing line is threaded through the round mount of the tackle and pulled along the main thread by 12-16 cm.
- They fold and make 4-5 turns around in the direction of the fastening.
- The free tail of the thread is inserted into the ring formed by the first turn.
- The knot is tightened.
Shark knot
Tuna knot
Fishermen use this knot on thick and thin synthetic threads.
The following instructions will help you tie a hook to a fishing line:
- The line needs to be threaded through the fastening and wound (3-4 times) around the base of the tackle.
- Bring the tail through the ear again.
- From the forend, lift the turns onto the folded fishing line and tighten the knot.
Tuna knot
Salmon knot
Many fishermen note the versatility and special strength of this knot (at 96%). Ideal for use on both synthetic and cotton braided and monofilament lines.
The salmon knot is done like this:
- Insert the tip of the thread into the ring of the tackle.
- Wrap the tail of the thread once around the main thread, insert it into the eye of the knot that was formed near the ring of the tackle.
- Carefully lower the knot onto the hook shaft and tighten.
Salmon knot
In the video you can see how to tie a hook to a fishing line in four ways. Filmed by Andrey Slepnev's channel.
How to tie a fishing hook to braid
Below are examples of fishing knots for braids; they can also be used for tying hooks to monofilament.
I also note that different types of fibers are used to produce braided fishing line. Braided fishing lines from different manufacturers may have different methods of weaving fibers, the number of fibers, the method of soldering, and the composition of the outer coating. Therefore, manufacturers provide recommendations for knots for their fishing lines complete with braid on the packaging or in a separate brochure.
The most popular fishing knots for braids are “Palomar knot”, “Uni knot”, “Improved Clinch knot”.
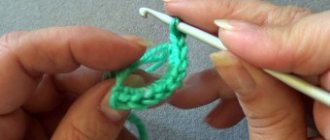
Palomar knot
1) We fold the fishing line in two and thread the resulting loop into the eye.
2) Now you need to make an ordinary knot, and the eye should be approximately in the center of the loop.
3) Thread the swivel (or hook) through the loop.
4) Wet and tighten the knot.
Uni knot
1) We thread the braid through the eye and make a loop.
2) We wrap the braid folded in two layers 5 - 7 times, threading the free end of the fishing line into the loop.
3) Wet and tighten the knot.
The best knot patterns for a spatula hook
Methods for attaching fishing line to hooks with a spatula:
- rib;
- step unit;
- snood;
- trombone loop;
- loop knot with external passage of the end of the fishing line.
Rib
Fishermen note that this is not the strongest mount, since its reliability percentage is 70%. Used on braided lines.
It's done like this:
- Fold the fishing line in half and attach it to the shank of the hook.
- Wrap the tail around the folded fishing line and fore-end 4-6 times.
- Thread the end of the fishing line into the loop that was formed as a result of folding.
- Tighten the knot.
Rib
Step knot
This is one of the most complex knots, but its strength is very high (90-95%). Used on synthetic fibers.
The step knot is performed like this:
- Attach the tail of the fishing line to the rod of the tackle, so that it faces in the opposite direction from the blade.
- Wrap the edge around the warp and fishing line twice.
- Wrap the doubled line and the rod three times.
- Pull the tip of the fishing line into the formed loop and tighten.
Step knot
Snood
A universal method that can be used on hooks with a ring or a spatula. Often used on braided and monofilament lines.
Tying sequence:
- Hold the hook with the spatula up.
- Make a small loop so that it looks at the tip of the tackle.
- Wrap the free end of the fishing line several times (usually 4-5) around the main thread and the rod.
- Place the tail in the loop made in step 2.
- Tighten the knot.
Snood
Trombone loop
This method is used on synthetic and natural braids and monofilaments. Difficult to make, but reliable.
It's done like this:
- Fold the tip of the thread with the main one, creating an open loop, retreating 10-15 cm from the edge.
- Start wrapping the running edge of the fishing line around the hook and folded fishing line (make 9-10 turns).
- Pass the end of the thread through the loop at the bottom and tighten.
Trombone loop
Loop knot with external passage of the end of the fishing line
Very similar to Snood in terms of execution technique and reliability, but still slightly different.
It's done like this:
- Fix the fishing line at the blade of the hook at a length of 10-15 cm from its tail.
- Use the free end to make a loop around the beginning of the rod.
- Wrap the tail around the hook 7-10 times.
- Pass the working edge of the fishing line through the loop and tighten.
Loop knot with external passage of the end of the fishing line
Knots for connecting monofilament fishing line with hooks
I would like to note that not all fishing knots used for hooks with rings are suitable for hooks with spades. How then to knit fishing knots for shoulder blades.
The fact is that they must have a large number of turns in order to sit firmly on the fore-end and not walk along it, otherwise the line, when it reaches the edge of the blade, will begin to deform against it.
Hook knot with spatula
One of the best and most reliable knots for a shoulder blade is knitted like this:
- We make a loop at the edge of the fishing line and attach it to the shank of the hook, leaving the free end about 6-7 cm long.
- With the free end of the fishing line we make 2-3 turns around the shank of the hook and the near edge of the fishing line. It is imperative to ensure that the line lays exactly turn to turn.
- Then we make about 4 more turns, wrapping both fishing lines and inserting the edge of the fishing line into the bottom loop.
- We wet the knot, and holding the remaining tip of the fishing line with one hand, pull the leash, tightening the knot.
- When tightening, it sometimes happens that the movement from the shoulder blade goes straight up, this is not entirely correct, since it should go a little to the side, so before tightening, we pull it back with the help of our thumb and then tighten it until it stops.
How to tie fishing knots for hooks with a ring
For these hooks, you can use the Palamar and the reinforced Clinch knot.
The disadvantage of the Palamar is that your hook may have an eye that is too small for a doubled line to fit through. A disadvantage of the clinch knot for fishing with a float is that it can move along the ring, and the hook will point to the side. For lure fishing, such a disadvantage is not a problem, but for float fishing, it is still better so that the hook does not wander.
A fishing knot that will not move around the ring is knitted like this:
- Take the hook and thread the line through the inside of the ring. We fold the threaded fishing line in half.
- With the free end we begin to wrap our loop and the shank of the hook, making 5-6 turns, while we begin to wrap the winding from the ring of the hook. We put the tip of the fishing line into a loop.
- Wet the knot and tighten it.
Read more about how to tie hooks on fishing line here.
The best universal patterns for tying knots
In addition to specialized methods, which are used either only on hooks with a ring or with a spatula, there are multi-purpose ones. They are suitable for two types of gear.
Universal methods:
- leash;
- polomar;
- rapala;
- Duncan loop;
- bloody knot.
Leash
Universal knot for hooks with eyes and blades. It is recommended to tie these on thin monofilaments and braids.
The leash is done like this:
- Using a 10-15 cm fishing line, make a loop in the shape of a hook.
- Wrap 10-15 times around the stem and thread.
- Insert the tail of the thread into the loop and tighten on both sides.
Leash
Polomar
The tensile strength of such a unit is close to 94%. For fishing they are used on monofilaments of medium and small cross-section. The main disadvantage is that it is not suitable for gear with a small mounting diameter.
Sequencing:
- Tie a simple loop, like on boots.
- Pass the free eye of the fishing line through the hook shaft, then tighten the knot.
Polomar
Rapala
This method was invented by Rapala and was used for tying spinners and wobblers, but over time it became popular for knots on hooks. Can be used on any fishing line of any cross-section.
The rapala is tied like this:
- A regular knot is made, like on boots.
- The tail of the fishing line is threaded through the eye of the hook, then sent into the loop.
- The edge of the thread is wrapped 3-4 times around the continuation.
- Again the tail is inserted into the initial loop.
- A fishing line is threaded into the created loop and tightened.
Rapala
Duncan Loop
It is best to use this method on soft fishing lines.
It fits like this:
- The end of the thread is passed through the bait ring.
- A small loop is made.
- The tail is pulled through the eye of the loop and wound on two fishing lines (4-5 turns).
- The knot is tightened.
Duncan Loop
Bloody Knot
The bloody knot can be performed as follows:
- Make a wide loop around the hook shaft.
- Wrap it around the tackle one more time, grabbing part of it and the fishing line.
- Thread the end of the thread into the loop formed and tighten.
Bloody Knot
Hook without eye
Step knot
Tying a knot is difficult, but due to its great strength it is popular among fishermen. Used on synthetic fibers.
Tensile strength: 90–95%:
- The tip of the fishing line is folded together with the fore-end so that the tip is directed in the direction opposite to the bend.
- Wrap the end around the forend with fishing line 2 times.
- Press the curved extension of the fishing line and wrap it all three times (the widow's fishing line folded with the fore-end).
- Once again, wrap the end of the thread around the forend with a bent loop of fiber and thread it through the resulting eye.
- Tighten the knot.
Spiral knot (Dumhof)
Designed for braided lines.
Tensile strength: 95%:
- Wet the fishing line.
- Fold it in half, apply it to the shank of the hook and wrap the tip around it 4-6 times.
- The end is pulled into the loop, which is obtained by folding the fishing line.
- Tighten the knot.
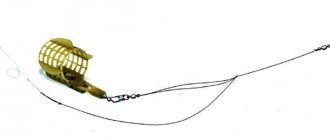
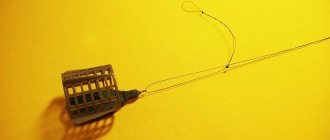
How to tie multiple hooks
There are two methods for this: hooks are tied to one fishing line or additional ones are attached to the main thread. An example is shown in the figure.
It is better not to tie many hooks to one fishing line - this will cause it to lose strength. For such cases, it will be necessary to select thicker threads, therefore, not all knots will be suitable.
Method No. 1
This method is best suited for live bait fishing, but also works well for other types of fishing.
Execution sequence:
- The first hook is usually knitted like this: the end of the fishing line is passed through the eye, several turns are made around the main part of the tackle and the thread.
- After this, the opposite end of the thread is threaded into the ring of the tackle.
- The second knot is knitted in the same way; before doing this, you need to step back a short distance from the first.
Method No. 2
It is based on creating several loops on the fishing line to secure additional hooks. A fairly simple and fast method.
This is done in 4 steps:
- On the main line, where there is already one hook, a regular knot is made with three turns of the thread.
- Little by little it tightens until it creates a small figure eight.
- A leash with a hook on a thinner fishing line needs to be tied to the main thread.
- First, its end sinks into the resulting figure eight, then they are tied together using a simple Clinch.
Visual instructions on how to firmly tie the second leash to the main line were prepared by the AB Video Stories channel.
Method No. 3
It is similar to the previous one, but allows you to quickly change gear if necessary.
This is done as follows:
- A knot with three turns is tied on the fishing line.
- A simple knot is twisted on the tail of the leash.
- By tightening the loop on the main line, the end of the leash is pulled into the formed eye.
- The knot is tightened until it stops.
Visually it looks like this:
Which node should I choose?
For tying two or more hooks, it is recommended to choose Snood, since its reliability is 90-95%, and it is suitable for different types of hooks and fishing line.
Loading …
Universal nodes
Palomar
Used on monofilament fishing lines of small and medium diameter. Suitable for hooks and lures. Among the shortcomings, we can highlight the fact that it is not suitable for a small ear.
Tensile strength: 94%:
- They tie a simple knot, like on shoelaces, only they wrap it not once, but three times.
- Thread the shank of the hook into the loop and tighten.
By the way, suitable for hooks without eyes.
Rib
Suitable for eye and spade hooks. This type of knot is used for braided lines.
The strength of such a unit is 70%:
- Fold the thread in half and apply it to the shank of the hook.
- Wrap the tip 4-5 times around the fore-end and the fishing line folded in half.
- On the last turn, the tip of the thread is threaded into the loop that was created by folding the fishing line.
- Tighten the knot.
Other ways to attach fishing line to a hook
cat's paw
Suitable for tying a hook to any diameter of braided fishing line.
Tensile strength: 85%:
- Fold the wire in half and thread it into the eye of the hook.
- The loop goes over the shank of the hook.
- Turn the hook 3-5 times clockwise. For better tightening, the line is wetted.
- Pass the tail through the loop of the thread folded in half.
- Tighten the knot.
Canoe Man
Tensile strength: on monofilament line – 98% and on flucarbon or braided line – 80%.
The difficulty lies in tightening the knot correctly, otherwise it will come undone on its own:
- Two half-loops are made on the fishing line.
- One is passed into the other.
- The tip of the fishing line is threaded into the eye of the hook.
- Pass the tip into the eye of the half-loop that was passed into the other.
- Tighten the knot.
Snell
Tensile strength: 94%.
If you slightly modify the beginning of the tie, you can use it on hooks with a spatula instead of an eye:
- The tip of the fishing line is threaded into the eye of the hook with a margin of 3–6 cm.
- A loop is made from the missing line, and again the tail is inserted into the eye of the hook.
- The loop is wrapped clockwise around the forend 5–7 times.
- Bend the remains over the bend of the hook and tighten the knot.
Orvis knot
Tensile strength: 98%.
They use the technology of knitting a knot on any fishing line:
- The tail is inserted into the eye of the hook with a small margin.
- Wrap the tail once around the extension of the fishing line.
- Thread the tail into the resulting loop.
- Wrap it 3 times around the part of the line you just bent and tighten.
Duncan loop
Tensile strength: 85–90%. On soft lines it turns out stronger:
- The tail of the fishing line is threaded into the eye of the hook.
- Wrap 4 times around the folded extension of the fishing line and part of the end.
- Tighten the knot.
Eugene
Tensile strength: 97%. Equally strong on any type:
- The tail is threaded into the eye of the hook with a small margin.
- A loop is made from this stock and wrapped 3 times around the fishing line.
- Thread the tail into the loop left over from wrapping and tighten.
Rapala knot
The Rapala was developed for tying wobblers and spinners, but has also gained popularity for tying hooks. Tensile strength: 92%. It makes no difference what line it will be used on.
They use the technology of knitting a knot on any fishing line:
- A regular knot is made as on shoe laces.
- The end is inserted into the eye of the hook.
- Thread the tip through the loop on the fishing line.
- Thread the knot to the hook.
- Wrap the end around the extension 3-4 times.
- Again the end is inserted into the starting loop.
- Immediately thread the end into the resulting loop.
- Tighten the knot.
Video
The video shows a tutorial on tying multiple fish hooks to a fishing line. Prepared by the channel Fish Zhor – Fishing – Fishing.
Was this article helpful?
Thank you for your opinion!
The article was useful. Please share the information with your friends.
Yes (100.00%)
No
X
Please write what is wrong and leave recommendations on the article
Cancel reply
Rate the benefit of the article: Rate the author ( 1 vote(s), average: 5.00 out of 5)
Discuss the article: