crochet slip loop
Let's start with the fact that such a knot allows you to start knitting in a circle, that is, it represents something like a base for the formation of a circular chain of loops. In general, this can be done using other techniques, such as an air loop.
However, the most popular is the “amigurumi ring”, since it allows you to create an invisible, tight and highly adjustable primary knot.
This method is widely used in figure knitting, for example, when you need to make flowers or leaves. But it can also be used to knit other elements, including full-fledged one-piece items, and not just decorative objects.
You can make a ring with knitting needles, but most often it is crocheted. Firstly, it is many times more convenient than knitting a sliding loop with knitting needles, and secondly, the result is more acceptable in a purely aesthetic sense.
Crocheting in general is quite a fascinating activity, as a result of which needlewomen get the most romantic, airy and openwork things. It is not difficult to make a sliding loop with crochet; moreover, there are several different methods for this, from which you are free to choose the most comfortable and convenient for yourself. So, where to start with “circular” knitting, and which version of the initial knot should you choose for this purpose?
sliding loop tools
You can knit with any tools and any yarn you like. In fact, there are no clear restrictions or prohibitions here - you must choose the materials yourself, depending on the current tasks. But we still recommend that you use a fairly thin hook, not the largest size.
The story is similar with yarn - there are threads that are generally quite difficult to knit. They are usually very thick, large and dense, with inclusions of small fibers. It is not worth choosing such yarn.
However, you can ignore these tips if you are knitting a large item, or if you like the technique of large knitting itself. In any case, the choice is yours. But creating a sliding loop in this case may take you a little more time and effort. If you are just learning the basics of knitting, you definitely should not experiment with such tools - start small, get your hands on it, and only then move on to complicating tasks.
The first method of knitting a sliding loop
How to make a sliding loop with crochet?
As mentioned earlier, there is not only one method for this. But we will start with the simplest, which will be useful for both beginners and amateurs who have decided to learn new ways in their usual needlework. Make sure you have enough yarn - you must admit, it will be quite a shame if it suddenly ends in the most interesting place and the knot has to be unraveled. Arm yourself with a standard ball and a quality hook.
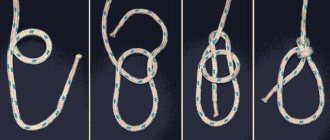
According to the first method, a sliding loop is made as follows:
- Throw the working end of the thread over the index finger of your left hand. Let its free end remain under the finger, but on the back side of the others;
- Insert the hook from right to left under the section of thread lying directly on the thumb;
- Turn the hook clockwise, grab the thread and pull it into the formed loop;
- You've got a sliding loop. It needs to be tied with a number of other loops, as indicated in the specific pattern according to which you are working. After all the columns are ready, all that remains is to tighten the knot by pulling its free end.
This option for making a sliding loop is the simplest and most versatile - it can be used by both experts and beginners. But there are other methods of forming it using this tool.
Step-by-step instructions and patterns for crocheting an amigurumi ring
Any novice needlewoman can learn how to make these toys. The circuits for such products are primitive. To learn how to knit an amigurumi ring correctly, read the step-by-step instructions and practice a little. Before starting work, prepare all the necessary tools and materials:
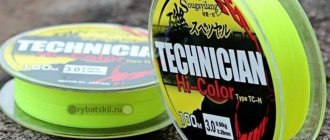
- Yarn. Beginners are recommended to choose threads of any color of medium thickness (cotton, acrylic). Too thin or textured threads or wool yarn can spoil or bend the knitted fragment.
- Crochet hook. Select the size of this tool 1-2 smaller than indicated on the yarn, then the product will be dense. The tip of the hook should not be too sharp or round, and its cutout should not be small.
There are two main ways of knitting a Japanese loop, which differ in the number of turns of the thread - one turn or two. The option you choose depends on the texture and thickness of the yarn taken, the size of the hook, and the purpose of the future product. The step-by-step master classes described below will discuss both methods, their advantages and disadvantages.
Master class on knitting a simple ring in one turn
The first method is easier to learn, but to completely simplify the lesson, choose thicker yarn and a suitable hook for it. Execution steps:
- With your right hand, make one turn of thread around your left index finger. Leave the end of the thread long and at first fix it between the little and ring fingers (so that the ring does not slip off).
- Insert the hook into the ring, hook it on the working thread (the one that comes from the skein) and drag it in front of the “sliding loop”. As a result, a loop forms on your hook.
- Re-hook the working thread, pull it through the resulting loop and tighten. The result should be a loop, which is considered the first column in the Japanese ring.
- Again, insert the tool into the “sliding loop”, hook the working thread and pull it through the ring. 2 air loops came out.
- Next, pull the working thread through both of these loops to form a single crochet (sc).
- Continue making the required number of sc (at least 6 single crochets).
- Remove the ring from your finger, pull the tail of the thread, tightening the “sliding loop”. The result is an arc.
- Connect the first column with the last one. The initial row of the Japanese ring is ready.
- Cookie dough in the oven
- Application for pension indexation from January 1, 2021
- New rules for coronavirus contacts
There are many advantages to creating this element using the one-turn method - it knits quickly and is easily tightened without effort. The disadvantages of this method include the following points:
- it is not suitable for knitting on thin threads;
- If you frequently wash the finished product, such a Japanese loop may become loose or unravel.
How to make a double ring using the amigurumi technique
The second method is more labor-intensive and requires more practical training. Thin and medium-thick yarn is suitable for this work. The step-by-step instructions are as follows:
- Pull a sufficient amount of yarn from the ball and wrap the end twice around your left index finger. If you chose thick threads, wrap the “sliding loop” around two fingers (index and middle).
- Insert the hook under both threads and grab a loop from the working thread.
- Make one chain stitch and work single crochets into a double slip stitch, as many as you need. If you are just learning, you need to dial 6 sc. When you start making toys, use patterns that indicate the required number of sc.
- Next, lightly pull the thread on the free tail. Notice the thread that is “moving.”
- Release the tail, take this thread, and lightly pull it outward until the ring narrows. Make sure that the columns do not unravel.
- There is one more part of the ring left - a loop sticking up. To get rid of it, slowly pull the thread by the tail.
- When the ring is completely closed, connect the first sc to the last.
- The first row is ready, then do the second, third, etc.
The disadvantages of this method include only the somewhat labor-intensive procedure for performing a “sliding loop”. The positive properties are:
- you can use thin yarn;
- Regardless of the manipulations performed with the finished product (washing, stretching), its center will never unravel.
The second method of creating an “amigurumi ring”
When crocheting a sliding loop using this method, you must be more attentive to your actions and careful not to get confused.
The method for starting knitting is the same as in the first option - you must pass the thread through your fingers in the same way.
Further instructions:
- After the thread is correctly positioned on your left hand, you need to wrap the working part of the thread (not the free one) around your thumb from bottom to top;
- Insert the hook into the resulting loop from below and grab part of the thread;
- Pull the thread into the loop and tighten the characteristic knot. You will still get the same sliding loop.
This method is faster in execution, but requires attention and caution. If you do something incorrectly, you can ruin some of the yarn.
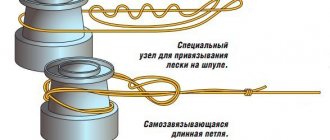
What is an amigurumi ring
There are many knitting techniques, the most popular technique coming from Japan is amigurumi (small animals created using a crochet hook). Such products have spherical or cylindrical parts that are sewn together and stuffed with soft filler. The design of each individual piece of the toy begins with an amigurumi ring (Japanese loop) - a composition of a sliding loop and several single crochets, thanks to which there will be no unwanted holes in the product (as in the manufacture of napkins), allowing the stuffing to peek out.
- How to do a routine check of water meters
- Dogo Canario - history, purpose and breed standard, character, care and health
- Who will get an increase in hourly wages and by how much?
The rarest sliding loop method
There is another, third, most rarely used, but interesting method. If you do not want to use the two methods given earlier, this will be acceptable for you.
Proceed as follows:
- Wrap the working thread twice around the index finger of your left hand;
- Remove the resulting ring as carefully as possible and grab it with the thumb and middle finger of the opposite hand;
- Quickly pick up the working thread with a hook and pull it through the resulting ring;
- Crochet the knot again and pull it through the loop.
This method is notable for the fact that it forms not a single, but a double knot. This is necessary for some knitting techniques. In general, making a loop using this principle is quite difficult, and some needlewomen simply cannot cope with this task. Probably the mistake most people make is that they only do one turn per finger. Also, when you form a knot using this principle, it is important to securely fix it so that during further knitting the ring does not unravel or loosen.
You learned how to form a sliding knot without air loops. How can we further knit the resulting “foundation”?
Second option
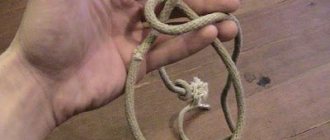
Take the end of the yarn and place it on your left palm, as in the photo below. We throw the working end of the yarn over the index finger.
Related article: Stylish crochet cap with pattern - how to knit or sew
Then we wrap the working thread around the thumb, from bottom to top, as in the image.
Insert a hook into this loop from below and grab the yarn
We pull the yarn through the loop and tighten the knot. This is how a sliding loop is created.