On a note
When knitting such knots, it is important to carefully straighten and tighten them, otherwise slipping is possible, due to which the heat generated by friction can damage and melt the cord. And with a strong jerk, such a knot can completely damage the main rope.
It is important to be able to correctly correlate the diameters of the main rope and the cord. The material from which the rope is made can also affect slippage. And take note that gripping units are not designed for dynamic jerking.
If the rope is slippery or icy, this knot will not function properly.
The knot should be made from a rope with a diameter of no more than 5-8 mm.
Autoblock
A distinctive feature of the autoblock is that the two ends of the cord are not threaded into a loop, but are closed with a carabiner. One has only to unfasten them, and the knot is instantly untied under the influence of the elastic force of the cord.
It is preferable to use an automatic block for insurance during descent or ascent. In some cases it is much more reliable and safer than the same Prusik. However, an important point is that the reliability of the autoblock greatly depends on the material from which both the cord and the main rope are made. Soft materials are preferable.
Prusik knot
Advantages
- The node is free to move
- Easily returned to its original position after removing the load
- Flaws
- Knitting quickly takes practice
- Loses effectiveness with a rigid rope, does not tolerate icing and jerking
- The knot is tied with a cord with a diameter of up to 7 mm. around the main rope with a diameter of up to 14 mm. The knot is designed to provide insurance for climbers. The knot can be easily moved by hand. In case of failure, the knot will quickly tighten and save you from falling. Works under different loads in any direction. But with a wet or icy rope, the knot does not behave effectively.
It is important to know!
- While moving along the rope, the knot is in the hand. When a climber falls, the knot reflexively clasps in the hand and does not grab the rope. In this case, the braking process is carried out only due to the force of the hand, which leads to severe burns, falling and complete rubbing of the gripping unit. That is why it is necessary to move the knot along the rope by pushing it in one direction or another, and in no case by squeezing it in the palm of your hand.
- Make sure that the second turn of the knot goes in the opposite direction to the first knot.
- As a rule, the prusik is tied from ropes of different or the same diameter than the diameter of the supporting rope (railing).
- One turn on the grasping knot is knitted when making an ascent or descent, as well as for lifting a large load. Remember, one turn on a climbing knot, and in other applications of the prusik, always means “etching”, and in the case where the main rope has too rigid a structure, icing or high tension, a small number of turns can lead to a breakdown, fall or uncontrollable the descent of man. Therefore, more than two turns are made on the node.
- During Prusik ascent, the gripping knot rises along the rope as it is pulled up by the free ends, this leads to the formation of overlaps, which contribute to the weakening of the gripping knot after loading. In addition, the knot is pushed along the rope, rather than pulled or grasped by the palm of your hand.
- When using the cord for a long period, make sure that it is intact and not frayed. Inspect equipment carefully before and after use.
- Ideally, the grasping knot should be as long as your outstretched arm. In the event of a breakdown, frostbite or injury, it is extremely difficult or almost impossible to reach a node located at a higher altitude!
This is interesting: Woodcock hunting: habits and habitats, hunting features
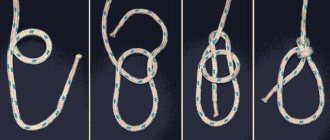
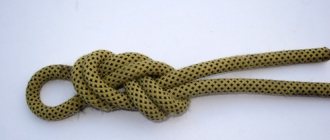
Knitting a knot
1. Wrap the cord around the main rope
2. Make another skein
3. Draw the end of the cord to the left of the skein and also wrap it around the main rope a couple of times
4. Tighten, carefully straightening the loops and the knot is ready
How to tie a knot
The Bachman is sometimes confused with the related Prusik carbine.
The knitting of the gripping carabiner “Bachman” is carried out as follows:
|
When a load is applied, the carabiner is pressed against the main halyard due to the cord. This blocks his movement. Relieving the load, the knot moves along with the carabiner along the main rope.
The reliability of the knot is given by the number of turns of the cord around the main halyard. It is better to use at least 4 turns.
Incomplete "Bachman" is knitted:
|
Blake's knot
The Blake knot is a frictional, sliding-grasping knot. The compound has found widespread use among climbers and herbarists during ascent and descent. You cannot put a load on the knot, since the loop weakens under pressure.
The first time we learn about this node is from the Australian Guides magazine in 1981. They say that the knot was invented in the 80s of the 20th century in North America.
The knot is quite reliable when used correctly; it does not slip or slip.
Advantages
- The main advantage is that the knot does not lose efficiency if the diameter between the main rope and the cord is the same.
- The Blake knot makes it easy to create quickly adjustable loops.
Double grasping knot
As with other types of belays, before tying a double grasping knot, you need to make sure that the main and auxiliary ropes differ in diameter. That is, the cord should be thinner than the railing rope - optimally one and a half times.
There are two options for tying a double grasping knot. The first assumes that two gripping knots are arranged on the main railing rope at some distance from each other. Thus, the climber can be sure that if for some reason one grasping unit fails, the second one will work.
According to another option, two loops are tied around the base of the rope. In this way, it is possible to organize both a double and triple symmetrical grasping unit.
Knitting a knot
1. With the running end of the cord, go around the main rope 4 times.
2. Pull the running end of the rope along the main rope, along the turns in a downward direction.
3. Pass the cord under the main rope and through the first two turns.
4. The node is ready. It is recommended to tie a locking knot, such as a figure eight, at the end of the free rope.
Tying method
The carabiner is applied with its long side to the main rope. The cord is quilted into a carabiner, folded in half, and wrapped 2-4 times around the main rope, to which the long side of the carabiner is attached, with each turn quilting through the carabiner. Under load, the cord presses the carabiner to the rope and prevents its movement. The reliability of the knot's grip depends on the number of turns on the rope. Typically 4 turns are used. To move the knot along the rope, remove the load from the knot and move the carabiner.
If the knot is used as the main one (that is, loaded with the weight of a person or is the only insurance for a precariously standing person), then the carabiner must be clutched [ source not specified 490 days
].
The Bachmann knot and the carbine knot (Prusik with carbine) are often confused. Sometimes the Bachmann knot is called the “Brahman knot,” which is incorrect. Sometimes called "the poor man's jumar."
Due to the increasing availability of lifting, descending and belay devices (such “hardware” as gris-gris and jumars), the Bachmann knot fades into the background. However, the ability to handle this unit can be very useful in an emergency.
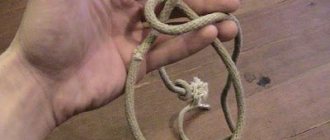
Knitting a knot
1. At the ends of the cord we tie a tightening knot (poacher's loop).
2. Lay the cord over the main rope. Pass one end under the rope and bring the cord up.
3. Loop the running end around the main rope towards you several times and pull.
Most common errors
- While moving along the rope, the knot is in the hand. When a climber falls, the knot reflexively clasps in the hand and does not grab the rope. In this case, the braking process is carried out only due to the force of the hand, which leads to severe burns, falling and complete rubbing of the gripping unit. That is why it is necessary to move the knot along the rope by pushing it in one direction or another, and in no case by squeezing it in the palm of your hand.
- Make sure that the second turn of the knot goes in the opposite direction to the first knot.
- As a rule, the prusik is tied from ropes of different or the same diameter than the diameter of the supporting rope (railing).
- One turn on the grasping knot is knitted when making an ascent or descent, as well as for lifting a large load. Remember, one turn on a climbing knot, and in other applications of the prusik, always means “etching”, and in the case where the main rope has too rigid a structure, icing or high tension, a small number of turns can lead to a breakdown, fall or uncontrollable the descent of man. Therefore, more than two turns are made on the node.
- During Prusik ascent, the gripping knot rises along the rope as it is pulled up by the free ends, this leads to the formation of overlaps, which contribute to the weakening of the gripping knot after loading. In addition, the knot is pushed along the rope, rather than pulled or grasped by the palm of your hand.
- When using the cord for a long period, make sure that it is intact and not frayed. Inspect equipment carefully before and after use.
- Ideally, the grasping knot should be as long as your outstretched arm. In the event of a breakdown, frostbite or injury, it is extremely difficult or almost impossible to reach a node located at a higher altitude!
| Category | Nooses |
| Related nodes | Prusik, Austrian grasping knot |
| Detachability | Easy to untie |
| Application | Grasping knot |
Variations of the Bachmann knot
The Bachmann knot works well with loops made from flat slings (which cannot be said about the Prusik).
This knitting method is widely used in the USA (it is used much less frequently on the European continent).
A knot made from such slings without the use of a carabiner is also used on steel cables.
In order for the knot to hold well on ropes with a fairly thin diameter, it is necessary to make several additional turns of the cord around the base. Or tie the cord after fastening it with a half-bayonet, under the lower part of the carabiner.
In these cases, it is possible to use hard (thick) cords, which do not work well in a regular Prusik when lifting.
To reduce friction under load and more securely hold, facilitate movement after removing the load, Bachman came up with the idea of using smooth metal rings (1660 g) in the assembly.
The rings were selected with a diameter (internal) of about 30 mm, with a cross-section of about 5 mm. Their use made it possible to use the knot even on steel cables (6 mm thick). If necessary, the ring can easily be replaced with a carabiner.
The version with a half-bayonet (under the ring) created reliable locking of the unit (pull down) and was easily towed along the base (pull up). Used for self-belaying on steep climbing routes, for the average participant in a team of three.
At the same time (60s), Bachman simplifies his knot with a ring, replacing it with small loops made with knots:
|
|
By using a single cord, the holding force of the knot is increased.
In 2003, the Bachman gripper appeared using “slings” (sewn loops of slings).
Knitting pattern:
- A loop is knitted as close as possible to the sewn part of the “sling”.
- Then it is wrapped around the base (the thinner the base, the more turns there are).
- The end of the “sling” is wound through the loop.