How to make a clasp on a bracelet: original and simple ideas, step-by-step description
- December 2, 2018
- Needlework
- Svetlana Funtova
Many girls, in order to diversify their look with original jewelry, make them themselves. You can make a product unique not only by an unusual design or by using rare materials. In this article we will look at how to make a clasp on a bracelet so that it complements it in an interesting way.
Rules for choosing a clasp for a bracelet, types of locks
When choosing this element for your product, you need to take into account some nuances and follow a number of rules. The most important of them is ease of use and the ability to put on or remove the bracelet yourself. In addition, the lock must be securely and firmly fixed so that the decoration does not have to be lost.
Another important point is the overall combination with the product and attractive appearance. We’ll look at how to make a clasp for a bracelet with your own hands so that it meets all the requirements later in the article.
The following types of locks are most often used for hand bracelets:
- magnetic;
- carbines;
- clamps;
- hooks;
- latches;
- toggles;
- chains;
- screw;
- ties.
Magnetic rectangle locks
Most women have seen this type of lock, as it is often used to secure bracelets, wallets, clutches and other haberdashery items. You can purchase such a retainer at any store of the relevant goods.
Let's look at how to make a clasp on a bracelet from magnets:
- Classic bracelet regaliz. Beads, rings, charms and other decorations are strung on a leather strap. Then a very thin layer of glue is coated on the inside of the lock and glued to the cord. It is important to maintain a balance here, because if there is too much glue, it will squeeze out and the product will look untidy.
- Bracelet with braided cords. Regaliz fittings can be combined not only with cords, so you can safely choose other, most suitable materials. The lock is coated with a thin layer of glue and one or more braided cords are inserted into it, depending on their thickness or diameter. Then, if desired, decorative parts are threaded through or dispensed with and the lock is glued in a similar way on the opposite side.
Do you want to finish your decoration beautifully? Accessories will help!
Experienced craftsmen know that in jewelry, not only the design is important, but also the fittings. The latter gives the jewelry an aesthetically finished look and makes them stronger. The final type of work largely depends on the fittings. That’s why it’s better to select end switches for a product already at the idea development stage.
https://vrukodelii.com/braslety-kumikhimo-iz-12-nitey-spiralnyy-uzor
What types of tips are there for jewelry?
Jewelry “tips” are accessories that help to aesthetically correctly and firmly complete the work on a piece of jewelry, hide knots, and protect them from abrasion or tearing; and also attach a clasp (often using connecting rings).
World of beads. How to tie a slip knot on a bracelet
Slip knots are used as an easy way to make the size of the jewelry adjustable. They are usually used in bracelets and beads made from different types of cords, such as leather or fiber.
Adjustable jewelry works best when using hemp, waxed cotton, or Chinese braided cord as the base.
It is best to use laces with a diameter greater than 1 mm, since on thinner cords the knots are too small, and this impairs their sliding, and it is also inconvenient to handle them.
There are a number of different types of knots used in making jewelry. Several square knots from the macramé technique are often used instead of a lock for bracelets, but such woven elements stretch, weaken or become untied over time.
Therefore, we suggest using a more reliable round knot, the technique of which you will learn in this lesson. It works great if you pull the ends of the bracelet through its spool as shown in the photo.
It differs from the version with an adjustable square knot, made using the macrame technique.
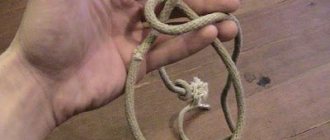
How to tie a slip knot on a bracelet
To practice tying this element, you will need two pieces of rope. The base section around which the knot will be tied (shown in black in the picture), and the section from which the knot will be tied (shown in brown in the picture).
To tie a knot, you need to take at least 10 cm of 1 mm thick cord or about 15 cm of 2 mm thick cord. This quantity is approximate, you may use a little less, but this length will definitely be enough. Too much length can make tying a knot difficult because it will be more difficult to hold during the braiding process.
Step-by-step instruction
1. Before making an adjustable slip knot as a clasp on your bracelet, place the knot piece on top of the base piece. Having placed the knot 3-5 centimeters from the end of the segment, make a loop.
Hold the loop with your index finger and thumb, pressing it simultaneously against the base piece. For the next steps you will need to use the one facing down in the picture.
2. Wrap three loose loops. Wrap the knot section around the base and tail knots at least three times. Try to ensure that the loops come out equal and straight, without overlapping each other.
3. Insert the end of the bracelet into the loops. While holding them in place (this may be quite difficult to do), pull the end of the cord through all the loops.
This step will be much easier to complete with a stiffer cord, similar to the 2mm leather cord pictured. Using flexible cord makes it difficult to pass through the center loops. In this case, just be patient.
Bauble of friendship
Baubles are very beautiful colored bracelets that will always emphasize the brightness of the image. These decorations symbolize peace and friendship throughout the world. And if friends gave each other such jewelry and they lasted a long time, then the friendship was considered strong. And if the person who had such a bauble on his hand took it off, it meant that the friendship was over. Weaving jewelry was passed down from generation to generation, until in the middle of the last century, representatives of the hippie subculture began wearing similar accessories.
But now such beautiful and bright bracelets are worn by charismatic, bright personalities who always strive to express themselves.
To make such a bright bracelet, you need to take several threads of floss of different colors. We put all the threads and fasten as follows.
To do this, take a clamp and secure the threads with it, as indicated in the photo. Each thread should be on what the pattern will be. To weave a bauble, you can use braiding, and in addition, use the basic patterns for knitting such a product. If you study the knots well, it will not be difficult to weave a bauble and read the knitting patterns. Further on the diagram will indicate how to tie such knots.
So, let's start weaving a bauble using the oblique weaving method. To do this, you need to knit 12 threads with 6 different colors. We need to arrange the threads symmetrically, taking into account the color, in a mirror manner. The length should be from 80 cm to a meter.
To choose the correct length of the threads, you need to multiply the length of the bauble by 4. We fasten the threads as suggested above, and then make a knot at a distance of 8-9 cm from the edge. We need to start weaving the bauble from the left thread. So take thread number 1, weave with thread number 2, you should get a four. We thread the tip of the first thread into the hole formed, we should get a knot. Next, the knot is tightened, and then the procedure is repeated with the same threads.
Related article: DIY application of autumn leaves for 1st grade children with photos
And when the first and second threads are woven together twice, you need to make the same knots with threads 12 and 11, the four should turn out to be a mirror image of the first.
We do this with each thread, as a result, those threads that were inside should be outside. Now we make two knots on the first threads, which are located on the edge, we have completed the first stage of weaving our bracelet.
Then we perform the same manipulations until we get the desired length of our bracelet. It is worth paying attention to the order of the threads in the order of weaving. And after several stages have passed, the threads will fall correctly. Using the first diagram, the pattern should look like a herringbone. After the weaving is completed, it is necessary to make knots on both sides, and then tie braids for beauty.
DIY clasp for a bracelet made of cord and beads
When working with beads or other materials for jewelry, every detail and little detail is thought through before starting creation. The way the product is fastened really stands out. Properly designed locking is a great success. This article will tell you how to make a clasp for a bracelet with your own hands.
You need to start by choosing a fastener.
Clasp and fastening
Handicraft stores have a huge selection of various accessories for fasteners, but even if you choose the right one there, this does not mean that you will be able to attach it correctly. Carelessness in such things is very noticeable. Therefore, before getting down to business, we will consider all kinds of fasteners and ways to secure them.
One option is to attach a screw lock. It is great for small bracelets and heavy beads, which can even consist of several threads. This fastener looks neat and almost invisible. Secure with thread and bead ring.
Standard carabiner
One of the most common clasps is the carabiner. This clasp is universal in all respects.
Firstly, it is easily suitable for any product, both small and large. Secondly, even if the product is very delicate in appearance, a neat carabiner will not spoil its appearance, the same goes for massive bright jewelry.
Decorative option
If you have not chosen a screw lock or a carbine lock for your product, pay attention to such a decorative fastener option as a toggle lock.
It has its advantages in the form of an original appearance. That is, by installing such a clasp, you will immediately receive both a bracelet element and a good fastening. It is also attached with a beaded ring or a ring made of metal and thin wire. The width of the decoration determines how many of these fasteners can be used at a time.
Article on the topic: Women's knitted hat for beginners with description and diagrams
Magnet and latches
The most convenient type of fastener is a magnet; it is compact and almost invisible. The main thing is that the magnetization must be good enough so that the bracelet or chain does not get lost in any case.
Well, we got to the usual latches. They look very organic on jewelry with vertical beads, and also if the product is large in width. Such latches are attached using fishing line and prepared holes.
Cord to help
You can make your own clasp. Especially if the bracelet is also woven from it. The two ends of the cord, ours is black, are folded together and connected with a knot. After that, another 14 knots are made from the second piece of cord for the fastener.
Now beads are put on the ends of the dark cord and secured with a knot. The excess is cut off, we get the result as in the photo.
Regular paracord
Paracord is an ordinary nylon cord; it became very popular when they began to weave things from it that were distinguished by their beauty and particular practicality. The cord itself is quite thin, but can withstand a load of up to two hundred kg.
This possibility is achieved by a special cable structure. It is important not to confuse paracord with regular polyester cords. Pronounced differences are the inherent properties of paracord such as softness, combustion with a clear release of smoke and odor.
Paracord is used to make high-quality bracelets, including military bracelets.
To weave this very ordinary bracelet you will need:
- Two meters of such rope;
- Fastening (a good option for such a bracelet is a plastic clasp) and scissors.
- The simplest weaving is a snake; it doesn’t even require a special pattern.
- We take a clasp and attach a rope to it.
- The second part of the fastener is also tried on immediately so that the length does not pinch or squeeze your hand.
Related article: DIY luggage tag
Next, the weaving itself begins. The tensioned main thread is sequentially wrapped around the working thread.
- When everything is woven to the very end, the remains are pulled into the fastener fastener, then the excess is cut off and melted.
Bright beads
Bracelets with original clasps can also be woven from beads. It is very popular among both beginning needlewomen and experienced craftswomen. It is better to start weaving bead bracelets with the simplest patterns. Next, select a variety of fasteners and beads and experiment with them.
It’s easy to find patterns on the Internet or, having mastered a little weaving skill, come up with them yourself.
- Of all the clasp options presented above for a beaded bracelet, absolutely any option is suitable.
- Sometimes you can play with the clasp in such an interesting way, as on the bracelet in the photo:
- You can also make the clasp without bothering at all and simply tying the ends of the bracelet into a knot and untying it if necessary.
Small decoration
To make a bracelet from threads with your own hands, for knitting we will need:
- floss threads or lacing;
- large beads;
- scissors;
- button
Now we take the thread and measure out the required amount of thread so that we get a piece. Folded in half, it will have the following dimensions: the first side is 66 cm, and the second is 48 cm. Afterwards, fold it in half, as shown in the photo below. This should result in three equal threads and one more small one.
We need to retreat 1.5 cm from the resulting top and make a knot, now we can cut off a short thread. Next we begin to weave our bracelet. We weave as indicated in the picture below: a braid, and when it is 2.5 cm, we string one bead into the left thread. And we continue to weave further, again weaving a bead, but into the right thread, alternating the weaving of beads - left, empty, right. The picture shows what should happen.
You need to weave so that the bracelet matches the size of your wrist. When as much as planned has been done on the wrist, at the end we again weave 2.5 cm and form a knot.
We must string a button onto one of the ends of our product. We thread two threads into each hole and make a knot again. And we need to cut off those threads that remain, and now our beautiful and simple bracelet made of threads, beads and beads is ready.
Related article: Beaded bonsai: step-by-step instructions with step-by-step photos and videos
Such bracelets are very simple to make and can be woven from threads of various colors, and you can also take beads that are of a different color, small or large. It all depends on your imagination and the desired result.