Step-by-step instructions for making a knife
Create and transfer a template
First of all, we make a template. You need to find a ready-made template on the Internet and print it, or draw it yourself. After that, we cut it out, apply it to the workpiece and outline it with a marker.
Rough work with the profile
We take a grinder and carefully cut out the rough shape of the profile. It must be remembered that steel will heat up quickly, which is not good for this material. When working with a grinder, you should constantly cool the workpiece with water.
Refinement of the knife profile
The result of rough cutting will be uncut areas on the profile in the form of various curves and other details. These elements can be cut using a sharpener. Here we again use a grinder, grinding wheels, and files with different shapes. When working with hand tools, you are less likely to overheat the metal.
Next we form bevels on the knife.
Drilling holes for pins
If your plans involve hardening a knife, you should always complete the main metal processing work before hardening. Otherwise, working with metal will be very difficult. For example, before hardening, it is worth making holes for the pins - at least two.
Hardening
This process takes place in two stages. First, the steel needs to be made extremely strong, and then softened somewhat so that it becomes less brittle. This manipulation is called “vacation”. To harden, we use a stove or a good fire. In this case, the temperature should be high, the workpiece is heated to a bright red glow, then cooled in oil - motor or vegetable. To determine the appropriate temperature, it is enough to bring a magnet to the workpiece - if it is not attracted, then the steel can be cooled.
After hardening, the alloy is highly brittle - if the workpiece is dropped, it will break into pieces. Therefore, we temper it, and as a result the blade becomes elastic. This operation can be carried out in a household oven. It needs to be heated to a temperature of 200°C and the knife should be placed for 1.5–2 hours. When the time is up, turn off the oven and let it cool along with the knife without opening it.
Wooden scabbard
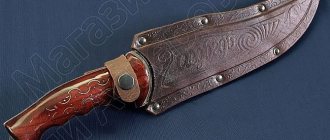
When wondering how to make a knife sheath, many opt for the wooden option. Wooden scabbards are reliable, practical and very beautiful. The wooden knife sheath is decorated with paintings. It is used for storing blades at home.
Pros and cons of the material
To make this type of protection, hardwood is used. It can be:
- oak;
- beech;
- nut.
Working with such breeds is very difficult. However, the resulting device will be reliable. In addition, it is possible to decorate it with decor, paints, wood painting (burning) and so on. If you plan to wear the sheath on a belt, you need to additionally create a loop for fastening made of leather material.
Required materials and tools
Wooden products do not have liners. It will be impossible to remove them and clean them. Therefore, to maintain safety, the inside of the wood is treated with wax or other waterproof compound. To make a sheath you will need the following materials and tools:
- wood for work (hardwoods are recommended);
- pencil;
- ruler;
- exemplary blade;
- chisel;
- sandpaper;
- wood glue;
- wax for impregnation.
Sandpaper for cleaning should be of medium abrasiveness.
Manufacturing stages
How to make a knife sheath with your own hands step by step:
- Take two pieces of wood. First we work with one of them. We apply the knife to it to the depth at which the blade is planned to enter the sheath.
- We outline the outline. Then we increase the perimeter by 2 mm for ease of use of the object.
- Using a chisel, we make indentations corresponding to the size of the blade.
- We repeat the same steps in mirror order with another piece of wood.
- Leaving about 5 mm for the thickness of the cover itself, we cut the rest of the wood along the contour.
- The core is sanded with sandpaper and treated with wax.
- The two halves are glued together using wood glue.
Making a sketch
Cutting out the core for the blade
Connecting the elements
Making a design sketch
Burn it out with a soldering iron
Design option
Post-processing
The prepared products must be carefully treated with sandpaper to avoid splinters when using the cover. Before you make a wooden knife sheath, you should think about impregnating it. It is advisable to treat them externally with wax.
We process the coating with sandpaper to remove splinters
Securing the pads
At this stage we use epoxy glue and a clamp or vice. We prepare two pins. For pins you can use brass, copper, and other alloys. If you don’t find anything, simple nails will do. So, you need to dilute the resin with the hardener and glue the halves together. After this, clamp the handle well with a clamp and leave until completely dry.
Smooth or textured handle
If the task is to make an absolutely smooth surface of the handle, then at the final stage it should be tightly wrapped with durable polyethylene film or the irregularities should be sanded well and then polished. If, on the contrary, the final version should be embossed or rough, then grains of river sand or other abrasive must be applied to the surface impregnated with epoxy resin and the product must be left until completely dry. When the resin has completely hardened, any excess abrasive should be removed from the surface.
Read also: How to use a compressor for painting
If the knife handle plate is much smaller in size than the intended handle, then it can be placed in a pre-prepared metal tube or hollow handle. The existing cavity can later be used to store various necessary small items, thus increasing the functionality of the product. For example, you can put threads and needles or matches there, but provided that the cavity is completely protected from moisture. It is impossible to know what situation you will find yourself in in the future.
Handle processing
Completion
After this, the wooden handle needs to be impregnated so that it does not absorb moisture and our knife does not deteriorate. For impregnation we take linseed oil - ideal if it is boiled oil, natural drying oil. After we have soaked the handle, we let the oil dry and then polish the handle until the surface has a shine. When leaving a knife for long-term storage, it is worth lubricating the blade with oil.
Read also: Soldering parts into a printed circuit board
And for comfortable and safe carrying of your homemade hunting knife, it is recommended to make a sheath that can be attached to a belt or in another way.
Hunting knives are not just weapons for finishing off animals. A good knife will easily cut up prey, remove skins, help when setting up a camp, and at the same time will hold a razor edge. There are special cutting knives, skinning and universal ones. What qualities are inherent in the best hunting knives? To do this, you need to consider the history of the appearance of knives of this type.
Making sheaths for different types of knives with your own hands
Making sheaths for different types of weapons with your own hands has identical algorithms, only for some types of knives there are features, and they need to be taken into account at the beginning of work.
How to make a holster
A holster implies the presence of fasteners on the handle of a knife, and this is not a separately made loop, but a T-shaped piece of leather.
Therefore, some changes concern the beginning of the manufacturing process of such sheaths:
- When cutting one pattern, you will need to measure the entire length of the knife and increase it by 5 cm.
- This pattern should be made on a wider piece of material, because you need to make two “branches” of leather to the sides at ½ the length of the handle. They will be narrow strips and long enough to connect at the handle.
- After completing the main work, you need to attach it to a T-shaped fragment - it’s convenient when it is fastened with a button.
The result is a sheath that opens like a holster and with just a flick of your fingers the knife is accessible.
How to make an American type sheath for Uzbek knives, swords and tactical
Regardless of what kind of weapon will be “hidden” in the sheath, they can be made according to the same instructions; you just need to take into account some nuances:
- tactically, the scabbard is made like a standard leather one, but for fastening it uses not a loop, but a wide ribbon, which allows you to wear it on the hip, shoulder and forearm;
- sheaths for Uzbek knives are distinguished by beautiful embossing - this is a mandatory “program”, and the decor should be rich, with rivets and fringe;
- American knives are carried in sheaths with pads, which can be made of thin and light metal - for example, aluminum.
As for the sword, the scabbard for it is made according to individual patterns and sizes, the base is wood, and the top can be covered with thin leather. The scabbard for a sword hides only its blade; the handle (hilt) is not fixed anywhere. The sword is worn on the belt, so the fastening is only on the scabbard - leather loops at both ends (on the end side), through which the cord is threaded, and it is already attached to the belt.
The appearance of the first hunting knives
The first hunting knives appeared in the Stone Age. Unlike daggers, which were made from horns and were not suitable for cutting prey, the first hunting knives were made from flint and had a sharp cutting edge. Over the course of many centuries, hunting tools developed along with military weapons. Their main difference has always been versatility. Knives were used for cutting and skinning prey and for cooking. If necessary, the knife became a formidable weapon in skillful hands.
Over time, hunting knives began to differ from household knives. They began to be beautifully decorated, although even then the dimensions of a hunting knife far exceeded the dimensions of household ones. Richly decorated hunting weapons were given to leaders and rulers as a sign of respect and reverence.
How to make a knife from wood
A wooden knife is not exotic, but a completely practical tool in a serious kitchen. It delicately cuts soft pastries, filled pies, and cheeses. They find it convenient to make sandwiches. This knife will not damage the non-stick coating of the pans.
Wooden knives for the kitchen PHOTO: rukikryki.ru
Materials and tools
The knife is made from a dry board of hard wood, such as linden or beech. It is desirable that there are no knots and the piece of board is straight-layered. You will also need mineral oil.
It is good if a belt sander, jigsaw or laser programmable machine is available.
Manufacturing instructions
The process is also gradual. First, the shape of the future knife is drawn, then the drawing is transferred to the board using the template. The workpiece is cut out from the design either manually or on a programmable laser machine. The future blade is formed on the belt grinding device
The work requires extreme caution and attention. The final operation consists of hand sanding with sandpaper.
A clean workpiece should be soaked in mineral oil. You need to let it soak into the wood well.
Fixed Blade Hunting Knives
The best hunting knives are fixed blade knives. The choice of such a design is not accidental; a hunter’s knife must be ready to work in any circumstances. Folding knives do not have this function. In addition to the fact that a folding knife needs to be opened, upon impact it can easily collapse on your fingers. In addition, due to the small size of the blade, such knives are not suitable for protection against animals. Now all-metal hunting knives have appeared, with linings on the handles. This design is very reliable and it is almost impossible to break it. However, hunters prefer classic models with mounted or through-mounted blades. A good hunter will choose a more reliable through-the-blade mount.
Folding hunting knife
Folding models of hunting knives were widespread in the USSR. Almost every hunter had a model equipped with a cartridge extractor. This product was completely unsuitable for cutting, since the steel on the blade was of terrible quality. Gradually, these knives migrated to the sons of hunters, and the fathers returned to using traditional fixed knives.
Now there is an excellent folding hunting knife - Wenger, represented by the New Ranger Hunter model. This model is equipped with an opener, corkscrew, saw and awl. The blade of the Wenger hunting knife is made of high-quality stainless steel. This knife is useful for cooking and doing small jobs in the camp. It just needs a reliable classic hunting knife with a fixed blade to be paired with it.
Hunting knife blade shapes
The blades of hunting knives have different shapes, but the most common are:
- Classic type blades. This was once the most common type of blade. For centuries, all knives, from the north to the east, had this shape (in the east, however, it was quickly replaced by a curved form); Upswept point blades (upturned blade). Such blades are found on skinning hunting knives; they cut well, but are not at all suitable for stabbing; Spear point type blade. Perfect for stabbing, but cutting is inconvenient; The blade is drop-point. One of the most convenient and versatile blade shapes; Clip point. This form occupies an intermediate position between the third and second options; The “Pike” form, beloved by most hunters. She's "Bowie". Despite its menacing appearance, such a knife is only suitable for finishing off large game and intimidating hooligans.
For hunting, the best knife will have a classic blade or drop point. It is capable of completing most hunting tasks.
National hunting knives
Each nation had its own national hunting knives. Some models are still popular and are used by hunters all over the world.
Read also: Feather drills for wood sizes
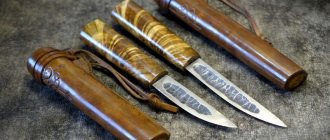
- Finnish puukko knives. This is a small knife suitable for cutting and household work. It is distinguished by the absence of a guard and a barrel-shaped birch handle. Not recommended for beginners due to the traumatic handle; Large Finnish leuku knives. This knife is used as a cleaver. They can be used to chop brushwood and poles for a hut. If necessary, it turns into a formidable weapon; The Yakut knife is the most unusual knife, dating back to the Stone Age. The shape is similar to half of a large bone. Probably made from bone in the Stone Age; Scandinavian knives. They differ from Finnish knives in the shape of the handle.
There are many more varieties of national knives, but they are not widely distributed.
Steel for hunting knives
There are different types of steel used for hunting knives. Starting from brand 45x13, to expensive powder and damask steel. There are two positions when choosing steel for a knife blade. It should hold an edge and be easy to edit.
- Steel 45x13 is not recommended for a hunting knife, it is too soft, although it does not rust; 65x13 is often used for inexpensive blades. Usually enough for one hunting trip, after which it requires sharpening; 95x18 is used on the blades of mid-priced knives. With good heat treatment, such a blade will cut two or three cuts without straightening; Tool steels allow you to achieve excellent cutting properties. Unfortunately, they are susceptible to corrosion and require maintenance; Hunting knives made of Damascus steel show excellent results; Damascus knives cut even better than Damascus knives. Only in both options the properties depend on the composition of the steel package used in welding damask steel and forging Damascus; Powder steels (the modern equivalent of damask steel) have better characteristics. Unfortunately they are very expensive.
DIY hunting knife
If you are interested in how to make a hunting knife with your own hands, first you need to decide on the shape and download the knife drawing you like. The drawing must be carefully studied and the blade cut from the blank. You can try to forge it, but you are unlikely to like your first forging experience. Having cut out the blade, you need to sharpen the slopes. A drawing will help you create the desired geometry of the slopes.
You can purchase a ready-made blade and simply “dress” it. A hole is drilled in the handle into which the blade shank is inserted. Don't forget the bolster. Without it, the blade will quickly become loose in the handle. The handle is given a shape that is comfortable for your hand, after which it needs to be impregnated with Danish Oil. Once the oil has dried, the knife handle can be polished with carnauba or beeswax. Now you know how to make a hunting knife.
Homemade knife: features and advantages
There is a huge range of knives on the modern market. It would seem that such a huge variety only makes the task of choosing a weapon easier, but in fact this is not the case. Among the products offered on the market, it is not always possible to choose a hunting knife of optimal hardness and sharpness, and some characteristics of the weapon will not meet the individual requirements of the buyer.
If you have not been able to find a suitable model, there is only one way out - to forge a hunting knife with your own hands (Figure 1). Having a custom blade made by a qualified smith can be expensive, so many people prefer to do this kind of production themselves. For example, you can always make a simple knife from cable, but remember that in the process you will have to handle the metal correctly so that it acquires the necessary characteristics.
Sharpening hunting knives
Every hunter wants to see his hunting knife in full combat readiness. Unfortunately, many people do not know how to sharpen blades correctly. To sharpen a high-quality steel hunting knife, you may need about an hour of time and a set of water stones of different grain sizes. To properly sharpen a knife, you need to strictly maintain the sharpening angle. Sharpening should begin with coarse-grained sharpening stones, gradually moving to finer grains.
If you want the blade to be razor sharp enough to shave arm hair, you need to sand the edge. To do this, a piece of leather is attached to a wooden block, with the inside out. Rub the skin with GOI paste and grind the blade using this device.
If this sharpening process seems very difficult to you, you can purchase a knife sharpener. Just don't buy a cheap kitchen or electric sharpener. Only the Lansky or Apex Pro system can sharpen a knife to razor sharpness. If you don't mind the money, you can buy a Chinese clone several times cheaper. Using such a system is as easy as shelling pears. The knife is clamped into a special device that maintains the desired sharpening angle of the blade, and a set of whetstones of different grain sizes will help to perfectly sharpen your hunting knife.
Read also: How to adjust the drainage pump float
One of the best hunting knife models is the Roselli Hunting.
This is one of the most popular knife models from the Finnish company, founded by blacksmith Heimo Roselli in 1974. This knife is positioned as a knife for harsh conditions, capable of withstanding harsh use. This knife costs about 7,000 rubles and is perfect for hunting. You shouldn’t go after a bear with this knife, but it is quite capable of solving other problems.
If you want to buy an inexpensive Swedish classic knife, you can't find anything better than the classic series from Mora. These knives cost from 900 to 2000 rubles. For such a modest amount you will get high-quality carbon steel and a birch handle. The quality of the cut is simply incredible for the money. Shaves hair out of the box. The only drawback is its risk of injury.
There are a great variety of hunting knives. Beginning hunters usually buy the most threatening blade, which is absolutely unsuitable for cutting and skinning work. After several trips, this knife settles on a shelf at home, and its place is taken by a convenient and multifunctional hunting blade.
This instruction is about how to make a high-quality hunting knife with your own hands. The material we use is 1080 steel. This is a fairly strong steel that can be hardened and processed well. The knife is made with simple common tools; the main work is carried out using a grinder with a good supply of wheels.
Materials and tools that the author used: – 1080 steel blank (buy blanks for knives); – grinder with grinding and cutting wheels; – different sandpaper; – drill with drills (drills are inexpensive); – rods for pins; - epoxy adhesive; – wood for finishing handles; – paper, pencil, etc. (for making a template); – marker; - sharpener; – heat source for hardening; – pliers, hammer, etc.; – household oven; – clamps or vices; – files for metal and wood; – preferably a belt sander (wide selection).
The process of making a knife with your own hands:
Step one. We make and transfer the template
First of all, you need to make a template. We find a ready-made one on the Internet and print it out, or draw it ourselves. Next, you will need to cut it out, then attach it to the workpiece and outline it with a marker. By the way, if you cut out a template from cardboard, you can hold it in your hands to make sure that the future knife will be comfortable.
You will also have to form bevels on the knife. Some people do this with a grinder, but it is best to use a belt sander. All cutting characteristics of the knife will depend on the bevels. The thinner the blade, the better the knife cuts and the easier it is to sharpen. First, mark the bevels on the knife and be sure to mark the center line on the future blade. It will allow you to make bevels at one angle. To split the blade into two halves, you can use a drill of the same diameter as your workpiece.
The author also carves teeth on the blade. They can be formed with files or a grinder.
Step four. Drilling holes for the pins
If you plan to harden your knife, always complete all major metalworking work before hardening. Otherwise, it will be very difficult to work with metal, or you will not be able to complete some work at all. For example, it is extremely important to drill holes for the pins. At a minimum, there should be two of them, this is quite enough to securely fix the linings. They do more, but it’s more for beauty.
Types of products
The first stage of purchasing or making a knife is choosing its model, depending on the purpose of using the blade (Figure 2).
All bladed weapons are divided into types depending on the scope of application:
- Hunting:
such knives are most often made to order, because such a blade must successfully combine very serious characteristics. Since such blades are most often used for cutting game, the blade must be durable, extremely sharp and not dull for a long time. In addition, such products must be wear-resistant, because during the hunt you will not have the opportunity to replace the blade. - Tourist:
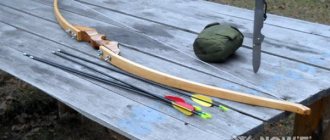
perhaps the most versatile option, since with the help of such a knife you can cut branches, plan wood chips and perform a number of other tasks. If you want to make such a folding camping knife with your own hands, keep in mind that its blade must be strong enough and wide, because such camping knives are often used as a replacement for an ax. - Survival knives:
a subspecies of tourist blades, which are separated into a separate group because of their versatility. As a rule, such models are equipped with additional devices that may be needed on a hike. But in practice, it is better to have all these devices separately, since when they are included in the knife itself, the width and performance characteristics of its blade deteriorate. - Kitchen knives:
such knives are also often made by hand, for example, from metal saws, since high-quality finished industrial products are usually very expensive.
Figure 2. Types of bladed weapons: 1 - hunting, 2 - tourist, 3 - survival knife, 4 - kitchen
In fact, you can make a knife with your own hands from almost any material - a bearing or a file, the main thing is to adhere to the correct heat treatment mode so that the finished blade is moderately hard, sharp and wear-resistant. Since many are interested in how to make a high-quality hunting knife with their own hands, we will look at all the nuances of this process in more detail.