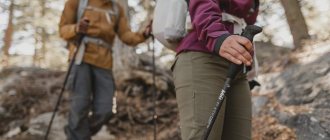
Types of trekking poles
Trekking poles, don’t be surprised, are often sold individually. There are, of course, paired sets. However, you must agree - it is very convenient! The sticks are quite fragile to break, and in case of serious damage, you can buy one. I think it's great.
Trekking poles improve your stability and can reduce the stress on your knees during hiking and hiking. Most are adjustable in length, and some include internal springs that absorb shock to reduce stress on your hands. (ANTI-SHOCK)
How to choose trekking poles?
Let us note right away that trekking poles are an optional element of equipment for hiking in Crimea and Turkey with the “Unknown World” Club. However, we are posting this article on our website so that people going hiking with us can choose high-quality trekking poles for hiking in Crimea or Turkey.
First, let's talk about the benefits of trekking poles. First of all, this useful device is needed to relieve stress on the knees and spine. It is clear that according to the Lomonosov-Lavoisier law, the mass of the tourist and the backpack does not disappear anywhere, and therefore, if you have weak hands, be prepared for soreness. However, it will pass quite quickly, but your knees and back will be very grateful to you for using trekking poles while hiking along the route.
According to studies conducted by independent experts, the use of trekking poles reduces the stress on the knees and spine by 25%. At the same time, a person receives two more points of support, which is important on ascents and descents. In addition, trekking poles can be used as a stand for an awning, and in case of an accident, for making a stretcher. Among the disadvantages of using trekking poles, one can note the already mentioned soreness, if the tourist’s hands are not strong enough. The second disadvantage is that when using poles for a long time, the tourist can no longer imagine how to walk without them.
How to choose trekking poles for a hike?
Let's start with the fact that trekking poles are also called telescopic. If you have ever seen a telescopic fishing rod or telescope in your life, then you understand what we are talking about. The term "telescopic" means sliding. When assembled, trekking poles take up little space and are easily attached to special mounts on a modern backpack. However, unlike a fishing rod or telescope, you also need to lean on a telescopic stick, and in such a way that it does not collapse.
To prevent this from happening, trekking poles use locks. They come in two types: with a lever and screw. The screw locks snap into place when the sticks are untwisted in different directions. Lever locks are designed on the principle of a button, a rod and a spring. You press a button and the stick is fixed at a certain length. Both types of locks are approximately equal in terms of reliability.
It is very important to choose trekking poles according to your height. Store salespeople and technical documentation will help you here. The instructions must indicate the maximum height of a tourist who can use these poles. In addition, the same instructions indicate the maximum weight that can be loaded on trekking poles. On travel forums, people write about the kind of crash tests that they performed on their telescopic poles. So, poles from Black Diamond, Masters and Leki stand up to testing well and are highly reliable.
You should also pay attention to the handles of the poles. They come in natural cork, rubber, or a combination of both. It is best to take trekking poles with natural cork handles, so that if your hands get sweaty, the poles will not slip on them. The tips of the sticks must be made of pobedite. Experts say that pobedit tips are more durable than others.
And the last thing I would like to dwell on: the anti-shock system. Its main function is to soften the impact on the joints, but when climbing a mountain it is more unnecessary than necessary. Therefore, if you buy trekking poles with “anti-shock”, then only with the ability to disable this function if necessary.
How long should trekking poles be?
Poles recommend bending your elbows at an angle of 90 degrees. This will be the ideal length of trekking poles. Many trekking poles have adjustable lengths, making customization and customization more accessible. However, they also come with a fixed length or a limited range of sizes. Here are some tips for you:
For trekking poles with adjustable length:
- If you are taller than 180 cm, choose trekking poles with a maximum length of at least 130 cm.
- If you're shorter than 180cm, you'll be able to shorten most adjustable trekking poles to make them work for you.
For fixed length trekking poles :
Use the table below
| Height | Suggested Pole Length |
| <155 cm | 100 cm |
| 155 – 170 cm | 110 cm |
| 170 - 180 cm | 120 cm |
| 180 cm + | 130 cm |
Adjusting the height of the poles
If you have trekking poles that adjust in length, it is important to know what height to set them to. Improperly adjusted trekking poles can cause harm to your arms, shoulders, back and neck. And they would rather hinder than help.
Adjust the length so that when you hold the trekking pole with the tip on the ground near your foot, your arm bends 90 degrees at the elbow. This will be the right length for most of your hikes.
If you have poles with three sections (knees), I recommend setting the top adjustment so that it is in the middle of the adjustment range, and then setting the bottom adjustment to a length that puts the arm at the correct angle. Then, if you need to make adjustments while hiking, you can only use the top adjustment to fine-tune the length. In addition, this option will make your trekking poles more resistant to breakage.
For long uphill climbs, you can shorten each pole by about 5-10 cm to get the correct and comfortable length. The steeper the slope, the more you shorten your trekking poles. Your trekking poles should help you move uphill without causing tension or fatigue in your shoulders. Remember - your shoulders should never feel like they're in an unnatural, elevated position or like they're being pushed into the straps of your backpack. If this is the case, you need to cut your sticks even further.
On a long descent , try extending each pole about 5-10 cm from the length you set it to on flat ground. This will keep your body upright for better balance.
If you are on a long slope (like a slope traverse), you can shorten one pole and lengthen the other as needed to improve comfort and stability.
How to Use Trekking Poles: General Instructions
Adjust your messages to the correct height
You should follow specific setup instructions for your trekking pole model, but most folding trekking poles these days come in three pieces.
The most stable way to adjust trekking poles is to allow the center section to reach all or as close to its height as possible. You can then use the bottom section to make small adjustments as needed.
The correct height for your posts should be around your elbows or just below. At this point you should be able to comfortably grasp the canes with a loose bend at the elbow.
Insert your hands into the straps and adjust
You want the straps to ride diagonally across your palm and under your thumb. Avoid wrapping straps around your wrist or avoiding them completely. Straps are a very useful tool that allow you to only hold the pole handle loosely.
In addition, they prevent the pole from falling when tired. Nobody likes to see their trekking poles bouncing down the side of the mountain they just climbed.
Use the right stick
To effectively grab sticks, you don't need to use a tight death grip. In fact, just run your hands around the message handle.
The straps around the palms should mostly support the racks, so you only need a light grip to maintain control.
Trekking instructions: flat terrain
- Place your posts at the correct height... When walking on flat or slightly undulating terrain, you can keep your posts at a neutral and comfortable height...
- Let your poles follow the natural movement of your body. When you walk, your arms automatically move along with your legs. Left foot forward, right hand forward. Let your poles keep up. When you place your left foot, the right post is slightly in front of you.
- Use poles to create momentum. Remember to keep the posts on you and then use them to move forward by pushing out the posts. Don't drag or crawl along the path, this will only tire you out faster.
Trekking instructions: uphill
- Shorten the poles. When you use your poles to walk uphill, you'll want to cut them a few inches. This will allow you to sit them slightly above you without extending your arms too much.
- Continue with a natural rhythm. As with the ground level instructions, you want to be aware of your body movement. Place the left pillar down with the right leg. Remember to use the pole to propel yourself up as you go up. Don't use posts to climb the mountain. You'll run out much faster.
- Tip: Don't plant the pole in front of your front leg. Your dominant foot is the foot in front. A good rule of thumb when walking uphill with trekking poles is to remember to place your front pole in front of your front foot. Try planting the pole even with your front foot or slightly behind. This makes it harder for you to stand up and should make the pushing motion more instinctive.
Trekking instructions: downhill
- Extend the poles. When using trekking poles to go downhill, you should lengthen the poles to reach elbow height. This will allow you to use the posts to lower the mountain without losing proper posture...
- Place messages firmly downwards. As you begin your descent, you want to be aware of your body's movement and use your trekking poles as support. Reach the mountain, plant the pole firmly in the ground and push it down while remaining upright. Don't try to get off the mountain.
- Advice for extremely steep or slippery slopes. If you are trying to walk on a slope that is very steep or slippery, you can use poles to enhance stability.
Plant your pole more firmly on the ground by pushing the end of the pole toward the ground. Then step on the same foot and walk sideways down the mountain.
The coin is kicked against the safe pole. This will support your weight and allow you to stabilize on the descent without slipping...
Features of trekking poles - types of poles
Adjustable: Many trekking poles are adjustable in length to increase stability on different terrains. They usually range from 60 to 130 cm in length. This is convenient if your hike involves rough terrain with ups and downs. Cons - any mechanism can break.
Non-adjustable: These trekking poles are not adjustable in length. These poles are lighter than adjustable poles because they have fewer parts. And light travelers love them for it. These poles are great for events where you know you need a certain height. The downside is that it may be inconvenient to transport.
Collapsible: Collapsible trekking poles act like tent poles rather than folding into themselves like adjustable poles. Folding trekking poles tend to be the most “collapsible” and are often very lightweight. In addition, they quickly turn into a working position. They are especially popular among ultra-runners and fast hikers. There are not many such models on our market, but they still appear.
Shock-absorbing supports . They have internal springs that absorb shock when descending. ANTI-SHOCK is most often written on the stick. On many poles this feature can be turned off when it is not needed, for example when you are walking uphill. Shock absorption is a good feature for any hiker, but is especially recommended if you have had problems with the joints of your hands, knees, or feet.
Standard supports: they do not have shock-absorbing properties and are therefore lighter and cheaper. However, they provide the same level of balance and support as shock-absorbing poles.
Ultralight: Ultralight poles have the advantage of being lighter. On a long hike this means less strain on your arms. Ultralight poles are also easier to pack. These include sticks, a pair of which does not exceed 450 grams.
Camera Mount: Some trekking poles include a built-in camera mount under the handle, allowing you to use it as a monopod.
Design
Trekking poles are divided into several main types based on the type of construction, which we will talk about below.
Telescopic
This design got its name for a reason; the principle of its operation is indeed very similar to a telescope. Such a stick consists of several segments of different diameters, which are nested inside each other. When folded, the narrower parts fit into the larger ones and are secured with a locking mechanism.
Thanks to such a simple design, this type of stick has become very widespread, because the size can be adjusted in a fairly large range - from 60 to 140 centimeters. But there are telescopic poles that do not have such versatility, for example, there are cheap models that fold at once - this cannot be said that this is very bad, but still sometimes such functionality may not be enough.
Also, the disadvantages include quite a lot of weight (one stick is about 300 grams) and not the smallest dimensions when folded (60-70 centimeters).
Folding
These are a less common type of trekking poles, but they are not inferior to the previous one. The segments of such sticks are not nested into each other, but are simply folded into several bends, secured with a regular cord in the middle of the structure.
Thanks to this simplified design, these poles can weigh about 300 grams in a pair, and when folded they have much smaller dimensions (from 35 centimeters)
The disadvantages include less reliability compared to telescopic poles, and many people complain that they are much less convenient and versatile.
Trekking pole locking mechanisms
Whether they are adjustable in length or not, all trekking poles have locking mechanisms to keep the set length from slipping during use. Most trekking poles use one of these four types of locking mechanisms:
External Lever Lock: A lever-based clamping mechanism that allows for quick and easy length adjustment, even while wearing gloves.
Push Button Locking: Poles with this locking mechanism snap and lock in one motion. Press the button to release the lock and fold the knee.
Rotary Lock: Uses expander and screw installation, which is strong and durable. However, from time to time it jams, you have to clean it and lubricate it with oil. To do this, simply remove your knee from the stick.
Combination Lock: Some poles use a combination of multiple locking mechanisms to achieve a balance of strength, light weight and ease of use. For example, a stick may have an external lever lock on the top knee and a pivot lock on the bottom.
Materials for trekking poles
The composition of the shaft is a key factor in determining the overall weight of the stick, as well as its strength.
Aluminum: Aluminum poles tend to be more durable and economical, weighing between 400 and 600 grams per pair. Actual weight (and price) may vary slightly depending on pole width - 12 to 16mm. Under high loads, aluminum may bend, but is unlikely to break. The main enemy of such a stick is lateral deformation. For example, when the nose of a stick gets stuck in the stones, and you continue to push it forward. Avoiding this will take a little time and experience.
Composite: Made entirely or partially from carbon. A lighter and more expensive option. Sticks weigh on average from 300 to 500 grams per pair. They dampen vibration well even without shock absorbers, but under high loads carbon fibers are more vulnerable to destruction than aluminum ones. If you are hiking in difficult to reach areas, this is something to keep in mind.
Review of trekking pole designs and recommendations for selection.
Selection criteria: reliable, lightweight, long enough when unfolded and short when folded, the length can be changed easily and quickly.
Number of sections.
Trekking poles come in two, three and four sections. The fewer sections, the cheaper, lighter and more reliable.
The two-section ones, when folded, are about 90 cm long, and this is not convenient for transportation, especially on an airplane: they will stick out above the backpack.
The three-section ones when folded have a length of 65 cm, and the four-section ones are about 50 cm. The length of 65cm is already quite comfortable, the height of the backpack is even a little more than usual. Therefore, the most optimal ones are three-section poles. The exception is four-section ones with a cable inside.
There, three sections are assembled without adjustment and only the upper section is smoothly adjustable. They are quite reliable and weigh even less than conventional three-section ones. You can take them too.
Length of poles.
For a height of 185cm, a length of 135cm is enough. For 165cm, 125cm is enough. But, you often have to use sticks as tent poles. And here the longer the length, the better. Therefore, I advise you to take the maximum 140-145cm. A weight gain of 50 grams is not significant.
Retainers.
There are collet-type (to clamp a section you need to rotate relative to another) and cam-type (clamped by turning a lever). The cam mechanism is optimal. It is both more reliable and fixes faster.
Tips.
There are carbide and regular metal tips. Take carbide ones. They cling to stones much better and do not slip. And they practically do not wear out.
Carbide tips:
Metal tips:
Lever.
The handle must first of all be smooth and wide at the top so that you can lean on it. Nordic walking poles and those with cane-type handles are not suitable for hiking:
The material of the handle doesn't matter much. Foamed polyurethane feels the most pleasant. Doesn't rub your hands. But it also wears out relatively quickly. If you go camping up to 20 days a year, then you can take foam. And the most optimal material is pressed crust. An extended handle is needed to hold the stick for a long time without a lanyard. But this is not worth doing. Therefore, I believe that the extended handle is not a necessary extra.
An example of a bad handle. The show off is made for the beauty of the design and rubs your hands. Apparently, the goal is to sell you gloves)
Here's a good handle.
Anti-shock system.
This is a mechanism with a spring that absorbs shock when touching a hard surface. Designed to make walking more comfortable. But in reality it worsens control over the stick, makes noise, breaks quickly, and increases weight and price. Don't use poles with this system!
Stick material.
There are aluminum and carbon. The latter are certainly easier. But less reliable. You need to be more careful with them. Aluminum can be of very different quality: the grade of material, wall thickness and diameter are of great importance. Here you need to find a compromise between reliability and weight. Try spreading the stick out to its full length and leaning on your entire weight. If it bends too much, take stronger poles. Typically, strong poles weigh 500-600 grams per pair, and lightweight ones 400-450 grams. As you can see, the difference is not big. Moreover, you can’t carry them in a backpack. Therefore, don't pay much attention to the lightness. The main thing is rigidity and reliability. After all, you actually trust sticks with your life!
For example, a photo of carbon poles that have already broken twice for me:
this stick was stepped on at a rest stop
and this one broke at the bottom from falling into a crack
As you can see, both breakdowns were repaired, and the poles are back in service. But the renovation was already done at home. And on a hike after a breakdown I had to walk with one stick. Now my wife walks with these sticks, and they don’t break anymore)
Types of trekking pole handles - how to choose
Almost all modern trekking poles have ergonomic, comfortable handles that provide a tilt angle of 15 degrees. This allows you to keep your wrists in a relaxed and comfortable position. Additionally, some hiking poles have handles that look similar to the handles of a walking stick (horizontal extension). This shape provides good support for everyday walking or very light hiking.
Handle materials
The material of the handles determines how well the trekking poles will fit in your hands, as well as their thermal insulating properties.
Wooden Cork: Resists moisture from sweaty hands, reduces vibration and best fits the shape of your hands. If you sweat a lot or plan to walk in hot weather, use cork handles.
Foam: Absorbs moisture from sweaty hands and is the softest to the touch. Does not have the property of rubbing hands.
Rubber/Plastic: Protects hands from cold, shock and vibration, making it best for cold weather hiking. However, it is more likely to chafe and does not wick moisture away from your palms at all, making it less suitable for warm weather hiking.
Additions to trekking poles
Wrist straps (lanyard): It's actually quite common to see hikers using lanyards on their poles incorrectly. To use them properly, slide your hand up through the bottom of the strap and then pull down and grab the handle of the stick. This technique supports your wrist and the base of your hand, allowing you to keep your hand relaxed. In addition, this provides additional shock absorption, which puts less strain on your hands.
You can adjust the length of the strap so that when you place your hand on the strap, it lines up with where you want it to rest on the handle. Properly adjusting the strap allows you to release the stick to take a photo, drink water, or adjust your backpack, and then easily grab the stick where you need it.
Note that many trekking poles have special right and left straps, and some have padded or padded straps to prevent chafing.
Rings: Hiking poles usually come with wide rings. They are convenient to use on a snowy path or in mud.
Pole
Tips : Carbide or steel tips are commonly used to provide traction on rock and ice. Protective rubber tips extend the life of the tips and protect your equipment during transport from sharp pole ends. Angled rubber running tips (usually sold separately) are designed for use on asphalt or other hard surfaces.
With
Fortunately, learning to walk with poles is not difficult. A few minutes will be enough for you to master the technique.
Alternating sticks and legs
Most tourists keep this rhythm of movement - right foot and left pole, left foot and right pole, etc.). If you don't get into that rhythm, just keep walking while lifting your poles off the ground. Start again as soon as you are ready. Soon it will become completely natural and you won't even have to think about it.
Double stop
Sometimes you may need to push both poles at the same time and then take two steps, reinstall both poles and continue. This can be useful on steep climbs or descents where you need the stability of both poles at the same time.
Walk naturally
When using trekking poles, it is best to walk naturally, no matter how it sounds. Maintain a natural arm swing, as if you had no sticks in your hands. The poles can be angled slightly behind you so that when you stick them in you can push off to help your forward movement
Overcoming obstacles with trekking poles
Trekking poles can be very useful when you encounter obstacles on the trail. More life hacks in our VK group
Crossing Streams and Rivers: Trekking poles provide much-needed stability when you need to ford a river. Make sure that each time you stick your stick in, it is securely attached to the bottom before moving forward. If the water is deep, lengthen the poles.
Puddles: You can maneuver around them using the poles for stability, or you can pole vault to the other side by getting a comfortable support with your poles
Large Rocks: For lifting and negotiating large rocks, poles can help you. To do this, stick both sticks into the ground and, as you climb onto the rock, support yourself on the sticks.
Logs: To step over a log, simply stick sticks into the ground and use them for added stability. If you're walking on a log to get across water, you can use poles to improve your balance (think of a tightrope walker using a large pole for balance).
When crossing any dangerous areas (ford, rocky slopes), loosen the lanyards, or remove your hands from them. If you fall, this will help avoid dislocations, sprains and fractures.
Using Trekking Poles to Set Up a Tent
Some lightweight tents require trekking poles to set up properly. They are used instead of the frame and arches. A very convenient thing for light vehicles.