Preview:
— formation of ideas about the main types and rules for the construction of temporary housing and shelters;
— training of people whose work requires skills in making temporary shelters;
— training students in life safety lessons, using the example of making a model of a gable hut.
— learn to determine the rules for choosing sites for the construction of temporary housing and shelter;
— get acquainted with the main types of summer and winter temporary shelters and shelters;
— learn to navigate the variety of forms of temporary housing and shelters;
- develop skills in building summer and winter temporary shelters and shelters;
- make a model of one of the temporary shelters in order to use it for conducting life safety lessons.
3. Basic conditions for building a temporary shelter:
A) Choosing a place for temporary housing.
B) The influence of weather conditions.
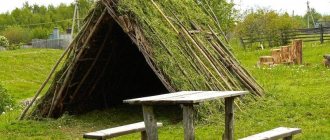
5. Making a model of a temporary dwelling using the example of a gable hut.
From the primitive era until now, of all the sciences, sometimes the most important is the ability to survive in difficult conditions. A person’s salvation from adverse influences, primarily from cold and getting wet, is their home. On a hike - a tent. But what if this item is not there? How to find shelter in a forest or open field? How to make a winter shelter? There are answers to these questions.
What types of temporary shelters are there?
Types of shelters are classified conditionally:
We find ourselves in an extreme situation, when normal existence in autonomous conditions requires housing, the construction of which is the most important problem for an unprepared person. What can be done?
In order to understand the essence, let's try to answer a few questions:
A) Choosing a place for temporary housing
What requirements must be observed when choosing a place for shelter?
The place should be dry and located near a stream or other water source so that there is always a supply of water nearby. It is important that there is fuel nearby (in winter the issue of firewood is very important). In summer, in an open place, so that the cool night breeze becomes a reliable protection against attacks by mosquitoes and midges.
When choosing the type of temporary shelter, use what is at hand. What kind of shelter to build must be decided depending on the specific situation and your skills.
What should a temporary shelter protect against?
From precipitation, scorching sun, strong wind, cold.
Therefore, it is better not to save time on its construction. The main thing is to immediately build a shelter for the night. More extensive construction can begin the next day.
What can be used to build a shelter?
Natural material, improvised means can serve as a raincoat, jacket, pieces of tarpaulin fabric.
How will weather conditions influence your choice?
B) Influence of weather conditions
Weather conditions are usually a determining factor in determining the location of your future shelter. For example, in cold climates in the lowlands it is usually a little colder at night, and it is also windy there. Being in a cold climate zone, you should try to build your shelter in the sun and use the maximum available amount of heat-insulating material. In desert conditions, a shelter should protect both from solar overheating during the day and from hypothermia at night.
How can wind help or hinder existence in the wild?
In a warm climate zone, you need to build a shelter in such a way as to take advantage of the refreshing breeze, but at the same time remember to protect the shelter from dust, dirt and debris that the wind may bring. In a cold climate zone, on the contrary, choose a place for shelter that is protected from the wind and the snow it brings.
Constructing shelters for survival in the forest - 4 simple types
It is difficult to imagine a situation where a person finds himself in a deep forest at night without any tools or means of communication. However, even for such a scenario you need to be prepared - you never know. Therefore, such a skill as constructing shelters for survival in the forest from scrap materials with bare hands is a rather useful skill. And now we will focus on the simplest shelter options that anyone can build.
Construction of shelters for survival in the forest
Pile of leaves
It's easy to keep warm while you're moving. Regular clothes are quite enough for this. But you can’t constantly move; you also need rest. And not in all situations you can just stretch out on some log to get some sleep. Exactly on a log, because on bare ground it is much easier to catch hypothermia and all the consequences associated with it.
However, in a standard deciduous forest in the middle zone, you can build a simple shelter - a pile of leaves. An important point is that only dry leaves or grass are suitable, since wet ones will take away precious heat without providing the necessary insulation. So when it rains, this forest survival shelter does not work. In other situations - please. Just make sure there is enough foliage - you need a decent pile, as deep as your outstretched arm. You need to climb into it with your head and imagine that this is such a “sleeping bag.”
A-frame shelter
A pile of leaves is good, but not universal. So we will have to start building shelters of more complex designs that even provide some protection from rain. This is an A-shaped shelter. All you need is a long and relatively straight support pole, as well as two smaller poles that can provide support. Natural “slingshots” are also suitable - it will be even easier.
You will also need some kind of material to secure the supports of the structure. There are laces or paracord - great. No - vines, young bark, roots of young trees. When you have made a strong knot, you can begin to work on “coating” the sidewalls. The first layer is thick branches, the second is spruce branches or branches with leaves, the third is a thin layer of fallen leaves. The shelter must be oriented so that the wind does not blow there and rain does not fall. However, there may be difficulties with the second point. In addition, it is worth training leaves and branches so as not to come into contact with the cold ground.
Wigwam
There are several options for constructing a Wigwam-type survival shelter. First, three poles are tied at the top to form a supporting frame. Everything else is installed on top of them. The second option is more complex, but also more effective. You need to find two trees that grow at a distance of a meter from each other. The trees are bent in an arc, large branches break off from the top, and these parts themselves are buried in the ground. At the point of intersection of the two arcs formed, it is better to tie them with a cord.
This results in a hemisphere that can be covered with thinner branches and leaves. But before that, it’s worth “weaving in” the side supporting branches. In short, it turns out to be something like a wicker dome, in which you can make a hole on either side so that the wind does not blow in. This method of constructing a shelter is suitable for situations where there are various vines and thin young trees nearby. Or something like reed. The method is not the simplest, but it provides sufficient protection from the weather.
Gazebo projects
Outdoor recreation is moving further into the realm of romance. But even today there are still quite a lot of enthusiasts who can not only spend the night on the river bank in a tent, but also go into the forest for several days with a minimum of equipment in order to remember that a person does not bear the title “king of nature” for his beautiful eyes. Let's figure out how to build a hut in the forest - with or without tools, what materials are best to choose for construction and how to choose a suitable structure depending on the nuances of the area.
The purpose of the hut in modern conditions
Making a hut in the forest is necessary to create more comfortable conditions during a hike or extreme adventure. It is the simplest option for shelter from cold, wind or precipitation, protection from small and large animals, and simply storing things. The advantage of a hut is its simplicity of design and unpretentiousness to “building materials” - usually improvised (or even “foot”) branches, earth and grass are enough for its construction.
A less extreme use for huts is children's play. This helps develop a child’s love of nature, adventurism, and diversify the list of entertainment.
Temporary housing: living conditions
Let's return again to the requirements for living conditions in temporary housing. They are different for everyone, but even though builders are used to dust and heat, if you hire a team to build a house, you need to provide them with a decent life. Moreover, a situation may arise when a temporary structure at the dacha becomes permanent. This option must be foreseen in advance, and therefore, as soon as you move into the building yourself or move the builders there, you need to think through normal, human life and all the conditions.
What do we need for a more or less comfortable life? It is not particularly important what type of temporary structure it will be, but we need a lot of it.
Of course, it is possible without much scope, but strictly according to the list of mandatory needs.
Water inside a trailer or cabin
It’s impossible to live without water, and therefore it is imperative to carry it inside the temporary structure. It’s good if you plan to convert such a place of stay into a permanent one, then you can completely bring water inside. If this is definitely a mobile home that will soon move, then you can simply hang a washbasin inside and put a cooler for drinking water. Moreover, a cooler is the best solution, since here you have both cold and hot water.
If the room is large, a shower can be organized inside, but more often it is located outside. We have already studied the outdoor shower and its construction, tanks for water and for its drainage on the website, and therefore you are welcome to the relevant topics.
Sewerage or regular drain
If you practically do not use water inside, then an ordinary sink inside temporary housing is enough for you. We washed, shaved, rinsed our hands... and simply took the water out of the bucket into the garden. If it is necessary to do it in a more civilized manner, then we bring the sewer system into the building and install it in accordance with all the rules for laying sewer systems, including draining wastewater into a septic tank or cesspool. If you need a middle option, we suggest putting the sewer into a drain, which we have already made from a vertically buried pipe with a drainage layer, or into a storm drain.
Electricity in temporary housing
We hope that there will be no problems with laying just one wire inside such a structure. Just choose the wires correctly, and then do not overload them with household electrical appliances. Also, be sure to entrust the wiring work to a professional electrician if you do not understand this matter.
You can get by with simpler devices that are not powered directly from the network.
True, then you will constantly need to purchase batteries. LED lamps, lamps, flashlights - all this is possible today, so choose what is more convenient and economical.
You can create conditions for a very long time, the main thing is not to get carried away and not turn temporary housing into permanent housing, with all the expensive amenities. It is clear that you still need to prepare food, close at night and feel safe, in addition, be comfortable and warm.
But we think that you will definitely figure out how to cook food, especially with electrical appliances or a small barbecue, and with locking the door and providing heat inside the cabin or trailer, and even more so. But remember one more important point! There should always be fresh air in such a room, and therefore windows or ventilation are simply necessary here. For those who are thinking about dismantling, this material will be useful.
It’s not difficult to build temporary housing at your dacha; the main thing is to immediately write down all your requirements and stick to the work plan. But it is quite possible that in addition to our ideas, you also have your own developments. If so, feel free to share them in the comments to the article.
Choosing a location
Flat, wooded landscapes are suitable for the construction of the structure. Ideally, you need to choose a place next to dense vegetation - bushes and trees with low-growing branches. This will reduce the amount of work required and the structure itself will be much more reliable.
There are places where it is better not to build a hut. These are sandy or rocky slopes, which often crumble, as well as lowlands that can flood groundwater. Avoid places where there is a lot of moss growing - usually there is high humidity.
It is ideal if there is running water and fuel for the fire nearby.
The place for the future hut must be cleared of debris, leaves, pebbles or branches. This is important for the comfort and safety of being inside.
Design options and site selection
Construction will require a lot of effort, since the structure consists of branches that must be searched throughout the forest. Weather and terrain are also taken into account.
To make a hut, you need to choose the type of construction:
A hut is built for protection from wind, scorching sun, hail, snow, wild animals, insects and to preserve heat.
A lean-to shelter is convenient because you can light a fire near the sun lounger and warm yourself, and predators will not dare to approach.
To build a shelter, choose flat clearings with dense bushes and trees, areas near rivers and reservoirs, and rocky slopes. Densely spaced plantings will protect the building from strong winds.
Having selected a good site for the night, the site is cleared of debris, branches, leaves and thorns. They prepare stones for the fire and go in search of poles.
In order not to get lost on a hike to extract resources, markers are placed on trees along a certain section of the path.
Types, types and purposes of huts
There are 3 most common ways to build a hut in the forest. They can be single-pitched, double-pitched and circular. The main differences are functional, so the required design is selected in each case separately. Much depends on weather conditions, precipitation, type of terrain, number of travelers and other nuances.
In addition, there are 3 types of huts:
An attached hut is usually single-sloped, while gable and circular huts can be either free-standing or recessed.
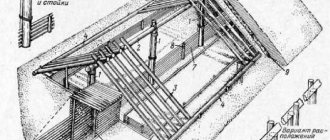
Single-pitch
This is the most primitive way to build a hut in the forest with your own hands.
This is a structure consisting of only one inclined wall, which is also a roof. Properly made, such a hut will protect from precipitation or heat, but in general, this option is suitable mainly for warm weather. If you don’t have a canopy with you, you won’t be able to hide even from multidirectional winds.
There is an algorithm for creating a design:
Several ways to build a children's hut
During a family vacation in the forest, there is not much difference between building a hut from branches for children or a regular one - except that in the first case you don’t have to be too zealous with the “roof”, since this is not a critical element for games.
But to play Indians, you don’t have to go to the forest - you can easily arrange an unforgettable evening by building a hut at home. Let's look at the simplest methods.
Method No. 1:
Method No. 2:
Method No. 3:
These three methods are very primitive and every child can build a hut. But there is a more interesting and original method with which you can surprise children.
To do this, you need to take not ordinary chairs, but ones with high backs. Form them into a square. Use a light blanket or sheet as a roof. Next, you need to pull it down so that it does not sag. A tall object (for example, a stick) is placed in the center. It is fixed to the floor.
The result is a wigwam. You can place pillows and blankets inside.